#!/usr/bin/env python
# coding: utf-8
#  # # Notebook: [ Week #8 - Deploying Streamlit App]
#
# 💡💡💡 We strongly suggest that you at least go through the following materials in our notes before proceeding with this hands-on session:
# - *"Password Protect the Streamlit App"*
# - *"Intro to Git and GitHub (Version Control)"*
# - *"Deploying Streamlit App on Streamlit Community Cloud*
#
# ---
#
# 💎 The **best way** to go through this hands-on:
# - Try not to watch the step-by-step videos unless you get stuck for more than 15-20 minutes.
#
# - At this point, you should be comfortable with fiddling with the code and resolvings errors on your own.
# ---
# ---
# # Task 1: Setting Up the Project Files
#
# 1. Make sure you have set up the following:
# - A [GitHub account](https://github.com/)
# - Install [GitHub Desktop](https://desktop.github.com/download/) on your local machine
# - A [Streamlit Account](https://streamlit.io/cloud)
#
#
# 2. Download a copy of the completed code of Topic 7 (Notebook Part 2) from the URL below onto your laptop.
# - URL: abc-notes.data.tech.gov.sg/resources/data/week-08.zip (Copy and paste into a browser)
# - Unzip the downloaded file
# - The folder that contains all the unzipped file will the `project folder` for this hands-on.
#
# 3. Set up a virtual environment (`venv`) in the `project folder` and install the required packages:
# - openai
# - streamlit
# - pandas
# - python-dotenv
# - tiktoken
#
# 4. Copy your `.env` file into the folder. It must at least contain the `OPENAI_API_KEY` variable.
#
# # Notebook: [ Week #8 - Deploying Streamlit App]
#
# 💡💡💡 We strongly suggest that you at least go through the following materials in our notes before proceeding with this hands-on session:
# - *"Password Protect the Streamlit App"*
# - *"Intro to Git and GitHub (Version Control)"*
# - *"Deploying Streamlit App on Streamlit Community Cloud*
#
# ---
#
# 💎 The **best way** to go through this hands-on:
# - Try not to watch the step-by-step videos unless you get stuck for more than 15-20 minutes.
#
# - At this point, you should be comfortable with fiddling with the code and resolvings errors on your own.
# ---
# ---
# # Task 1: Setting Up the Project Files
#
# 1. Make sure you have set up the following:
# - A [GitHub account](https://github.com/)
# - Install [GitHub Desktop](https://desktop.github.com/download/) on your local machine
# - A [Streamlit Account](https://streamlit.io/cloud)
#
#
# 2. Download a copy of the completed code of Topic 7 (Notebook Part 2) from the URL below onto your laptop.
# - URL: abc-notes.data.tech.gov.sg/resources/data/week-08.zip (Copy and paste into a browser)
# - Unzip the downloaded file
# - The folder that contains all the unzipped file will the `project folder` for this hands-on.
#
# 3. Set up a virtual environment (`venv`) in the `project folder` and install the required packages:
# - openai
# - streamlit
# - pandas
# - python-dotenv
# - tiktoken
#
# 4. Copy your `.env` file into the folder. It must at least contain the `OPENAI_API_KEY` variable.
#
#
# ---
# ---
#
# # Task 2: Password Protect the Streamlit App
#
# 1. Create the file that store the password
# - Create a new folder called `.streamlit` at the root of the project folder
# - Add a new file `secrets.toml` in the new folder
# - Add this line to the file `password = ""`
# - Note that this `toml` will only be used for local development and will be excluded from the GitHub repository.
# - The `passsword` will be set separately in the Streamlit Community Cloud settings.
#
# ---
#
#
# 2. Add a new Python script `utility.py` in the `helper_functions` folder. The script will contain the following code:
#
# ```Python
# import streamlit as st
# import random
# import hmac
#
# # """
# # This file contains the common components used in the Streamlit App.
# # This includes the sidebar, the title, the footer, and the password check.
# # """
#
#
# def check_password():
# """Returns `True` if the user had the correct password."""
# def password_entered():
# """Checks whether a password entered by the user is correct."""
# if hmac.compare_digest(st.session_state["password"], st.secrets["password"]):
# st.session_state["password_correct"] = True
# del st.session_state["password"] # Don't store the password.
# else:
# st.session_state["password_correct"] = False
# # Return True if the passward is validated.
# if st.session_state.get("password_correct", False):
# return True
# # Show input for password.
# st.text_input(
# "Password", type="password", on_change=password_entered, key="password"
# )
# if "password_correct" in st.session_state:
# st.error("😕 Password incorrect")
# return False
# ```
#
# ---
#
# 3. Add this code block into any of the scripts that render a Streamlit page that need to be password protected:
#
# ```Python
# import streamlit as st
# from helper_functions.utility import check_password
#
# # Check if the password is correct.
# if not check_password():
# st.stop()
# ```
#
# ---
#
# 4. Try the app locally to see if everything is working as expected.
# ---
# ---
#
# # Task 3: Commit and Push the Changes to GitHub
# 1. Initialize a new repository in the `week-08` folder.
#
# - Within VS Code, initalize a new repository in the `week-08` folder.
#
# - Alternatively, you can also initialize a new repository in the `week-08` folder using GitHub Desktop.
#
# ---
#
# 2. Create a `.gitignore` file in the root of the project folder.
#
# - Add the following lines to the file:
# ```
# # Byte-compiled / optimized / DLL files
# __pycache__/
# *.py[cod]
# *$py.class
#
# # Virtual environments
# venv/
# env/
# ENV/
# .venv/
# .env
#
# # Distribution / packaging
# build/
# dist/
# *.egg-info/
#
# # VS Code
# .vscode/
# # PyCharm
# .idea/
#
# # Streamlit
# .streamlit/secrets.toml
#
# ```
#
# ---
#
# 3. Commit the changes to the GitHub repository.
#
# - Within VS Code, stage the changes and commit the changes with a message.
#
# - Alternatively, you can also commit the changes using GitHub Desktop.
#
# ---
#
# 4. Push the changes to the GitHub repository.
#
# - You may need to set up the remote repository if you haven't done so.
#
# - Alternatively, you can also push the changes using GitHub Desktop.
# ---
# ---
#
#
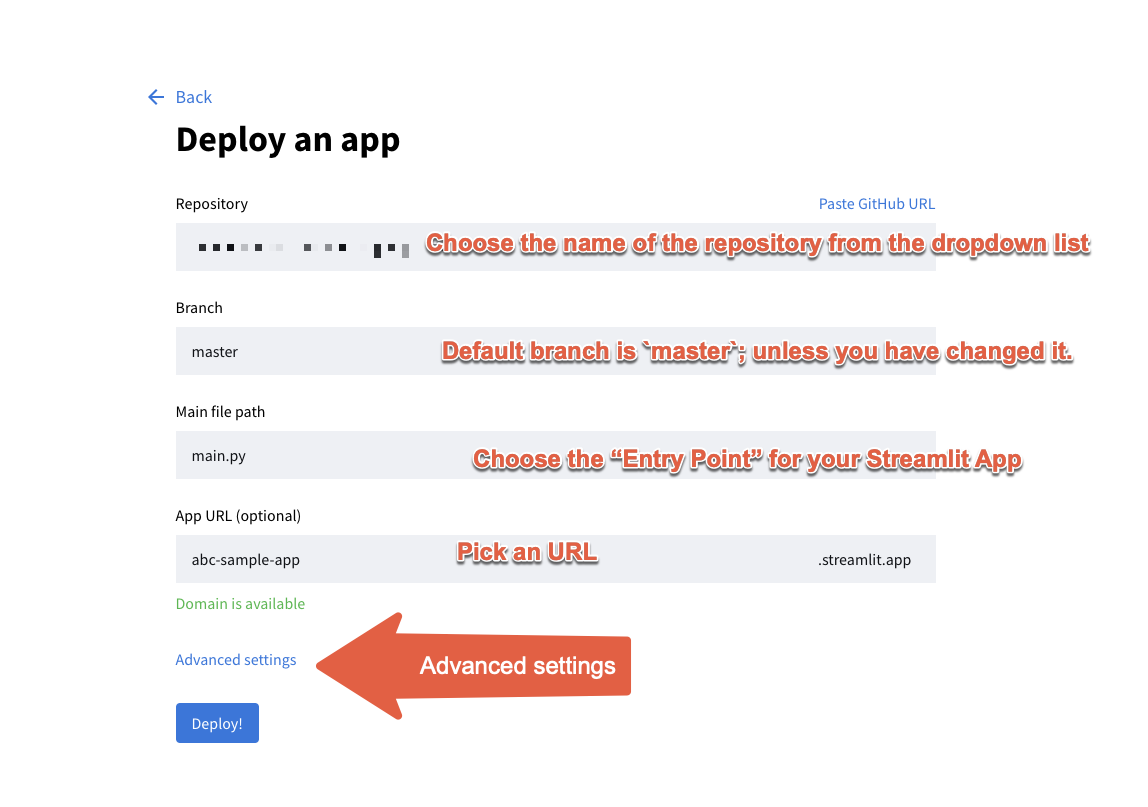
# # Task 4: Create a New Streamlit App on Streamlit Community Cloud
#
# - Head over to the [Streamlit Community Cloud](https://share.streamlit.io/) and log in.
# - You may need to allow Streamlit to access your GitHub account, if you haven't done so.
# - Click on the "New app" button.
# - Select the repository that you have pushed to GitHub.
# - Click on the `Advanced settings`
# - Set the `password` and `OPENAI_API_KEY` in the `Secrets` section.
# - Click on the `Deploy` button.
#
# 
#
# # Task 5: Specifying the Packages Needed and the Way API Keys are being Read
#
# - You will get an error message from the Streamlit app.
#
# - This is because we have not yet:
#
# - Specified the packages needed for the app to run.
#
# - Change the way the API keys are being read in our Script
#
#
# ---
#
# ### Step 1: Add a `requirements.txt` file in the root of the project folder.
# - run `pip freeze > requirements.txt` in the terminal to generate the file.
#
#
# ---
#
# ### Step 2: Modify the way the API keys are being read in the script in `llm.py` file.
#
# ```Python
# Original Code:
# import os
# from dotenv import load_dotenv
# from openai import OpenAI
# import tiktoken
#
# load_dotenv('.env')
#
#
# # Pass the API Key to the OpenAI Client
# client = OpenAI(api_key=os.getenv('OPENAI_API_KEY'))
#
# # Some other code here are omitted for brevity
# ```
#
# ---
#
#
# - Here is the new code
#
# ```Python
# import os
# import streamlit as st
# from dotenv import load_dotenv
# from openai import OpenAI
# import tiktoken
#
#
# if load_dotenv('.env'):
# # for local development
# OPENAI_KEY = os.getenv('OPENAI_API_KEY')
# else:
# OPENAI_KEY = st.secrets['OPENAI_API_KEY']
#
#
# # Pass the API Key to the OpenAI Client
# client = OpenAI(api_key=OPENAI_KEY)
# # Some other code here are omitted for brevity
# ```
#
# ---
#
# ### Step 3: **Commit and push** the changes to the GitHub repository.
#
#
# ---
# ---
#
#
#
# # [OPTIONAL] Task 6: Share the URL of your Deployed App on our `Miro Board`!!!
# - This is a achievement that you should be proud of! Share the URL of your deployed app on our `Miro Board` so that everyone can see your work!
# - 🚀🚀🚀 That's it! You have successfully deployed a password-protected Streamlit app on the Streamlit Community Cloud. 🚀🚀🚀
#