#!/usr/bin/env python
# coding: utf-8
# Table of Contents
#
# # Feature Store with Aerospike
# This notebook is the first in the series of notebooks that show how Aerospike can be used as a feature store.
#
# This notebook requires the Aerospike Database and Spark running locally with Aerospike Spark Connector. To create a Docker container that satisfies the requirements and holds a copy of Aerospike notebooks, visit the [Aerospike Notebooks Repo](https://github.com/aerospike-examples/interactive-notebooks).
# ## Introduction
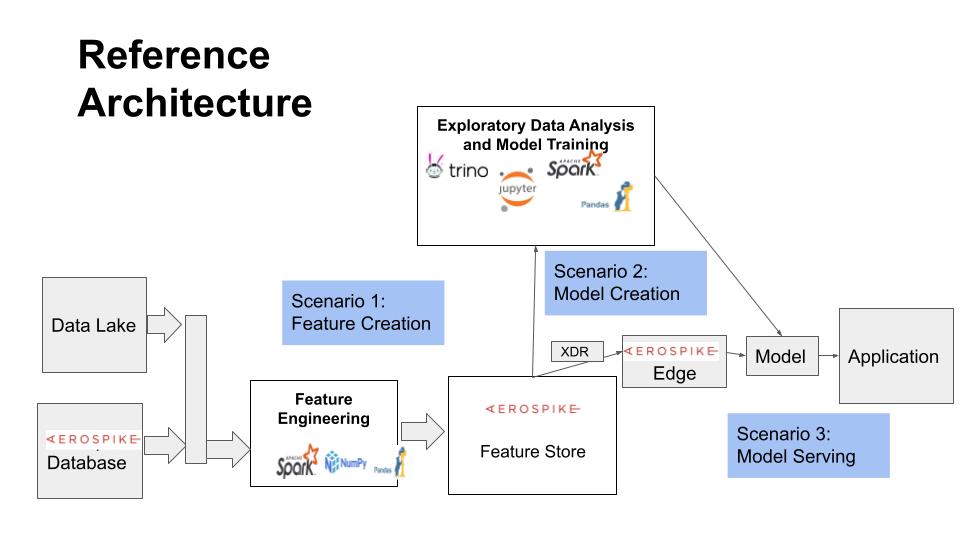
# This notebook demonstrates how Aerospike can be used as a Feature Store for Machine Learning applications on Spark using the Aerospike Spark Connector. It is part of the Feature Store series of notebooks, and focuses on data model and Feature Engineering aspects concerning a Feature Store. The subsequent notebook(s) will describe the Model Traiing and Model Serving aspects of an ML application that deal with a Feature Store.
# 
# This notebook is organized in two parts:
# 1. The first part explains the key objects, data model, and operations of a Feature Store, and provides a simple implementation on top of the Aerospike Database.
# 2. The second part shows with two examples how the model developed in the first part can be used for Feature Engineering and storing features in the Feature Store.
# ## Prerequisites
# This tutorial assumes familiarity with the following topics:
#
# - [Aerospike Notebooks - Readme and Tips](../readme_tips.ipynb)
# - [Hello World](../python/hello_world.ipynb)
# - [Aerospike Connect for Spark Tutorial for Python](AerospikeSparkPython.ipynb)
# ## Setup
# Set up Aerospike Server. Spark Server, and Spark Connector.
# ### Ensure Database Is Running
# This notebook requires that Aerospike datbase is running.
# In[1]:
get_ipython().system('asd >& /dev/null')
get_ipython().system('pgrep -x asd >/dev/null && echo "Aerospike database is running!" || echo "**Aerospike database is not running!**"')
# ### Initialize Spark
# We will be using Spark functionality in this notebook.
# #### Initialize Paths and Env Variables
# In[2]:
# directory where spark notebook requisites are installed
SPARK_NB_DIR = '/opt/spark-nb'
SPARK_DIR = 'spark-dir-link'
SPARK_HOME = SPARK_NB_DIR + '/' + SPARK_DIR
AEROSPIKE_JAR = 'aerospike-jar-link'
AEROSPIKE_JAR_PATH = SPARK_NB_DIR + '/' + AEROSPIKE_JAR
# In[3]:
# IP Address or DNS name for one host in your Aerospike cluster
AS_HOST ="localhost"
# Name of one of your namespaces. Type 'show namespaces' at the aql prompt if you are not sure
AS_NAMESPACE = "test"
AS_PORT = 3000 # Usually 3000, but change here if not
AS_CONNECTION_STRING = AS_HOST + ":"+ str(AS_PORT)
# In[4]:
# Locate the Spark installation using the SPARK_HOME parameter.
import findspark
findspark.init(SPARK_HOME)
# In[5]:
# Specify the Aerospike Spark Connector jar in the command used to interact with Aerospike.
import os
os.environ["PYSPARK_SUBMIT_ARGS"] = '--jars ' + AEROSPIKE_JAR_PATH + ' pyspark-shell'
# #### Configure Spark Session
# Please visit [Configuring Aerospike Connect for Spark](https://docs.aerospike.com/docs/connect/processing/spark/configuration.html) for more information about the properties used on this page.
# In[6]:
# imports
import pyspark
from pyspark.context import SparkContext
from pyspark.sql.context import SQLContext
from pyspark.sql.session import SparkSession
from pyspark.sql.types import StringType, StructField, StructType, ArrayType, IntegerType, MapType, LongType, DoubleType
# In[7]:
sc = SparkContext.getOrCreate()
conf=sc._conf.setAll([("aerospike.namespace",AS_NAMESPACE),("aerospike.seedhost",AS_CONNECTION_STRING)])
sc.stop()
sc = pyspark.SparkContext(conf=conf)
spark = SparkSession(sc)
sqlContext = SQLContext(sc)
# ### Access Shell Commands
# You may execute shell commands including Aerospike tools like [aql](https://docs.aerospike.com/docs/tools/aql/index.html) and [asadm](https://docs.aerospike.com/docs/tools/asadm/index.html) in the terminal tab throughout this tutorial. Open a terminal tab by selecting File->Open from the notebook menu, and then New->Terminal.
# # Online and Offline Feature Stores
# Aerospike can be used as a Feature Store in cases where broader capabilities of a commercial Feature Store are not warranted. Instead, when it is critical to have:
# - Sub-millisecond online access to features
# - Scaling to a very large number of entities and features
# - Convenient and reliable distributed deployment
# - Small server footprint for a low cost of operation
# An Online Feature Store provides access to features in real time, and as such requires speed and, for many deployments, scalability. The Online Store only stores the latest version of feature values.
#
# Aerospike is purpose built for the performance and scale requirements of an Online Store.
#
# An Offline Store requires historic data to be maintained for “time travel” use cases, that is, to create datasets at a particular point in time for training and other needs. A time series of feature values can be maintained in Aerospike as a map (timestamp->value) for each feature. Aerospike's native APIs allow efficient implementation of an Offline Store.
#
# ## Offline-Online Consistency
#
# An essential requirement for a Feature Store is to maintain Online-Offline consistency to ensure that the models that were trained with the Offline (historic) data remain valid in the production (Online) environment. Typically this means convenient, efficient, and timely sync of data from Offline to Online Store. Sometimes a reverse sync from Online to Offline Store may be requred if only the Online Store may be updated.
#
# Synchronization in either direction between Online and Offline Stores can be achieved through various streaming connectors that Aerospike provides (such as for Kafka and Pulsar).
#
# What is also necessary is to be able to access a specific version “as of time” (a special case being the latest version) for various use cases using the appropriate client library or connector.
# Our focus in this Feature Store series will be primarily on the Online Store.
# ## Design Considerations
# The key design criteria for a Feature Store with Aerospike are access and storage efficiency. (The other key criterion, Offline - Online synchronization, will not be discussed further here. For our purpose here, we assume that can be handled with appropriate change notification and update setup between Offline and Online Stores.)
#
# We will assume the following object model which is typical in a Feature Store:
# - Precomputed `Feature Values` are stored for `Entities` such as users, credit card transactions, and sensors.
# - `Features` are organized in `Feature Groups`. A `Feature Group` signifies the set of features that share common data sources, pipeline, and are created and updated together.
# - A `Dataset` is a snapshot of specified `Features` across a set of `Entity` instances. The snapshot is stored outside the Feature Store, whereas the Feature Store holds the metadata such as the snapshot query and location.
# - The Online Store keeps only the latest version of Feature Values, whereas the Offline store maintains a time series of Feature Values.
# ### Online Store
# There are multiple ways to store the latest Feature Values, each with its trade-offs. Here are two possible options:
# 1. One `Entity` instance record holds all `Feature Values` across multiple `Feature Groups`.
# - Stored in a set named after the `Entity` type (e.g., "user-features").
# - Read and write for a `Feature Group`'s `Features` entails listing the `Feature` bins. Accessing a `Feature` vector at Model Serving time entails enumerating the model's `Feature` bins across `Feature Groups`. To avoid `Feature` name collisions acroos `Feature Groups`, a bin name needs to include both the `Feature Group` and `Feature` name such as `Feature-Group:Feature`.
# - Pros:
# - Fast and convenient read and write access to all features of an entity.
# - Cons:
# - A single last-update-time must be shared among all `Feature Groups` without additional mechanisms.
#
# 2. Multiple `Entity` instance records, one for each `Feature Group`.
# - Each `Feature Group`'s values are stored in its own set named in form `Entity:FeatureGroup-features` such as "user:fg1-features".
# - Read and write for a `Feature Group`'s `Features` entail listing the `Feature` bins. Accessing a `Feature` vector at Model Serving time entails multiple requests over `Feature Groups`. Bin names are same as `Feature` names since they are unique within a `Feature Group`.
# - Pros:
# - Provides a better organization.
# - Allows for a large number of `Features` if they may exceed the record size limit.
# - Allows a separate timestamp for each `Feature Group` since each is updated separately.
# - Cons:
# - Multiple requests must be issued to access `Features` across `Feature Groups`.
# ### Offline Store
# The design requires multiple versions of Feature Values to be stored, each with its timestamp. One way of modeling such a time series of feature values in Aerospike is to store each feature as a map `timestamp->value`.
#
# #### Modeling for Size
# With historic versions stored in it, the Offline Store has to account for the data size problem: both in terms of individual record size as well as overall database size.
# - Record size
# - Limit the number of versions in each record by designating a record by its time duration. So Feature Values for an Entity instance will have multiple records by hour, day, week, month, or year, etc, depending on the frequency of updates. The record will have a compound key of the form `entity-key:duration-id` like "123:202101", for example, for a record holding feature values during January 2021 for a user with id 123.
# - As discussed above, the record size can be kept small by storing each Feature Group's Feature Values in its own set.
# - Database size
# - To limit the size of the Offline Store, older data can be archived in a batch process. An indexed bin in a record holds the record's duration specifier allowing efficient access to old records for archival. For example, weekly records wiil have an indexed bin with a year and week values concatenated like "202140".
# ## Improving Performance and Scalability
# Before we dive into the implementation, here are some relevant performance and scalability aspects in use of the Spark Connector.
# ### Random access with primary key
# Random access using the primary key must use the \__key bin for direct access through the primary index. Many times the unique user key is duplicated for convenience in another bin, but the equality predicate using another bin will result in a scan. This is shown below in single object `load` methods.
# ### Efficient scan with set indexes
# A set index should be enabled on a set for faster scans over the set. Data exploration as well as dataset creation operations will benefit by not having to scan the entire namespace instead of a fraction of records in a set, resulting in significant speedup as the namespace can be very large as compared to, say, the metadata sets. In the following implementation, we enable set indexes on all sets.
# ### Aerospike Expression pushdown
# To minimize the amount of data retrieved from the database, query predicates must be "pushed down", or in other words, processed in the database and not on Spark. We will illustrate how expression pushdown is implemented with examples in the Model Training notebook.
# ### Performance tuning parameters
# Several tuning parameters such as `partition factor` and `compression` are available for optimizing perfomrance with the Spark Connector. The implementation here does not make use of them, but you are encouraged to explire them elsewhere.
# ### Use of secondary indexes
# While Aerospike provides secondary indexes, the Spark Connector currently does not leverage them. This performance enhancement is planned in the future.
# # Defining a Simple Feature Store
# To make it concrete, let us define and implement a simple Feature Store.
#
# ## Main Objects
# The main objects in a Feature Store as discussed above are Feature Group, Feature, Entiry, and Dataset. These are explained below.
# ### Features Group
# Machine Learning features are grouped by the source of data and processing pipeline. A Feature Group includes many features, and has the following attributes that are useful during feature exploration:
# - name: a unique name
# - description: human readable description
# - source: source of fact data
# - attrs: other metadata
# - tags: associated tags
#
# A feature group is stored in the set "fg-metadata".
#
# ### Feature
# A Feature consists of the following attributes:
# - fid: the record's primary key consists of the string concatenation of feature group name and feature name in the form: fgname_fname
# - fgname: the name of the feature group that the feature belongs to
# - name: feature name that is unique within the feature group
# - type: feature type (integer, double, string, and possibly others)
# - description: human readable description
# - attrs: various performance stats and other metadata
# - tags: associated tags
#
# A feature is stored in the set "feature-metadata".
#
# ### Entity
# Features are computed and stored for an Entity such as a user, credit card, or sensor. Feature values are stored per Entity instance. Features in multiple feature groups for an Entity type are combined in one Entity record. A feature values record for an Entity has these attributes:
# - id_col: the column containing the id of the entity instance that serves as the record key
# - feature specific bins: each feature is stored in a bin named after the feature in the format fgname_fname.
# - timestamp: update timestamp
#
# Entity records for an entity type are stored in an entity-type specific set "entitytype-features". For example, the set "user-features" holds features for user instances, and "cc-features" holds features for credit card instances.
#
# ### Dataset
# A Dataset is a subset of features and entities selected to train an ML model. A Dataset object holds the selected features and entity instance definitions. The actual copy of entities is stored outside the feature store (for instance, in a file system). A dataset record has the following attributes.
# - name: name of the data set, serves as the primary key for the record
# - description: human readable description
# - features: a list of the dataset features
# - predicate: query predicate to enumerate the entity instances in the dataset
# - location: external location where the dataset is stored
# - attrs: other metadata
# - tags: associated tags
#
# Datasets are stored in the set "dataset-metadata".
#
# ## Operations
# The following operations are implemented for the different use scenarios:
# - Feature Engineering
# - Feature Group
# - create or update (save)
# - load (get)
# - Feature
# - create or update
# - load
# - Entity
# - create or update using a dataframe
# - load
# - Model Training
# - Feature Group
# - load
# - query by various attributes
# - Feature
# - query
# - Entity
# - query
# - Dataset
# - create
# - load
# - query
#
# - Model Serving
# - Entity
# - get a specific feature vector for an entity instance
# ## Example Implementation
# The following code is a simple implementation of the above operations. These operations will be illustrated in this and follow-up notebooks.
# ### Feature Group Implementation
# In[8]:
import copy
class FeatureGroup:
schema = StructType([StructField("name", StringType(), False),
StructField("description", StringType(), True),
StructField("source", StringType(), True),
StructField("attrs", MapType(StringType(), StringType()), True),
StructField("tags", ArrayType(StringType()), True)])
def __init__(self, name, description, source, attrs, tags):
self.name = name
self.description = description
self.source = source
self.attrs = attrs
self.tags = tags
return
def __str__(self):
return str(self.__class__) + ": " + str(self.__dict__)
def save(self):
inputBuf = [(self.name, self.description, self.source, self.attrs, self.tags)]
inputRDD = spark.sparkContext.parallelize(inputBuf)
inputDF = spark.createDataFrame(inputRDD, FeatureGroup.schema)
#Write the data frame to Aerospike, the name field is used as the key
inputDF.write \
.mode('overwrite') \
.format("aerospike") \
.option("aerospike.writeset", "fg-metadata")\
.option("aerospike.updateByKey", "name") \
.save()
return
def load(name):
fg = None
schema = copy.deepcopy(FeatureGroup.schema)
schema.add("__key", StringType(), False)
fgdf = spark.read \
.format("aerospike") \
.option("aerospike.set", "fg-metadata") \
.schema(schema) \
.load().where("__key = \"" + name + "\"")
if fgdf.count() > 0:
fgtuple = fgdf.collect()[0]
fg = FeatureGroup(*fgtuple[:-1])
return fg
def query(predicate): #returns a dataframe
fg_df = spark.read \
.format("aerospike") \
.schema(FeatureGroup.schema) \
.option("aerospike.set", "fg-metadata") \
.load().where(predicate)
return fg_df
# In[9]:
# Enable set index on fg-metadata
get_ipython().system('asinfo -v "set-config:context=namespace;id=test;set=fg-metadata;enable-index=true"')
# In[10]:
# test feature group
# test save and load
# save
fg1 = FeatureGroup("fg_name1", "fg_desc1", "fg_source1",
{"fg_attr1":"1", "fg_attr2":"two"}, ["fg_tag1", "fg_tag2"])
fg1.save()
# load
fg2 = FeatureGroup.load("fg_name1")
print(fg2, '\n')
# test query
print("Feature Groups with name ending with '_name1' and having attribute 'fg_tag1'='1':")
df = FeatureGroup.query("name like '%_name1' and attrs.fg_attr1 == '1'")
df.show()
# ### Feature Implementation
# In[11]:
class Feature:
schema = StructType([StructField("fid", StringType(), False),
StructField("fgname", StringType(), False),
StructField("name", StringType(), False),
StructField("type", StringType(), False),
StructField("description", StringType(), True),
StructField("attrs", MapType(StringType(), StringType()), True),
StructField("tags", ArrayType(StringType()), True)])
def __init__(self, fgname, name, ftype, description, attrs, tags):
self.fid = fgname + '_' + name
self.fgname = fgname
self.name = name
self.ftype = ftype
self.description = description
self.attrs = attrs
self.tags = tags
return
def __str__(self):
return str(self.__class__) + ": " + str(self.__dict__)
def save(self):
inputBuf = [(self.fid, self.fgname, self.name, self.ftype, self.description, self.attrs, self.tags)]
inputRDD = spark.sparkContext.parallelize(inputBuf)
inputDF = spark.createDataFrame(inputRDD, Feature.schema)
#Write the data frame to Aerospike, the fid field is used as the key
inputDF.write \
.mode('overwrite') \
.format("aerospike") \
.option("aerospike.writeset", "feature-metadata")\
.option("aerospike.updateByKey", "fid") \
.save()
return
def load(fgname, name):
f = None
schema = copy.deepcopy(Feature.schema)
schema.add("__key", StringType(), False)
f_df = spark.read \
.format("aerospike") \
.schema(schema) \
.option("aerospike.set", "feature-metadata") \
.load().where("__key = \"" + fgname+'_'+name + "\"")
if f_df.count() > 0:
f_tuple = f_df.collect()[0]
f = Feature(*f_tuple[1:-1])
return f
def query(predicate): #returns a dataframe
f_df = spark.read \
.format("aerospike") \
.schema(Feature.schema) \
.option("aerospike.set", "feature-metadata") \
.load().where(predicate)
return f_df
# In[12]:
# Enable set index on feature-metadata
get_ipython().system('asinfo -v "set-config:context=namespace;id=test;set=feature-metadata;enable-index=true"')
# In[13]:
# test Feature
# test save and load
# save
feature1 = Feature("fg_name1", "f_name1", "integer", "f_desc1",
{"f_attr1":"1", "f_attr2":"two"}, ["f_tag1", "f_tag2"])
feature1.save()
# load
f1 = Feature.load("fg_name1", "f_name1")
print(f1, '\n')
# test query
feature2 = Feature("fg_name1", "f_name2", "double", "f_desc2",
{"f_attr1":"1.0", "f_attr3":"three"}, ["f_tag1", "f_tag3"])
feature2.save()
print("Features having name starting with 'f_name' and tagged with 'f_tag1':")
f_df = Feature.query("name like 'f_name%' and array_contains(tags, 'f_tag1')")
f_df.show()
# ### Entity Implementation
# In[14]:
class Entity:
def __init__(self, etype, record, id_col):
# record is an array of triples (name, type, value)
self.etype = etype
self.record = record
self.id_col = id_col
return
def __str__(self):
return str(self.__class__) + ": " + str(self.__dict__)
def get_schema(record):
schema = StructType()
for f in record:
schema.add(f[0], f[1], True)
return schema
def get_id_type(schema, id_col):
return schema[id_col].dataType.typeName()
def save(self, schema):
fvalues = [f[2] for f in self.record]
inputBuf = [tuple(fvalues)]
inputRDD = spark.sparkContext.parallelize(inputBuf)
inputDF = spark.createDataFrame(inputRDD, schema)
#Write the data frame to Aerospike, the id_col field is used as the key
inputDF.write \
.mode('overwrite') \
.format("aerospike") \
.option("aerospike.writeset", self.etype+'-features')\
.option("aerospike.updateByKey", self.id_col) \
.save()
return
def load(etype, eid, schema, id_col):
ent = None
ent_df = spark.read \
.format("aerospike") \
.schema(schema) \
.option("aerospike.set", etype+'-features') \
.option("aerospike.keyType", "string") \
.load().where(id_col + " = \"" + eid + "\"")
if ent_df.count() > 0:
ent_tuple = ent_df.collect()[0]
record = [(schema[i].name, schema[i].dataType.typeName(), fv) for i, fv in enumerate(ent_tuple)]
ent = Entity(etype, record, id_col)
return ent
def saveDF(df, etype, id_col): # save a dataframe
# df: dataframe consisting of feature values
# etyoe: entity type (such as user or sensor)
# id_col: column name that holds the primary key
#Write the data frame to Aerospike, the column in id_col is used as the key
df.write \
.mode('overwrite') \
.format("aerospike") \
.option("aerospike.writeset", etype+'-features')\
.option("aerospike.updateByKey", id_col) \
.save()
return
def query(etype, predicate, schema, id_col): #returns a dataframe
ent_df = spark.read \
.format("aerospike") \
.schema(schema) \
.option("aerospike.set", etype+'-features') \
.option("aerospike.keyType", Entity.get_id_type(schema, id_col)) \
.load().where(predicate)
return ent_df
def get_feature_vector(etype, eid, feature_list): # elements in feature_list are in "fg_name|name" form
# deferred to Model Serving notebook
pass
# In[15]:
# Enable set index on cctxn-features
get_ipython().system('asinfo -v "set-config:context=namespace;id=test;set=cctxn-features;enable-index=true"')
# In[16]:
# test Entity
# test save and load
# save
features1 = [('fg1:f_name1', IntegerType(), 1), ('fg1:f_name2', DoubleType(), 2.0), ('fg1:f_name3', StringType(), 'three')]
record1 = [('eid', StringType(), 'eid1')] + features1
ent1 = Entity('entity_type1', record1, 'eid')
schema = Entity.get_schema(record1)
ent1.save(schema);
# load
e1 = Entity.load('entity_type1', 'eid1', schema, 'eid')
print(e1, '\n')
# test query
features2 = [('fg1:f_name1', IntegerType(), 10), ('fg1:f_name2', DoubleType(), 20.0), ('fg1:f_name3', StringType(), 'thirty')]
record2 = [('eid', StringType(), 'eid2')] + features2
ent2 = Entity('entity_type2', record2, 'eid')
ent2.save(schema);
# query 1
print("Instances of entity type entity_type1 with eid ending in 1:")
instances = Entity.query('entity_type1', 'eid like "%1"', schema, 'eid')
instances.show()
# query 2
print("Instances of entity type entity_type2 with eid in ['eid2']:")
instances = Entity.query('entity_type2', 'eid in ("eid2")', schema, 'eid')
instances.show()
# In[17]:
# test save dataframe
from pyspark.sql import SparkSession, Row
data = [{"ID": 'eid_1', "fg2_feature_1": 1, "fg2_feature_2": 12.40},
{"ID": 'eid_2', "fg2_feature_1": 2, "fg2_feature_2": 30.10},
{"ID": 'eid_3', "fg2_feature_1": 3, "fg2_feature_2": 100.01}
]
# create and save a dataframe
df = spark.createDataFrame([Row(**i) for i in data])
df.show()
Entity.saveDF(df, "etype_1", "ID")
# In[18]:
# test query operation that returns a dataframe
# need to define a schema first
schema = StructType([
StructField('ID', StringType(), False),
StructField('fg2_feature_1', IntegerType(), True),
StructField('fg2_feature_2', DoubleType(), True)])
queryDF = Entity.query('etype_1', 'ID in ("eid_1", "eid_3")', schema, 'ID')
queryDF.show()
# ### Dataset Implementation
# In[19]:
# Deferred to the second notebook in this series on Model Training.
# # Using Feature Store
# Let us now see how the feature store objects and operations can be leveraged through the various phases of the ML flow. In this notebook, the focus is on Feature Engineering. Future notebooks will look into Model Training and Model Serving scenarios.
# ## Example: Credit Card Fraud Data
# The demo data is abridged from its original version from [here](https://www.kaggle.com/mlg-ulb/creditcardfraud). It represents real transactions by European cardholders in 2013. The original dataset has close to 300K transactions, whereas the abdridged version used here contains about a thousand records.
#
# We will illustrate use of the feature store for Feature Engineering through the following sequence:
# - Read the demo data from a csv file.
# - Perform feature engineering tasks.
# - Save the engineered features to the Feature Store.
# ### Read Data into Dataframe
# Read and examine the columns and rows.
#
# The data contains transformed versions of PCA ("V1"-"V28") with 29 feature columns and 1 label ("Class") column.
# In[20]:
import pandas as pd
data=pd.read_csv("resources/creditcard_small.csv")
data.info()
# The data contains all fraudulent transactions from the original dataset, and the same number of randomly selected non-fraudulent transactions.
# In[21]:
total = len(data)
normal = len(data[data.Class == 0])
fraudulent = len(data[data.Class == 1])
fraud_percentage = round(fraudulent/total*100, 2)
print('Total number of transactions: {}'.format(total))
print('Number of normal transactions {}'.format(normal))
print('Number of fraudulent transactions: {}'.format(fraudulent))
# Here is how the data looks:
# In[22]:
data.head()
# ### Perform Feature Engineering Tasks
# We will perform some simple data transformations:
# - order the rows
# - rename the columns to include the feature group prefix "CC1"
# - add a transaction id column "TxnId" and assign a unique generated value to it
# - select (drop the index column) and order columns
# In[23]:
# rename the index column from the orignal dataset
data = data.rename(columns={"Unnamed: 0": "OldIdx"})
# order the rows by timestamp (original index order)
data = data.sort_values("OldIdx")
data.reset_index(drop=True, inplace=True)
data
# In[24]:
# rename the columns to include the feature group prefix "CC1"
curr_columns = data.columns
data = data.rename(columns=dict(zip(curr_columns, ["CC1_"+c for c in curr_columns])))
data
# Create a Spark dataframe to save data to Aerospike efficiently through the Aerospike Spark Connector.
# In[25]:
sparkDF = spark.createDataFrame(data)
sparkDF.printSchema()
sparkDF.toPandas()
# Add an identifier column TxnId. Generate and assign a unique value to it.
# In[26]:
# add a new column TxnId for transaction id
# define a udf to update the new TxnId column
import pyspark.sql.functions as F
curr_txn_id = 1
def get_txn_id():
global curr_txn_id
txn_id = str(curr_txn_id)
curr_txn_id += 1
return txn_id
txn_id_udf = F.UserDefinedFunction(get_txn_id, StringType())
sparkDF = sparkDF.withColumn('TxnId', txn_id_udf())
# select the needed columns
sparkDF = sparkDF.select(['TxnId','CC1_Class','CC1_Amount']+['CC1_V'+str(i) for i in range(1,29)])
sparkDF.show(3, truncate=3)
# ### Save Features to Feature Store
# We are ready to save the features in the Spark dataframe to Aerospike.
#
# Of the following three steps, the first two steps are needed only the first time when the feature group and features are created. Subsequent updates will use only the third step.
# 1. Create a feature group.
# 2. Create feature metadata.
# 3. Save feature values in entity records.
# In[27]:
# 1. Create a feature group.
FG_NAME = 'CC1'
FG_DESCRIPTION = 'Credit card transaction data'
FG_SOURCE = 'European cardholder dataset from Kaggle'
fg = FeatureGroup(FG_NAME, FG_DESCRIPTION, FG_SOURCE,
attrs={'entity':'cctxn', 'class':'fraud'}, tags=['kaggle', 'demo'])
fg.save()
# 2. Create feature metadata
FEATURE_AMOUNT = 'Amount'
f = Feature(FG_NAME, FEATURE_AMOUNT, 'double', "Transaction amount",
attrs={'entity':'cctxn'}, tags=['usd'])
f.save()
FEATURE_CLASS = 'Class'
f = Feature(FG_NAME, FEATURE_CLASS, 'integer', "Label indicating fraud or not",
attrs={'entity':'cctxn'}, tags=['label'])
f.save()
FEATURE_PCA_XFORM = "V"
for i in range(1,29):
f = Feature(FG_NAME, FEATURE_PCA_XFORM+str(i), 'double', "Transformed version of PCA",
attrs={'entity':'cctxn'}, tags=['pca'])
f.save()
# 3. Save feature values in entity records
ENTITY_TYPE = 'cctxn'
ID_COLUMN = 'TxnId'
Entity.saveDF(sparkDF, ENTITY_TYPE, ID_COLUMN)
print('Features stored to Feature Store.')
# ### Query Features
# Let's issue a query against the saved features to get fraudulent transactions with amount greater than $2000. There appears to be only one such transaction in the demo data.
# In[28]:
schema = StructType([StructField(ID_COLUMN, StringType(), False),
StructField(FG_NAME+'_'+FEATURE_CLASS, IntegerType(), False),
StructField(FG_NAME+'_'+FEATURE_AMOUNT, DoubleType(), False)])
for i in range(1,29):
schema.add(FG_NAME+'_'+FEATURE_PCA_XFORM+str(i), DoubleType(), True)
queryDF = Entity.query(ENTITY_TYPE, 'CC1_Class == 1 and CC1_Amount > 2000', schema, ID_COLUMN)
queryDF.show(5, truncate=7)
# Examine the data through aql with the following command:
# In[37]:
get_ipython().system('aql -c "select * from test.cctxn-features where PK=\'362\'"')
# ## Example: Salary Data
# Let's look at another example of feature store use for data engineering, which is taken from another Aerospike Spark notebook.
#
# We will illustrate use of the feature store for Feature Engineering through the following sequence:
# - Generate demo data.
# - Perform feature engineering tasks.
# - Save the engineered features to Feature Store.
# ### Generate Demo Data
# In[30]:
# We create age vs salary data, using three different Gaussian distributions
import numpy as np
import matplotlib.pyplot as plt
import pandas as pd
import math
# Make sure we get the same results every time this workbook is run
# Otherwise we are occasionally exposed to results not working out as expected
np.random.seed(12345)
# Create covariance matrix from std devs + correlation
def covariance_matrix(std_dev_1,std_dev_2,correlation):
return [[std_dev_1 ** 2, correlation * std_dev_1 * std_dev_2],
[correlation * std_dev_1 * std_dev_2, std_dev_2 ** 2]]
# Return a bivariate sample given means/std dev/correlation
def age_salary_sample(distribution_params,sample_size):
mean = [distribution_params["age_mean"], distribution_params["salary_mean"]]
cov = covariance_matrix(distribution_params["age_std_dev"],distribution_params["salary_std_dev"],
distribution_params["age_salary_correlation"])
return np.random.multivariate_normal(mean, cov, sample_size).T
# Define the characteristics of our age/salary distribution
age_salary_distribution_1 = {"age_mean":25,"salary_mean":50000,
"age_std_dev":1,"salary_std_dev":5000,"age_salary_correlation":0.3}
age_salary_distribution_2 = {"age_mean":45,"salary_mean":80000,
"age_std_dev":4,"salary_std_dev":8000,"age_salary_correlation":0.7}
age_salary_distribution_3 = {"age_mean":35,"salary_mean":70000,
"age_std_dev":2,"salary_std_dev":9000,"age_salary_correlation":0.1}
distribution_data = [age_salary_distribution_1,age_salary_distribution_2,age_salary_distribution_3]
# Sample age/salary data for each distributions
sample_size_1 = 100;
sample_size_2 = 120;
sample_size_3 = 80;
sample_sizes = [sample_size_1,sample_size_2,sample_size_3]
group_1_ages,group_1_salaries = age_salary_sample(age_salary_distribution_1,sample_size=sample_size_1)
group_2_ages,group_2_salaries = age_salary_sample(age_salary_distribution_2,sample_size=sample_size_2)
group_3_ages,group_3_salaries = age_salary_sample(age_salary_distribution_3,sample_size=sample_size_3)
ages=np.concatenate([group_1_ages,group_2_ages,group_3_ages])
salaries=np.concatenate([group_1_salaries,group_2_salaries,group_3_salaries])
print("Data created")
# ### Perform Feature Engineering Tasks
# Display simulated age/salary data.
# In[31]:
# Plot the sample data
group_1_colour, group_2_colour, group_3_colour ='red','blue', 'pink'
plt.xlabel('Age',fontsize=10)
plt.ylabel("Salary",fontsize=10)
plt.scatter(group_1_ages,group_1_salaries,c=group_1_colour,label="Group 1")
plt.scatter(group_2_ages,group_2_salaries,c=group_2_colour,label="Group 2")
plt.scatter(group_3_ages,group_3_salaries,c=group_3_colour,label="Group 3")
plt.legend(loc='upper left')
plt.show()
# In[32]:
# Turn the above records into a Data Frame
# First of all, create an array of arrays
inputBuf = []
for i in range(0, len(ages)) :
id = i + 1 # Avoid counting from zero
name = "Individual: {:03d}".format(id)
# Note we need to make sure values are typed correctly
# salary will have type numpy.float64 - if it is not cast as below, an error will be thrown
age = float(ages[i])
salary = int(salaries[i])
inputBuf.append((id, name,age,salary))
# Convert to an RDD
inputRDD = spark.sparkContext.parallelize(inputBuf)
# Convert to a data frame using a schema
# Note the feature group SAL is prefixed to each feature column
schema = StructType([
StructField("id", IntegerType(), True),
StructField("SAL_name", StringType(), True),
StructField("SAL_age", DoubleType(), True),
StructField("SAL_salary",IntegerType(), True)
])
inputDF=spark.createDataFrame(inputRDD,schema)
inputDF.show(5)
# ### Save Features to Feature Store
# 1. Create a feature group.
# 2. Create feature metadata.
# 3. Save feature values in entity records.
# In[33]:
# 1. Create a feature group.
FG_NAME = 'SAL'
FG_DESCRIPTION = 'Age salary data'
FG_SOURCE = 'Generated demo data'
fg = FeatureGroup(FG_NAME, FG_DESCRIPTION, FG_SOURCE,
attrs={'access':'all'}, tags=['test'])
fg.save()
# 2. Create features metadata.
FEATURE_NAME = 'name'
f = Feature(FG_NAME, FEATURE_NAME, "string", "Name of the person",
attrs={'unique':'no'}, tags=['test'])
f.save()
FEATURE_AGE = 'age'
f = Feature(FG_NAME, FEATURE_AGE, "double", "Age of the person",
attrs={'range':'0-100'}, tags=['test'])
f.save()
FEATURE_SALARY = 'salary'
f = Feature(FG_NAME, FEATURE_SALARY, 'integer', "Salary of the person",
attrs={'range':'20-999K'}, tags=['test'])
f.save()
# 3. Save feature values in entity records.
ENTITY_TYPE = 'user'
ID_COLUMN = 'id'
Entity.saveDF(inputDF, ENTITY_TYPE, ID_COLUMN)
print('Features stored to Feature Store.')
# ### Query Features
# Issue a query against the saved features to get a dataframe with records in age group 25 to 30. There are 50 such users in the dataset.
# In[34]:
queryDF = Entity.query(ENTITY_TYPE, '`SAL_age` between 25 and 30', schema, ID_COLUMN)
print("Number of users of age between 25 and 30: {}".format(queryDF.count()))
queryDF.show(5)
# Examine the data through aql with the following command:
# In[35]:
get_ipython().system('aql -c "select * from test.user-features where PK=85"')
# # Takeaways and Conclusion
# In this notebook, we explored how Aerospike can be used as a Feature Store for ML applications. Specifically, we showed how features engineered using the Spark platform can be efficiently stored in Aerospike feature store via the Aerospike Spark Connector. We implemented a simple example feature store interface that leverages the Aerospike Spark connector capabilities for this purpose. We used the API to save and query features created in two data engineering examples.
#
# This is a first in the series of notebooks on how Aerospike can be used as a feature store. Subseequent notebooks in this series will explore use of Aerospike Feature Store for Model Training and Model Serving.
# # Cleaning Up
# Close the spark session, and remove the tutorial data by executing the cell below.
# In[36]:
try:
spark.stop()
except:
("# ignore")
# To remove all data in the namespace test, uncomment the following line and run:
#!aql -c "truncate test"
# # Further Exploration and Resources
# Here are some links for further exploration.
#
# ## Resources
# - Related notebooks
# - [Model Training with Aerospike Feature Store (Part 2)](feature-store-model-training.ipynb)
# - [Model Serving with Aerospike Feature Store (Part 3)](feature-store-model-serving.ipynb)
# - [Aerospike Connect for Spark Tutorial for Python](AerospikeSparkPython.ipynb)
# - [Pushdown Expressions for Spark Connector](resources/pushdown-expressions.ipynb)
# - Related blog posts
# - [Let AI/ML workloads take off with Aerospike and Spark 3.0](https://medium.com/aerospike-developer-blog/let-ai-ml-workloads-take-off-with-aerospike-and-spark-3-0-82de2d834b99)
# - [Using Aerospike Connect For Spark](https://medium.com/aerospike-developer-blog/aerospike-is-a-highly-scalable-key-value-database-offering-best-in-class-performance-5922450aaa78)
# - Aerospike Developer Hub
# - [Developer Hub](https://developer.aerospike.com/)
# - Github repos
# - [Spark Aerospike Example](https://github.com/aerospike-examples/spark-aerospike-example)
# ## Exploring Other Notebooks
#
# Visit [Aerospike notebooks repo](https://github.com/aerospike-examples/interactive-notebooks) to run additional Aerospike notebooks. To run a different notebook, download the notebook from the repo to your local machine, and then click on File->Open in the notebook menu, and select Upload.