Use Case: Unmatched Instances Input
Install Dependencies
!pip install panoptica auxiliary rich numpy > /dev/null
If you installed the packages and requirements on your own machine, you can skip this section and start from the import section.
Setup Colab environment (optional)
Otherwise you can follow and execute the tutorial on your browser. In order to start working on the notebook, click on the following button, this will open this page in the Colab environment and you will be able to execute the code on your own (Google account required).
Now that you are visualizing the notebook in Colab, run the next cell to install the packages we will use. There are few things you should follow in order to properly set the notebook up:
- Warning: This notebook was not authored by Google. Click on 'Run anyway'.
- When the installation commands are done, there might be "Restart runtime" button at the end of the output. Please, click it.
If you run the next cell in a Google Colab environment, it will clone the 'tutorials' repository in your google drive. This will create a new folder called "tutorials" in your Google Drive. All generated file will be created/uploaded to your Google Drive respectively.
After the first execution of the next cell, you might receive some warnings and notifications, please follow these instructions:
- 'Permit this notebook to access your Google Drive files?' Click on 'Yes', and select your account.
- Google Drive for desktop wants to access your Google Account. Click on 'Allow'.
Afterwards the "tutorials" folder has been created. You can navigate it through the lefthand panel in Colab. You might also have received an email that informs you about the access on your Google Drive.
import sys

# Check if we are in google colab currently
try:
    import google.colab

    colabFlag = True
except ImportError as r:
    colabFlag = False

# Execute certain steps only if we are in a colab environment
if colabFlag:
    # Create a folder in your Google Drive
    from google.colab import drive

    drive.mount("/content/drive")
    # clone repository and set path
    !git clone https://github.com/BrainLesion/tutorials.git /content/drive/MyDrive/tutorials
    BASE_PATH = "/content/drive/MyDrive/tutorials/panoptica"
    sys.path.insert(0, BASE_PATH)

else:  # normal jupyter notebook environment
    BASE_PATH = "."  # current working directory would be BraTs-Toolkit anyways if you are not in colab
Setup Imports
import numpy as np
from auxiliary.nifti.io import read_nifti
from rich import print as pprint
from panoptica import NaiveThresholdMatching, Panoptica_Evaluator, InputType
from panoptica.utils.segmentation_class import LabelGroup, SegmentationClassGroups
No module named 'pandas'
OPTIONAL PACKAGE MISSING
Load Example Data
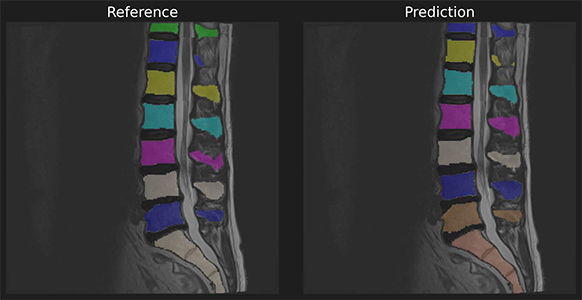
To demonstrate we use a reference and predicition of spine a segmentation with unmatched instances.

ref_masks = read_nifti(f"{BASE_PATH}/spine_seg/unmatched_instance/ref.nii.gz")
pred_masks = read_nifti(f"{BASE_PATH}/spine_seg/unmatched_instance/pred.nii.gz")

# labels are unmatched instances
pred_masks[pred_masks == 27] = 26  # For later
np.unique(ref_masks), np.unique(pred_masks)
(array([  0,   2,   3,   4,   5,   6,   7,   8,  26, 102, 103, 104, 105,
        106, 107, 108, 202, 203, 204, 205, 206, 207, 208], dtype=uint8),
 array([  0,   3,   4,   5,   6,   7,   8,   9,  26, 103, 104, 105, 106,
        107, 108, 109, 203, 204, 205, 206, 207, 208, 209], dtype=uint8))
Define Class Groups
# Define (optionally) semantic groups
# This means that only instance within one group can be matched to each other
segmentation_class_groups = SegmentationClassGroups(
    {
        "vertebra": LabelGroup(list(range(1, 11))),
        "ivd": LabelGroup(list(range(101, 111))),
        "sacrum": ([26], True),
        "endplate": LabelGroup(list(range(201, 211))),
    }
)
# In this case, the label 26 can only be matched with label 26 (thats why have to ensure above that 26 exists in both masks, otherwise they wouldn't be matched)
Let's do it ourselves!
Panoptica allows you to call everything yourself if you really want to
# Input are unmatched instances, so lets match em!
from panoptica import Metric

# This will match based on IoU metric, will only match if instance have a IoU of 0.5 or higher and will not allow multiple predictions to be matched to the same reference
matcher = NaiveThresholdMatching(
    matching_metric=Metric.IOU, matching_threshold=0.5, allow_many_to_one=False
)

# Now we have to do our processing object ourselves
from panoptica import UnmatchedInstancePair

unmatched_instance_input = UnmatchedInstancePair(pred_masks, ref_masks)

matched_instance_output = matcher.match_instances(unmatched_instance_input)
print("prediction_arr=", np.unique(matched_instance_output.prediction_arr))
print("reference_arr=", np.unique(matched_instance_output.reference_arr))

# Based of this, we see that some references are not sucessfully hit (203, 205, 208)
# We can also see that we indeed have the same number of prediction instances that got no match, they will be appended afterwards (209, 210, 211)
prediction_arr= [  0   2   3   4   5   6   7   8  26 102 103 104 105 106 107 108 202 204
 206 207 209 210 211]
reference_arr= [  0   2   3   4   5   6   7   8  26 102 103 104 105 106 107 108 202 203
 204 205 206 207 208]
Let's match 'em all!
# This will match based on IoU metric, will only match if instance have a IoU of 0.0 or higher and will not allow multiple predictions to be matched to the same reference
matcher = NaiveThresholdMatching(
    matching_metric=Metric.IOU, matching_threshold=0.0, allow_many_to_one=False
)

matched_instance_output = matcher.match_instances(unmatched_instance_input)
print("prediction_arr=", np.unique(matched_instance_output.prediction_arr))
print("reference_arr=", np.unique(matched_instance_output.reference_arr))

# With a threshold of 0.0, we ensure that we match as much as possible.
# We see, that contrary to before, instances 203, 205, and 208 are now matched
prediction_arr= [  0   2   3   4   5   6   7   8  26 102 103 104 105 106 107 108 202 203
 204 205 206 207 208]
reference_arr= [  0   2   3   4   5   6   7   8  26 102 103 104 105 106 107 108 202 203
 204 205 206 207 208]
Do it yourself
Now it is up to you to explore the different matching algorithms and the best setup for your project
Just remember, this setup can have drastic differences in the resulting metrics as well as interpretation of those results. For example, if you always match everything, of course your F1-Score will be 1.0. This becomes meaningless then. Also the choice of metric does matter!