Some pre-requisites
Firstly, we need OpenCV for working with images. Also, we want matplotlib to show our results.
import sys
!{sys.executable} -m pip install --quiet opencv-python matplotlib
!{sys.executable} -m pip install pyOpenSSL cryptography
!{sys.executable} -m pip install --quiet azure-cognitiveservices-vision-face
import cv2
import matplotlib.pyplot as plt
import glob, os
WARNING: You are using pip version 20.0.2; however, version 20.1.1 is available. You should consider upgrading via the '/Users/linuxoid/.virtualenvs/dl4cv/bin/python3 -m pip install --upgrade pip' command. Requirement already satisfied: pyOpenSSL in /Users/linuxoid/.virtualenvs/dl4cv/lib/python3.7/site-packages (19.1.0) Requirement already satisfied: cryptography in /Users/linuxoid/.virtualenvs/dl4cv/lib/python3.7/site-packages (2.9.2) Requirement already satisfied: six>=1.5.2 in /Users/linuxoid/.virtualenvs/dl4cv/lib/python3.7/site-packages (from pyOpenSSL) (1.14.0) Requirement already satisfied: cffi!=1.11.3,>=1.8 in /Users/linuxoid/.virtualenvs/dl4cv/lib/python3.7/site-packages (from cryptography) (1.14.0) Requirement already satisfied: pycparser in /Users/linuxoid/.virtualenvs/dl4cv/lib/python3.7/site-packages (from cffi!=1.11.3,>=1.8->cryptography) (2.20) WARNING: You are using pip version 20.0.2; however, version 20.1.1 is available. You should consider upgrading via the '/Users/linuxoid/.virtualenvs/dl4cv/bin/python3 -m pip install --upgrade pip' command. WARNING: You are using pip version 20.0.2; however, version 20.1.1 is available. You should consider upgrading via the '/Users/linuxoid/.virtualenvs/dl4cv/bin/python3 -m pip install --upgrade pip' command.
Extracting Facial Landmarks
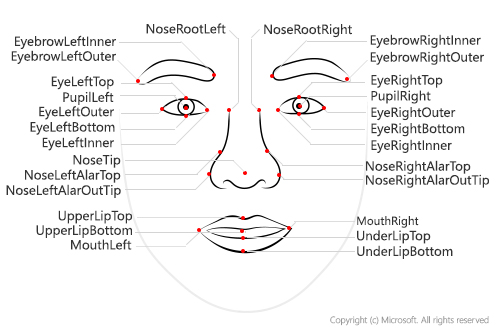
To extract facial landmarks, we will use Microsoft Face API. It provides a simple REST API that can extract a lot of useful information from the face image, including those landmarks:
For using Face API, we need a key and endpoint URL. There are many ways to obtain Face API Key, but I will use the simpliest way:
- Requesting 7 days free trial key here.
Important: If you use trial key, your Face API will have some limitations, in terms of number of images you can process, and frequency of API calls (not more than 20 calls per minute). In order to make things work, we would need to insert some pauses in between calls, when using API on a series of images.
After you get the key and endpoint, please insert them into the cell below. There would typically be two keys given on the portal, you can use any one of them.
key = 'b26c6bf5497d42dda79205134d8d43a8'
endpoint = 'https://westcentralus.api.cognitive.microsoft.com'
Most of the calls of the Face API are done through the static module cognitive_face, which we will call cf for brevity.
import azure.cognitiveservices.vision.face as cf
from msrest.authentication import CognitiveServicesCredentials
cli = cf.FaceClient(endpoint,CognitiveServicesCredentials(key))
The main function for face detection is called face.detect_with_url or face.detect_with_stream. It can extract a lot of useful information from the face, depending on the parameters that you specify - in our case we would need facial landmarks:
face_url = 'https://2016.dotnext-piter.ru/assets/images/people/soshnikov.jpg'
res = cli.face.detect_with_url(face_url,return_face_landmarks=True)
print(res[0].face_landmarks.as_dict())
{'pupil_left': {'x': 112.6, 'y': 126.7}, 'pupil_right': {'x': 170.9, 'y': 118.9}, 'nose_tip': {'x': 148.7, 'y': 158.4}, 'mouth_left': {'x': 121.6, 'y': 182.6}, 'mouth_right': {'x': 177.8, 'y': 172.1}, 'eyebrow_left_outer': {'x': 84.1, 'y': 120.3}, 'eyebrow_left_inner': {'x': 122.9, 'y': 110.1}, 'eye_left_outer': {'x': 103.3, 'y': 128.9}, 'eye_left_top': {'x': 112.3, 'y': 122.8}, 'eye_left_bottom': {'x': 113.7, 'y': 131.4}, 'eye_left_inner': {'x': 122.4, 'y': 126.7}, 'eyebrow_right_inner': {'x': 157.2, 'y': 106.3}, 'eyebrow_right_outer': {'x': 192.1, 'y': 106.6}, 'eye_right_inner': {'x': 162.7, 'y': 120.8}, 'eye_right_top': {'x': 171.3, 'y': 115.0}, 'eye_right_bottom': {'x': 172.7, 'y': 123.5}, 'eye_right_outer': {'x': 181.5, 'y': 118.5}, 'nose_root_left': {'x': 135.4, 'y': 126.3}, 'nose_root_right': {'x': 151.5, 'y': 124.3}, 'nose_left_alar_top': {'x': 131.9, 'y': 147.4}, 'nose_right_alar_top': {'x': 158.4, 'y': 143.8}, 'nose_left_alar_out_tip': {'x': 128.2, 'y': 159.3}, 'nose_right_alar_out_tip': {'x': 167.0, 'y': 153.0}, 'upper_lip_top': {'x': 150.3, 'y': 173.6}, 'upper_lip_bottom': {'x': 151.7, 'y': 176.9}, 'under_lip_top': {'x': 152.7, 'y': 186.2}, 'under_lip_bottom': {'x': 154.5, 'y': 193.0}}
Getting Some Images
In this repository, sample images of Bill Gates are available in images/gates directory and sample images of Angelina Joley are available in images/joley directory.
first_path = 'images/gates/*'
second_path = 'images/joley/*'
def imread(fn):
im = cv2.imread(fn)
return cv2.cvtColor(im,cv2.COLOR_BGR2RGB) if im is not None else None
For our further experiments, let's load 10 first images, and run them through Face API to obtain facial landmarks. We will save the images into images array, and landmarks data into imagepoints.
def processing(path, filenames, images, imagepoints, evens = []):
fnames = glob.glob(path)
i = 1
for fn in fnames[0:9]:
print("Processing {}".format(fn))
with open(fn,'rb') as f:
res = cli.face.detect_with_stream(f, return_face_landmarks=True)
if len(res) > 0:
filenames.append(fn)
images.append(imread(fn))
imagepoints.append(res[0].face_landmarks.as_dict())
evens.append(i)
if i == 3: i = 0
i += 1
filenames = []
images = []
imagepoints = []
filenames2 = []
images2 = []
imagepoints2 = []
evens = []
cli.face.detect_with_url(face_url)
processing(first_path, filenames, images, imagepoints)
processing(second_path, filenames2, images2, imagepoints2, evens)
Processing images/gates/gates_36.jpg Processing images/gates/gates_22.jpg Processing images/gates/gates_23.jpg Processing images/gates/gates_37.jpg Processing images/gates/gates_21.jpg Processing images/gates/gates_35.jpg Processing images/gates/gates_34.jpg Processing images/gates/gates_24.jpg Processing images/gates/gates_30.jpg Processing images/joley/joley1.jpg Processing images/joley/joley3.jpg Processing images/joley/joley2.jpg Processing images/joley/joley6.jpg Processing images/joley/joley7.jpg Processing images/joley/joley5.jpg Processing images/joley/joley4.jpg Processing images/joley/joley10.jpg Processing images/joley/joley9.jpg
Let's check our downloaded pictures.
def display_images(l):
n = len(l)
fig,ax = plt.subplots(1,n)
for i,im in enumerate(l):
ax[i].imshow(im)
ax[i].axis('off')
fig.set_size_inches(fig.get_size_inches()*n)
plt.tight_layout()
plt.show()
display_images(images[5:])
display_images(images2[5:])


Affine Transformations
The function to rotate our images to the fixes eyes-mouth position is defined below. We have a bool flag for choosing the way of creation X-Man Face: two heads with one mouth or x-man with additional two simmetrical heads below the main head.
import numpy as np
teeth_target = np.float32([(750.0,250.0),(1050.0,250.0),(900.0,550.0)])
xmen_target_left = np.float32([(500.0,350.0),(750.0,150.0),(950.0,450.0)])
xmen_target_right = np.float32([(1000.0,150.0),(1350.0,350.0),(850.0,450.0)])
main_target = np.float32([(750.0,150.0),(1050.0,150.0),(900.0,450.0)])
def transformation(img, attrs, f, showTeeth):
mc_x = (attrs['mouth_left']['x'] + attrs['mouth_right']['x']) / 2.0
mc_y = (attrs['mouth_left']['y'] + attrs['mouth_right']['y']) / 2.0
target_right = xmen_target_right
target_left = xmen_target_left
if showTeeth: target_left = teeth_target
if not showTeeth and f % 3 == 0:
tr = cv2.getAffineTransform(np.float32([(attrs['pupil_left']['x'],attrs['pupil_left']['y']),
(attrs['pupil_right']['x'],attrs['pupil_right']['y']),
(mc_x,mc_y)]), target_right)
elif f & 1:
tr = cv2.getAffineTransform(np.float32([(attrs['pupil_left']['x'],attrs['pupil_left']['y']),
(attrs['pupil_right']['x'],attrs['pupil_right']['y']),
(mc_x,mc_y)]), target_left)
else:
tr = cv2.getAffineTransform(np.float32([(attrs['pupil_left']['x'],attrs['pupil_left']['y']),
(attrs['pupil_right']['x'],attrs['pupil_right']['y']),
(mc_x,mc_y)]), main_target)
return cv2.warpAffine(img,tr,(1900,1000))
img_aligned_teeth = [transformation(i, a, f, True) for i, a, f in zip(images, imagepoints, evens)]
img_aligned = [transformation(i, a, f, False) for i, a, f in zip(images2, imagepoints2, evens)]
For more interesting results for two heads, we will add fun color.
def rotate_and_color(img, num, color):
if num & 1:
img = cv2.flip(img, 0)
if color:
img = cv2.cvtColor(cv2.cvtColor(img, cv2.COLOR_BGR2HSV), cv2.COLOR_BGR2HSV)
return img
num = 1
images_with_teeth = []
for img in img_aligned_teeth:
images_with_teeth.append(rotate_and_color(img, num, color = True))
num += 1
images_xman = [rotate_and_color(img, num, color = False) for img, num in zip(img_aligned, evens)]
display_images(images_xman[0:4])

display_images(images_with_teeth[4:9])

Image Blending
To blend images together, we just calculate the average:
def merge(images,wts=None):
res = np.zeros_like(images[0], dtype=np.float32)
if wts is None:
wts = np.ones(len(images))
wts /= np.sum(wts)
for n,i in enumerate(images):
res += wts[n] * i.astype(np.float32)
return res.astype(np.ubyte)
display_images([images_with_teeth[0], images_with_teeth[1], merge(images_with_teeth[0:2])])

display_images([images_xman[0], images_xman[1], images_xman[2], merge(images_xman[0:3])])

Now let's merge all aligned images altogether and see what happens:
res1 = merge(images_with_teeth)
plt.imshow(res1)
<matplotlib.image.AxesImage at 0x7f9965cbacf8>

res2 = merge(images_xman)
plt.imshow(res2)
<matplotlib.image.AxesImage at 0x7f99660fb160>

If this image does not look good, we can vary weights of different images, producing different results:
imgs = [merge(images_with_teeth, np.random.random(len(images_with_teeth))) for _ in range(5)]
display_images(imgs)

imgs = [merge(images_xman, np.random.random(len(images_xman))) for _ in range(5)]
display_images(imgs)

Saving the result
I recommend to save the result into results directory, and to add quick description of the technique you used into readme.md file in the repo. To save the image, please execute the cell below:
cv2.imwrite('results/gates_with_teeth.jpg', res1)
True
cv2.imwrite('results/joley_x-man.jpg', cv2.cvtColor(res2, cv2.COLOR_BGR2RGB))
True