Web scraping with python
Author: Ties de Kok (Personal Website)
Last updated: June 2020
Conda Environment: LearnPythonForResearch
Python version: Python 3.7
License: MIT License
Note: Some features (like the ToC) will only work if you run it locally, use Binder, or use nbviewer by clicking this link: https://nbviewer.jupyter.org/github/TiesdeKok/LearnPythonforResearch/blob/master/4_web_scraping.ipynb
Introduction
Depending on the website it can be very easy or very hard to extract the information you need.
Websites can be classified into roughly two categories:
- Computer oriented webpage: API (Application Program Interface)
- Human oriented webpage: regular website
Option 1 (an API) is designed to be approach programmatically so extracting the data you need is usually easy. However, in many cases you don't have an API available so you might have to resort to scraping the regular website (option 2).
It is worth noting that option 2 can put a strain on the server of the website. Therefore, only resort to option 2 if there is no API available, and if you decide to scrape the regular website make sure to do so in a way that is as polite as possible!
This notebook is structured as follows:
- Using the
requestspackage to interact with a website or API - Extract data using an API
- Extract data from a regular website using regular expressions
- Extract data from a regular website by parsing the HTML
- Extract data from Javascript heavy websites using Selenium
- Advanced webscraping using Scrapy
Note 1: In this notebook I will often build upon chapter 11 of 'automate the boring stuff' which is available here:
https://automatetheboringstuff.com/chapter11/
Note 2: In this notebook I focus primarily on extracting information from webpages (i.e. web scraping) and very little on programming a bot to automatically traverse the web (i.e. web crawling).
Note 3: I recommend reading this blog post on the legality of web scraping/crawling:
https://benbernardblog.com/web-scraping-and-crawling-are-perfectly-legal-right/
2019 update I also recommend to read into the "HIQ vs. Linkedin Case":
e.g. https://www.natlawreview.com/article/data-scraping-survives-least-now-key-takeaways-9th-circuit-ruling-hiq-vs-linkedin
Table of Contents 
We will use the requests module. I like the description mentioned in the book 'automate the boring stuff':
The requests module lets you easily download files from the Web without having to worry about complicated issues such as network errors, connection problems, and data compression.
import requests
Note: If you google around on webscraping with Python you will probably also find mentions of the urllib2 package. I highly recommend to use requests as it will make your life a lot easier for most tasks.
Basics of the requests package
The requests package takes a URL and allows you to interact with the contents. For example:
res = requests.get('https://automatetheboringstuff.com/files/rj.txt')
print(res.text[4:250])
Project Gutenberg EBook of Romeo and Juliet, by William Shakespeare

This eBook is for the use of anyone anywhere at no cost and with
almost no restrictions whatsoever.  You may copy it, give it away or
re-use it under the terms of the Projec
The requests package is incredibly useful because it deals with a lot of connection related issues automatically. We can for example check whether the webpage returned any errors relatively easily:
res.status_code
200
requests.get('https://automatetheboringstuff.com/thisdoesnotexist.txt').status_code
404
You can find a list of most common HTTP Status Codes here:
https://www.smartlabsoftware.com/ref/http-status-codes.htm
APIs are designed to be approached and 'read' by computers, whereas regular webpages are designed for humans not computers.
An API, in a simplified sense, has two characteristics:
- A request is made using a URL that contains parameters specifying the information requested
- A response by the server in a machine-readable format.
The machine-readable formats are usually either:
- JSON
- XML
- (sometimes plain text)
Demonstration using an example
Let's say, for the sake of an example, that we are interested in retrieving current and historical Bitcoin prices.
After a quick Google search we find that this information is available on https://www.coindesk.com/price/.
We could go about and scrape this webpage directly, but as a responsible web-scraper you look around and notice that coindesk fortunately offers an API that we can use to retrieve the information that we need. The details of the API are here:
There appear to be two API calls that we are interested in:
- We can retrieve the current bitcoin price using: https://api.coindesk.com/v1/bpi/currentprice.json
- We can retrieve historical bitcoin prices using: https://api.coindesk.com/v1/bpi/historical/close.json
Clicking on either of these links will show the response of the server. If you click the first link it will look something like this:

Not very readable for humans, but easily processed by a machine!
Task 1: get the current Bitcoin price
As discussed above, we can retrieve the current Bitcoin price by "opening" the following URL:
https://api.coindesk.com/v1/bpi/currentprice.json
Using the requests library we can easily "open" this url and retrieve the response.
res = requests.get('https://api.coindesk.com/v1/bpi/currentprice.json')
An important observation is that this API returns information in the so-called JSON format.
You can learn more about the JSON format here: https://www.w3schools.com/js/js_json_syntax.asp.
We could, as before, return this results as plain text:
text_res = res.text
text_res
'{"time":{"updated":"Jun 3, 2020 02:14:00 UTC","updatedISO":"2020-06-03T02:14:00+00:00","updateduk":"Jun 3, 2020 at 03:14 BST"},"disclaimer":"This data was produced from the CoinDesk Bitcoin Price Index (USD). Non-USD currency data converted using hourly conversion rate from openexchangerates.org","chartName":"Bitcoin","bpi":{"USD":{"code":"USD","symbol":"$","rate":"9,494.8652","description":"United States Dollar","rate_float":9494.8652},"GBP":{"code":"GBP","symbol":"£","rate":"7,558.3400","description":"British Pound Sterling","rate_float":7558.34},"EUR":{"code":"EUR","symbol":"€","rate":"8,500.6484","description":"Euro","rate_float":8500.6484}}}'
This is, however, not desirable because we want see the prices that we want but we have no way of easily and reliably extract these prices from the string.
We can, however, achieve this by telling requests that the response is in the JSON format:
json_res = res.json()
json_res
{'time': {'updated': 'Jun 3, 2020 02:14:00 UTC',
  'updatedISO': '2020-06-03T02:14:00+00:00',
  'updateduk': 'Jun 3, 2020 at 03:14 BST'},
 'disclaimer': 'This data was produced from the CoinDesk Bitcoin Price Index (USD). Non-USD currency data converted using hourly conversion rate from openexchangerates.org',
 'chartName': 'Bitcoin',
 'bpi': {'USD': {'code': 'USD',
   'symbol': '$',
   'rate': '9,494.8652',
   'description': 'United States Dollar',
   'rate_float': 9494.8652},
  'GBP': {'code': 'GBP',
   'symbol': '£',
   'rate': '7,558.3400',
   'description': 'British Pound Sterling',
   'rate_float': 7558.34},
  'EUR': {'code': 'EUR',
   'symbol': '€',
   'rate': '8,500.6484',
   'description': 'Euro',
   'rate_float': 8500.6484}}}
All that is left now is to extract the Bitcoin prices. This is now easy because res.json() returns a Python dictionary.
json_res['bpi']['EUR']
{'code': 'EUR',
 'symbol': '€',
 'rate': '8,500.6484',
 'description': 'Euro',
 'rate_float': 8500.6484}
json_res['bpi']['EUR']['rate']
'8,500.6484'
Task 2: write a function to retrieve historical Bitcoin prices
We can retrieve historical Bitcoin prices through the following API URL:
https://api.coindesk.com/v1/bpi/historical/close.json
Looking at https://www.coindesk.com/api/ tells us that we can pass the following parameters to this URL:
index-> to specify the indexcurrency-> to specify the currencystart-> to specify the start date of the intervalend-> to specify the end date of the interval
We are primarily interested in the start and end parameter.
As illustrated in the example, if we want to get the prices between 2013-09-01 and 2013-09-05 we would construct our URL as such:
https://api.coindesk.com/v1/bpi/historical/close.json?start=2013-09-01&end=2013-09-05
But how do we do this using Python?
Fortunately, the requests library makes it very easy to pass parameters to a URL as illustrated below.
For more info, see: http://docs.python-requests.org/en/master/user/quickstart/#passing-parameters-in-urls
API_endpoint = 'https://api.coindesk.com/v1/bpi/historical/close.json'
payload = {'start' : '2013-09-01', 'end' : '2013-09-05'}
res = requests.get(API_endpoint, params=payload)
We can print the resulting URL (for manual inspection for example) using res.url:
print(res.url)
https://api.coindesk.com/v1/bpi/historical/close.json?start=2013-09-01&end=2013-09-05
Again, the result is in the JSON format so we can easily process it:
bitcoin_2013 = res.json()
bitcoin_2013['bpi']
{'2013-09-01': 128.2597,
 '2013-09-02': 127.3648,
 '2013-09-03': 127.5915,
 '2013-09-04': 120.5738,
 '2013-09-05': 120.5333}
Wrap the above into a function
In the example above we hardcode the parameter values (the interval dates), if we want to change the dates we have to manually alter the string values. This is not very convenient, it is easier to wrap everything into a function:
API_endpoint = 'https://api.coindesk.com/v1/bpi/historical/close.json'

def get_bitcoin_prices(start_date, end_date, API_endpoint = API_endpoint):
    payload = {'start' : start_date, 'end' : end_date}
    res = requests.get(API_endpoint, params=payload)
    json_res = res.json()
    return json_res['bpi']
get_bitcoin_prices('2016-01-01', '2016-01-10')
{'2016-01-01': 434.463,
 '2016-01-02': 433.586,
 '2016-01-03': 430.361,
 '2016-01-04': 433.493,
 '2016-01-05': 432.253,
 '2016-01-06': 429.464,
 '2016-01-07': 458.28,
 '2016-01-08': 453.37,
 '2016-01-09': 449.143,
 '2016-01-10': 448.964}
In order to extract information from a regular webpage you first have to:
- Construct or retrieve the URL
- Retrieve page returned from URL and put it in memory (usually HTML)
From here you have a choice:
Treat the HTML source as text and use regular expression to extract the information.
Or
Process the HTML use the native HTML structure to extract information (Using
LXMLorRequests-HTML
I will discuss both methods below. However, I strongly recommend to go with the second option. HTML is machine readable by nature, which means that you are better off with parsing the HTML in 95% of the cases compared to trying to write complicated regular expressions.
Regular expressions
Python has a native package to deal with regular expressions, you can import it as such:
import re
Demonstration
Reminder: You usually only want to use regular expressions if you want to do something quick-and-dirty, using LXML is nearly always a better solution!
Let's say our goal is to get the number of abstract views for a particular paper on SSRN:
For example this one: https://papers.ssrn.com/sol3/papers.cfm?abstract_id=1968579
Step 1: download the source of the page
ssrn_url = r'https://papers.ssrn.com/sol3/papers.cfm?abstract_id=1968579'
page_source = requests.get(ssrn_url, headers={'User-Agent' : 'Mozilla/5.0 (Windows NT 10.0; Win64; x64) AppleWebKit/537.36 (KHTML, like Gecko) Chrome/83.0.4103.61 Safari/537.36'})
Note: Some websites will block any visits from a client without a user agent, this is why we add the user agent above.
Step 2: convert source to a string (i.e. text)
Note: by doing so we essentially ignore the inherent structure of an HTML file, we just treat it as a very large string.
source_text = page_source.text
Step 3: use a regular expression to extract the number of views
Using the Chrome browser we can, for example, right click on the number and select 'inspect' to bring up this screen:

Based on this we can construct a regular expression to capture the value that we want.
Note, we have to account for any spaces, tabs, and newlines otherwise the regular expression will not capture what we want, this can be very tricky.
Once we have identified the appropriate regular expression (it can help to use tools like www.pythex.org) we can use re.findall():
found_values = re.findall('Abstract Views</div>\r\n\t\t\t\t<div class="number" title="">(.*?)</div>', source_text)
found_values
[' 434,321']
After cleaning the value up a bit (remove spaces and remove comma) we can convert the value to an integral so that Python handles it as a number:
int(found_values[0].strip().replace(',', ''))
434321
As you can see, regular expression are rarely convenient for web scraping and if possible should be avoided!
Note: I will show both the higher-level Requests-HTML and the lower-level LXML
In the example above we treat a HTML page as plain-text and ignore the inherent format of HTML.
A better alternative is to utilize the inherent structure of HTML to extract the information that we need.
A quick refresher on HTML from 'automate the boring stuff':
In case it’s been a while since you’ve looked at any HTML, here’s a quick overview of the basics. An HTML file is a plaintext file with the .html file extension. The text in these files is surrounded by tags, which are words enclosed in angle brackets. The tags tell the browser how to format the web page. A starting tag and closing tag can enclose some text to form an element. The text (or inner HTML) is the content between the starting and closing tags. For example, the following HTML will display Hello world! in the browser, with Hello in bold:
<strong>Hello</strong> world!
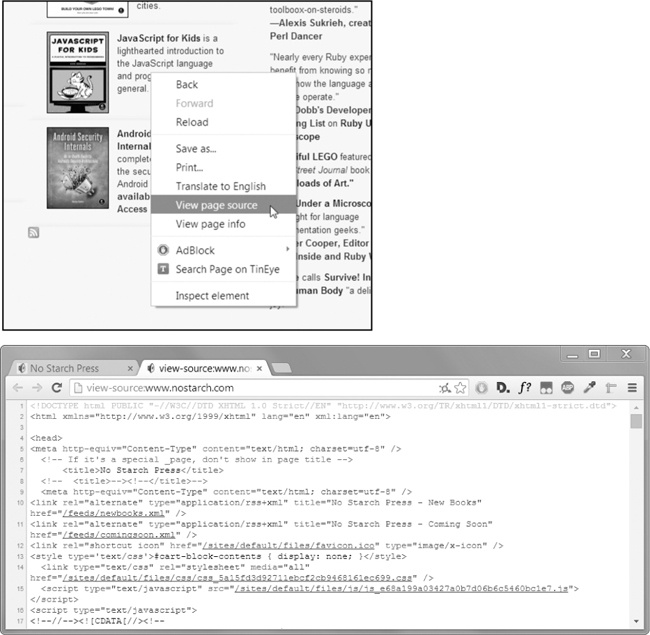
You can view the HTML source by right-clicking a page and selecting view page source:
Demonstration
Request-HTML
Requests-HTML is a convenient library that extends the functionality of requests by allowing HTML parsing.
You can find the documentation here: https://github.com/kennethreitz/requests-html)
LXML
LXML is a powerfull XML parser that is used as a parser by many packages. However, you can also use it directly in combination with the requests package.
You can find the documentation for LXML here: http://lxml.de/
Note: an alternative to LXML is Beautifulsoup but nowadays (in my experience) it is better to use LXML.
import requests_html
import lxml.html
Create a session object for requests_html:
session = requests_html.HTMLSession()
Example introduction
Let's say we want to extract information (title, description, speakers) about talks from the jupytercon conference.
We have identified that this information is available on this URL:
https://conferences.oreilly.com/jupyter/jup-ny/public/schedule/proceedings
NOTE: I would normally not recommend scraping these types of websites. However, JupyterCon is awesome so I my hope is that you encounter some interesting talks while looking through the proceedings! :)
Using Requests-HTML:
Part 1 + Part 2: Load the source from the URL + parse HTML
JC_URL = 'https://conferences.oreilly.com/jupyter/jup-ny/public/schedule/proceedings'
res = session.get(JC_URL)
print(type(res))
<class 'requests_html.HTMLResponse'>
Note: as the names implies requests-html combines requests with the HTML parser (so we don't need to use requests first)
Using Requests + LXML:
Part 1: Load the source from the URL
JC_URL = 'https://conferences.oreilly.com/jupyter/jup-ny/public/schedule/proceedings'
jc_source = requests.get(JC_URL)
Part 2: Process the result into an LXML object
tree = lxml.html.fromstring(jc_source.text)
The function lxml.html.fromstring(res.text) converts the raw HTML (i.e. the string representation) and converts it into an HtmlElement that we can structurally search:
type(tree)
lxml.html.HtmlElement
Part 3: extract the information from the HTML structure
The beauty of an HtmlElement is that we can use the structure of the HTML document to our advantage to extract specifics parts of the website.
There are two ways to go about this:
- Using a
css selector - Using an
XPath
I recommend to only use css selectors as they tend increasingly tend to be the superior option in near all cases.
What is a css selector?
CSS is a language that is used to define the style of an HTML document.
It does this by attaching some piece of styling (e.g. "make text bold") to a particular HTML object.
This attaching is achieved by defining patterns that select the appropriate HTML elements: these patterns are called CSS selectors.
To illustrate, let's say that we have this piece of HTML:
<html>
<body>

<h1>Python is great!</h1>

</body>
</html>
We can change the color of the title text to blue through this piece of CSS code:
h1 {
    color: Blue;
}
The h1 is the css selector and it essentially tells the browser that everything between <h1> </h1> should have color: Blue.
Now, the cool thing is that we can also use these css selectors to select the HTML elements that we want to extract!
Syntax of a css selector
Below are the most frequent ways to select a particular HTML element:
- Use a dot to select HTML elements based on the class:
.classname - Use a hash symbol (#) to select HTML elements based on the id:
#idname - Directly put the name of an element to select HTML elements based on the element:
p,span,h1
You can also chain multiple conditions together using >, +, and ~.
If we want to get all <p> elements with a <div> parent we can do div > p for example.
For a full overview I recommend checking this page:
https://www.w3schools.com/cssref/css_selectors.asp
A pragmatic way to generate the right css selector
If you are unfamiliar with programming websites then it might be hard to wrap your head around CSS selectors.
Fortunately, there are tools out there that can make it very easy to generate the css selector that you need!
*Option 1:*
If you want just one element you can use the build-in Chrome DevTools (Firefox has something similar).
You achieve this by right clicking on the element you want and then click "inspect", this should bring up the Dev console.
If you then right click on the element you want to extract, you can have DevTools generate a css selector:

This will result in the following css selector:
#en_proceedings > div:nth-child(1) > div.en_session_title > a
*Option 2:*
The above can be limiting if you want to select multiple elements.
An other option that makes this easier is to use an awesome Chrome extension called SelectorGadget.
You can install it here:
https://chrome.google.com/webstore/detail/selectorgadget/mhjhnkcfbdhnjickkkdbjoemdmbfginb
There is more information available here as well:
http://selectorgadget.com/
With this extension you can simply highlight what do / do not want to select and it will generate the css selector that you need. For example, if we want all the titles:

This yields the following css selector:
'.en_session_title a'
Note: The number between brackets after 'Clear' indicates the number of elements selected.
CSS Selectors with Requests-HTML:
Generate a list of all titles
title_elements = res.html.find('.en_session_title a')
len(title_elements)
48
Get text of first element:
title_elements[0].text
'Containerizing notebooks for serverless execution (sponsored by AWS)'
Note: if you are only interested in the first (or only) object you can add first=True to res.html.find() and it will only return one result
Get text of all elements:
[element.text for element in title_elements][:3]
['Containerizing notebooks for serverless execution (sponsored by AWS)',
 'Advanced data science, part 2: Five ways to handle missing data in Jupyter notebooks',
 'All the cool kids are doing it; maybe we should too? Jupyter, gravitational waves, and the LIGO and Virgo Scientific Collaborations']
Extract the hyperlink that leads to the talk page
Above we extract the text, but we can also add .attrs to access any attributes of the element:
title_elements[0].attrs
{'href': '/jupyter/jup-ny/public/schedule/detail/71980'}
As you can see, there is a href attribute with the url.
So we can create a list with both the text and the url:
talks = []
for element in title_elements:
    talks.append((element.text,
                  element.attrs['href']))
talks[:3]
[('Containerizing notebooks for serverless execution (sponsored by AWS)',
  '/jupyter/jup-ny/public/schedule/detail/71980'),
 ('Advanced data science, part 2: Five ways to handle missing data in Jupyter notebooks',
  '/jupyter/jup-ny/public/schedule/detail/68407'),
 ('All the cool kids are doing it; maybe we should too? Jupyter, gravitational waves, and the LIGO and Virgo Scientific Collaborations',
  '/jupyter/jup-ny/public/schedule/detail/71345')]
Extract the title, hyperlink, description, and authors for each talk
We can use the above approach and do also get a list of all the authors and the descriptions.
It, however, becomes a little bit tricky to combine everything given that one talk might have multiple authors.
To deal with this (common) problem it is best to loop over each talk element separately and only then extract the information for that talk, that way it is easy to keep everything linked to a specific talk.
If we look in the Chrome DevTools element viewer, we can observe that each talk is a separate <div> with the en_session class:

We first select all the divs with the en_session class that have a parent with en_proceedings as id:
talk_elements = res.html.find('#en_proceedings > .en_session')
talk_elements[:3]
[<Element 'div' class=('en_session', 'en_clearfix')>,
 <Element 'div' class=('en_session', 'en_clearfix')>,
 <Element 'div' class=('en_session', 'en_clearfix')>]
Now we can loop over each of these elements and extract the information we want:
talk_details = []
for talk in talk_elements:
    title = talk.find('.en_session_title a', first=True).text
    href = talk.find('.en_session_title a', first=True).attrs['href']
    description = talk.find('.en_session_description', first=True).text.strip()
    speakers = [speaker.text for speaker in talk.find('.speaker_names > a')]
    talk_details.append((title, href, description, speakers))
For the sake of the example, below a prettified inspection of the data we gathered:
for title, href, description, speakers in talk_details[:3]:
    print('The title is: ', title)
    print('Speakers: ', speakers, '\n')
    print('Description: \n', description, '\n')
    print('For details see: ', 'https://conferences.oreilly.com/' + href)
    print('-'*100, '\n')
The title is:  Containerizing notebooks for serverless execution (sponsored by AWS)
Speakers:  ['Kevin McCormick', 'Vladimir Zhukov']

Description:
 Kevin McCormick explains the story of two approaches which were used internally at AWS to accelerate new ML algorithm development, and easily package Jupyter notebooks for scheduled execution, by creating custom Jupyter kernels that automatically create Docker containers, and dispatch them to either a distributed training service or job execution environment.

For details see:  https://conferences.oreilly.com//jupyter/jup-ny/public/schedule/detail/71980
----------------------------------------------------------------------------------------------------

The title is:  Advanced data science, part 2: Five ways to handle missing data in Jupyter notebooks
Speakers:  ['Matt Brems']

Description:
 Missing data plagues nearly every data science problem. Often, people just drop or ignore missing data. However, this usually ends up with bad results. Matt Brems explains how bad dropping or ignoring missing data can be and teaches you how to handle missing data the right way by leveraging Jupyter notebooks to properly reweight or impute your data.

For details see:  https://conferences.oreilly.com//jupyter/jup-ny/public/schedule/detail/68407
----------------------------------------------------------------------------------------------------

The title is:  All the cool kids are doing it; maybe we should too? Jupyter, gravitational waves, and the LIGO and Virgo Scientific Collaborations
Speakers:  ['Will M Farr']

Description:
 Will Farr shares examples of Jupyter use within the LIGO and Virgo Scientific Collaborations and offers lessons about the (many) advantages and (few) disadvantages of Jupyter for large, global scientific collaborations. Along the way, Will speculates on Jupyter's future role in gravitational wave astronomy.

For details see:  https://conferences.oreilly.com//jupyter/jup-ny/public/schedule/detail/71345
----------------------------------------------------------------------------------------------------
CSS Selectors with LXML:
Note: In order to use css selectors with LXML you might have to install cssselect by running this in your command prompt:
pip install cssselect
Generate a list of all titles:
We can use the css selector that we generated earlier with the SelectorGadget extension:
title_elements = tree.cssselect('.en_session_title a')
len(title_elements)
48
If we select the first title element we see that it doesn't return the text:
title_elements[0]
<Element a at 0x1e034bf23b8>
In order to extract the text we have to add .text to the end:
title_elements[0].text
' Containerizing notebooks for serverless execution (sponsored by AWS)'
We can do this for all titles to get a list with all the title texts:
title_texts = [x.text for x in title_elements]
title_texts[:3]
[' Containerizing notebooks for serverless execution (sponsored by AWS)',
 'Advanced data science, part 2: Five ways to handle missing data in Jupyter notebooks',
 'All the cool kids are doing it; maybe we should too? Jupyter, gravitational waves, and the LIGO and Virgo Scientific Collaborations']
Extract the hyperlink that leads to the talk page
Above we extract the text, but we can also add .attrib to access any attributes of the element:
title_elements[0].attrib
{'href': '/jupyter/jup-ny/public/schedule/detail/71980'}
As you can see, there is a href attribute with the url.
So we can create a list with both the text and the url:
talks = []
for element in title_elements:
    talks.append((element.text,
                  element.attrib['href']))
talks[:3]
[(' Containerizing notebooks for serverless execution (sponsored by AWS)',
  '/jupyter/jup-ny/public/schedule/detail/71980'),
 ('Advanced data science, part 2: Five ways to handle missing data in Jupyter notebooks',
  '/jupyter/jup-ny/public/schedule/detail/68407'),
 ('All the cool kids are doing it; maybe we should too? Jupyter, gravitational waves, and the LIGO and Virgo Scientific Collaborations',
  '/jupyter/jup-ny/public/schedule/detail/71345')]
Extract the title, hyperlink, description, and authors for each talk
We can use the above approach and do also get a list of all the authors and the descriptions.
It, however, becomes a little bit tricky to combine everything given that one talk might have multiple authors.
To deal with this (common) problem it is best to loop over each talk element separately and only then extract the information for that talk, that way it is easy to keep everything linked to a specific talk.
If we look in the Chrome DevTools element viewer, we can observe that each talk is a separate <div> with the en_session class:
We first select all the divs with the en_session class that have a parent with en_proceedings as id:
talk_elements = tree.cssselect('#en_proceedings > .en_session')
talk_elements[:3]
[<Element div at 0x1e037dfbe58>,
 <Element div at 0x1e037dfbea8>,
 <Element div at 0x1e037de8db8>]
Now we can loop over each of these elements and extract the information we want:
talk_details = []
for talk in talk_elements:
    title = talk.cssselect('.en_session_title a')[0].text
    href = talk.cssselect('.en_session_title a')[0].attrib['href']
    description = talk.cssselect('.en_session_description')[0].text.strip()
    speakers = [speaker.text for speaker in talk.cssselect('.speaker_names > a')]
    talk_details.append((title, href, description, speakers))
For the sake of the example, below a prettified inspection of the data we gathered:
for title, href, description, speakers in talk_details[:3]:
    print('The title is: ', title)
    print('Speakers: ', speakers, '\n')
    print('Description: \n', description, '\n')
    print('For details see: ', 'https://conferences.oreilly.com/' + href)
    print('-'*100, '\n')
The title is:   Containerizing notebooks for serverless execution (sponsored by AWS)
Speakers:  ['Kevin McCormick', 'Vladimir Zhukov']

Description:
 Kevin McCormick explains the story of two approaches which were used internally at AWS to accelerate new ML algorithm development, and easily package Jupyter notebooks for scheduled execution, by creating custom Jupyter kernels that automatically create Docker containers, and dispatch them to either a distributed training service or job execution environment.

For details see:  https://conferences.oreilly.com//jupyter/jup-ny/public/schedule/detail/71980
----------------------------------------------------------------------------------------------------

The title is:  Advanced data science, part 2: Five ways to handle missing data in Jupyter notebooks
Speakers:  ['Matt Brems']

Description:
 Missing data plagues nearly every data science problem. Often, people just drop or ignore missing data. However, this usually ends up with bad results. Matt Brems explains how bad dropping or ignoring missing data can be and teaches you how to handle missing data the right way by leveraging Jupyter notebooks to properly reweight or impute your data.

For details see:  https://conferences.oreilly.com//jupyter/jup-ny/public/schedule/detail/68407
----------------------------------------------------------------------------------------------------

The title is:  All the cool kids are doing it; maybe we should too? Jupyter, gravitational waves, and the LIGO and Virgo Scientific Collaborations
Speakers:  ['Will M Farr']

Description:
 Will Farr shares examples of Jupyter use within the LIGO and Virgo Scientific Collaborations and offers lessons about the (many) advantages and (few) disadvantages of Jupyter for large, global scientific collaborations. Along the way, Will speculates on Jupyter's future role in gravitational wave astronomy.

For details see:  https://conferences.oreilly.com//jupyter/jup-ny/public/schedule/detail/71345
----------------------------------------------------------------------------------------------------
A lot of websites nowadays use Javascript elements that are difficult (or impossible) to crawl using requests.
In these scenarios we can use an alternative method where we have Python interact with a browser that is capable of handling Javascript elements.
There are essentially two ways to do this:
- Use a so-called
headless automated browsingpackage that runs in the background (you don't see the browser). - Use the
Selenium Webdriverto control a browser like Chrome (you do see the browser).
Headless automated browsing
The goal of headless browser automation is to interact with a browser that is in the background (i.e. has no user interface).
They essentially render a website the same way a normal browser would, but they are more lightweight due to not having to spend resources on the user interface.
There are many packages available: https://github.com/dhamaniasad/HeadlessBrowsers
The easiest solution is to use the requests-html package with r.html.render(), see here: requests-html: javascript support
Alternatives:
- Ghost.py (http://jeanphix.me/Ghost.py/)
- Dryscrape (https://dryscrape.readthedocs.io/en/latest/)
- Splinter (http://splinter.readthedocs.io/en/latest/index.html?highlight=headless)
Setting up headless browsers can be tricky and they can also be hard to debug (given that they run in the background)
Example using requests-html
Note: if you get an error you might have to run pyppeteer-install in your terminal to install Chromium .
import requests_html
asession = requests_html.AsyncHTMLSession()
URL = 'https://www.tiesdekok.com'
r = await asession.get(URL)
await r.html.arender()
for element in r.html.find('.ul-interests > li'):
    print(element.text)
Financial Accounting
Management Accounting
Computer Science
Data Engineering
Selenium
The Selenium WebDriver allows to control a browser, this essentially automates / simulates a normal user interacting with the browser.
One of the most common ways to use the Selenium WebDriver is through the Python language bindings.
Combining Selenium with Python makes it very easy to automate web browser interaction, allowing you to scrape essentially every webpage imaginable!
Note: if you can use requests + LXML then this is always preferred as it is much faster compared to using Selenium.
The package page for the Selenium Python bindings is here: https://pypi.python.org/pypi/selenium
If you run below it will install both selenium and the selenium Python bindings:
pip install selenium
You will also need to install a driver to interface with a browser of your preference, I personally use the ChromeDriver to interact with the Chrome browser:
https://sites.google.com/a/chromium.org/chromedriver/downloads
Quick demonstration
Set up selenium
import selenium, os
from selenium import webdriver
Often selenium cannot automatically find the ChromeDriver so it helps to find the location it is installed and point selenium to it.
In my case it is here:
CHROME = r"C:\chromedriver83.exe"
os.environ ["webdriver.chrome.driver" ] = CHROME
Start a selenium session
driver = webdriver.Chrome(CHROME)
After executing driver = webdriver.Chrome(CHROME) you should see a chrome window pop-up, this is the window that you can control with Python!
Load a page
Let's say we want to extract something from the Yahoo Finance page for Tesla (TSLA):
https://finance.yahoo.com/quote/TSLA/
Tesla_URL = r'https://finance.yahoo.com/quote/TSLA/'
driver.get(Tesla_URL)
If you open the Chrome window you should see that it now loaded the URL we gave it.
Navigate
You can select an element multiple ways (most frequent ones):
driver.find_element_by_name()
driver.find_element_by_id()
driver.find_element_by_class_name()
driver.find_element_by_css_selector()
driver.find_element_by_tag_name()
Let's say we want to extract some values from the "earnings" interactive figure on the right side:

This would be near-impossible using requests as it would simply not load the element, it only loads in an actual browser.
We could extract this data in two ways:
- Programming Selenium to mouse-over the element we want, and use CSS selectors to extract the values from the mouse-over window.
- Use the console to interact with the underlying Javascript data directly.
The second method is far more convenient than the first so I will demonstrate that:
Retrieve data from Javascript directly
We can use a neat trick to find out which Javascript variable holds a certain value that we are looking for:
https://stackoverflow.com/questions/26796873/find-which-variable-holds-a-value-using-chrome-devtools
After pasting the provided function into the dev console we can run globalSearch(App, '-1.82') in the Chrome Dev Console to get:
App.main.context.dispatcher.stores.QuoteSummaryStore.earnings.earningsChart.quarterly[3].estimate.fmt
This is all the information that we need to extract all the data points:
script = 'App.main.context.dispatcher.stores.QuoteSummaryStore.earnings.earningsChart.quarterly'
quarterly_values = driver.execute_script('return {}'.format(script))
Note: I add return in the beginning to get a JSON response.
quarterly_values
[{'actual': {'fmt': '-1.12', 'raw': -1.12},
  'date': '2Q2019',
  'estimate': {'fmt': '-0.36', 'raw': -0.36}},
 {'actual': {'fmt': '1.86', 'raw': 1.86},
  'date': '3Q2019',
  'estimate': {'fmt': '-0.42', 'raw': -0.42}},
 {'actual': {'fmt': '2.06', 'raw': 2.06},
  'date': '4Q2019',
  'estimate': {'fmt': '1.72', 'raw': 1.72}},
 {'actual': {'fmt': '1.14', 'raw': 1.14},
  'date': '1Q2020',
  'estimate': {'fmt': '-0.25', 'raw': -0.25}}]
Using driver.execute_script() is essentially the programmatical way of executing it in the dev console:

If you are not familiar with Javascript and programming for the web then this might be very hard to wrap you head around, but if you are serious about web-scraping these kinds of tricks can save you days of work.
Close driver
driver.close()
Web crawling with Scrapy
In the examples above we always provide the URL directly.
We could program a loop (with any of the above methods) that takes a URL from the page and then goes to that page and extracts another URL, etc.
This tends to get confusing pretty fast, if you really want to create a crawler you might be better of to look into the scrapy package.
Scrapy allows you to create a spider that basically 'walks' through webpages and crawls the information.
In my experience you don't need this for 95% of our use-cases, but feel free to try it out: http://scrapy.org/