Product Recommendation with Feathr on Azure
This notebook demonstrates how Feathr Feature Store can simplify and empower your model training and inference. You will learn:
- Define sharable features using Feathr API
- Register features with register API.
- Create a training dataset via point-in-time feature join with Feathr API
- Materialize features to online store and then retrieve them with Feathr API
In this tutorial, we use Feathr to create a model that predicts users' product rating.
1. Prerequisite: Use Azure Resource Manager(ARM) to Provision Azure Resources
First step is to provision required cloud resources if you want to use Feathr. Feathr provides a python based client to interact with cloud resources.
Please follow the steps here to provision required cloud resources. This will create a new resource group and deploy the needed Azure resources in it.
If you already have an existing resource group and only want to install few resources manually you can refer to the cli documentation here. It provides CLI commands to install the needed resources. Please Note: CLI documentation is for advance users since there are lot of configurations and role assignment that would have to be done manually so it won't work out of box and should just be used for reference. ARM template is the preferred way to deploy.
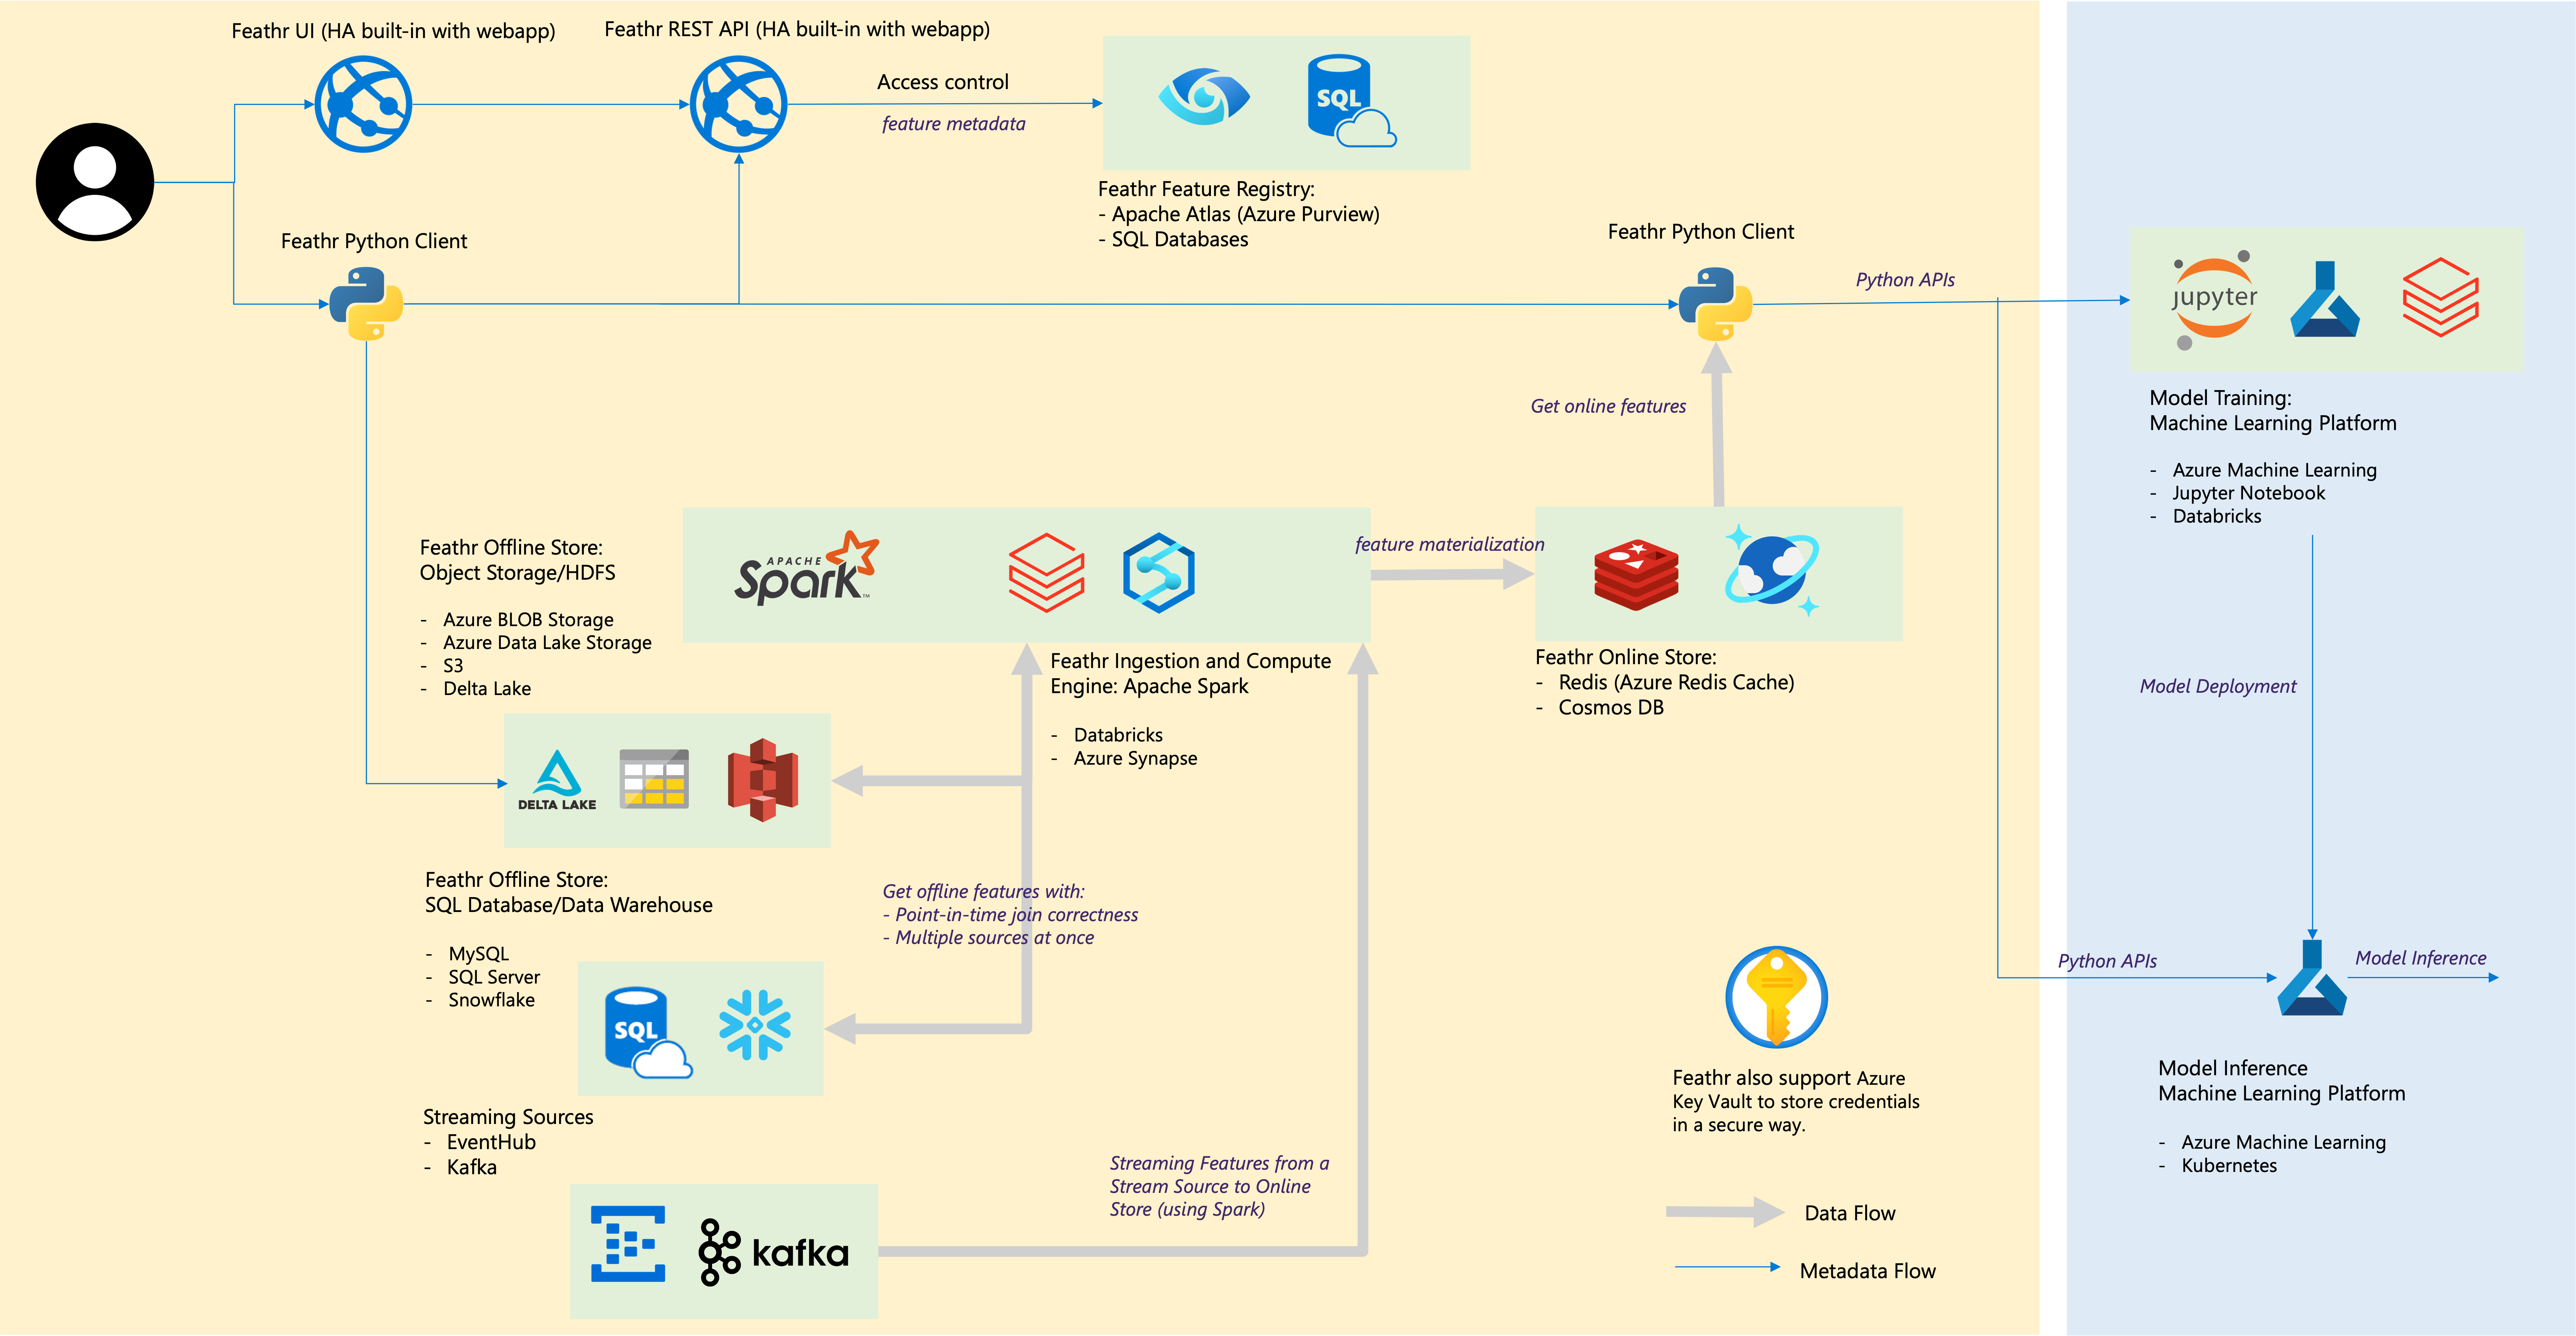
The below architecture diagram represents how different resources interact with each other
2. Prerequisite: Install Feathr and it's dependencies and Login to Azure
Install Feathr and dependencies to run this notebook. Normally you could run all the pip installs in one line, but when running this notebook in synapse, you may get some errors or blocks installing above packages in one cell. Hence installing them in different cells.
%pip install -U feathr
%pip install -U azure-cli
%pip install -U pandavro
%pip install -U scikit-learn
Login to Azure with a device code (You will see instructions in the output once you execute the cell):
! az login --use-device-code
Import Dependencies to make sure everything is installed correctly
import glob
import os
import tempfile
from datetime import datetime, timedelta
from math import sqrt

import pandas as pd
import pandavro as pdx
from feathr import FeathrClient
from feathr import BOOLEAN, FLOAT, INT32, ValueType
from feathr import Feature, DerivedFeature, FeatureAnchor
from feathr import BackfillTime, MaterializationSettings
from feathr import FeatureQuery, ObservationSettings
from feathr import RedisSink
from feathr import INPUT_CONTEXT, HdfsSource
from feathr import WindowAggTransformation
from feathr import TypedKey
from sklearn.metrics import mean_squared_error
from sklearn.model_selection import train_test_split
from azure.identity import AzureCliCredential
from azure.keyvault.secrets import SecretClient
If you meet errors like 'cannot import FeatherClient from feathr', it may be caused by incompatible version of 'aiohttp'. Please try to install/upgrade it by running: '%pip install aiohttp==3.8.3'
3. Prerequisite: Set the required permissions
Before you proceed further, you would need additional permissions: permission to access the keyvault, permission to access the Storage Blob as a Contributor and permission to submit jobs to Synapse cluster. Run the following lines of command in the Cloud Shell before running the cells below. Please replace the resource_prefix with the prefix you used in ARM template deployment.
    resource_prefix="YOUR_RESOURCE_PREFIX"
    synapse_workspace_name="${resource_prefix}syws"
    keyvault_name="${resource_prefix}kv"
    objectId=$(az ad signed-in-user show --query id -o tsv)
    az keyvault update --name $keyvault_name --enable-rbac-authorization false
    az keyvault set-policy -n $keyvault_name --secret-permissions get list --object-id $objectId
    az role assignment create --assignee $userId --role "Storage Blob Data Contributor"
    az synapse role assignment create --workspace-name $synapse_workspace_name --role "Synapse Contributor" --assignee $userId
If you run into issues where Key vault or other resources are not found through notebook despite being there, make sure you are connected to the right subscription by running the command: 'az account show' and 'az account set --subscription <subscription_id>'
4. Prerequisite: Feathr Configuration
Setting the environment variables
Set the environment variables that will be used by Feathr as configuration. Feathr supports configuration via enviroment variables and yaml, you can read more about it here.
Fill in the resource_prefix that you used while provisioning the resources in Step 1 using ARM.
RESOURCE_PREFIX = "YOUR_RESOURCE_PREFIX" # from ARM deployment in Step 1
FEATHR_PROJECT_NAME="YOUR_PROJECT_NAME" # provide a unique name
# Get name for deployed resources using the resource prefix
KEY_VAULT_NAME=f"{RESOURCE_PREFIX}kv"
SYNAPSE_WORKSPACE_NAME=f"{RESOURCE_PREFIX}syws"
ADLS_ACCOUNT=f"{RESOURCE_PREFIX}dls"
ADLS_FS_NAME=f"{RESOURCE_PREFIX}fs"
KEY_VAULT_URI = f"https://{KEY_VAULT_NAME}.vault.azure.net"
FEATHR_API_APP = f"{RESOURCE_PREFIX}webapp"


# Getting the credential object for Key Vault client
credential = AzureCliCredential()
client = SecretClient(vault_url=KEY_VAULT_URI, credential=credential)

# Getting Redis store's connection string.
retrieved_secret = client.get_secret("FEATHR-ONLINE-STORE-CONN").value

# Parse Redis connection string
REDIS_PORT=retrieved_secret.split(',')[0].split(":")[1]
REDIS_HOST=retrieved_secret.split(',')[0].split(":")[0]
REDIS_PASSWORD=retrieved_secret.split(',')[1].split("password=",1)[1]
REDIS_SSL=retrieved_secret.split(',')[2].split("ssl=",1)[1]
# Set password as environment variable.
os.environ['REDIS_PASSWORD']=REDIS_PASSWORD
Write the configuration as yaml file.
The code below will write this configuration string to a temporary location and load it to Feathr. Please refer to feathr_config.yaml for full list of configuration options and details about them.
import tempfile
yaml_config = f"""
api_version: 1
project_config:
  project_name: '{FEATHR_PROJECT_NAME}'
offline_store:
# Please set 'enabled' flags as true (false by default) if any of items under the same paths are expected to be visited
  adls:
    adls_enabled: true
  wasb:
    wasb_enabled: true
spark_config:
  spark_cluster: 'azure_synapse'
  spark_result_output_parts: '1'
  azure_synapse:
    dev_url: 'https://{SYNAPSE_WORKSPACE_NAME}.dev.azuresynapse.net'
    pool_name: 'spark31'
    workspace_dir: 'abfss://{ADLS_FS_NAME}@{ADLS_ACCOUNT}.dfs.core.windows.net/feathr_project'
    executor_size: 'Small'
    executor_num: 1
online_store:
  redis:
    host: '{REDIS_HOST}'
    port: {REDIS_PORT}
    ssl_enabled: {REDIS_SSL}
feature_registry:
  api_endpoint: 'https://{FEATHR_API_APP}.azurewebsites.net/api/v1'
"""

tmp = tempfile.NamedTemporaryFile(mode='w', delete=False)
with open(tmp.name, "w") as text_file:
    text_file.write(yaml_config)
feathr_output_path = f'abfss://{ADLS_FS_NAME}@{ADLS_ACCOUNT}.dfs.core.windows.net/feathr_output'
Define sharable features using Feathr API
In this tutorial, we use Feathr Feature Store and create a model that predicts users' product rating. To make it simple, let's just predict users' rating for ONE product for an e-commerce website. (We have an advanced demo that predicts ratings for arbitrary products.)
Initialize Feathr Client
Let's initialize a Feathr client first. The Feathr client provides all the APIs we need to interact with Feathr Feature Store.
feathr_client = FeathrClient(config_path=tmp.name, credential=credential)
Understand the Raw Datasets
We have 3 raw datasets to work with: one observation dataset(a.k.a. label dataset) and two raw datasets to generate features.
# Observation dataset(a.k.a. label dataset)
# Observation dataset usually comes with a event_timestamp to denote when the observation happened.
# The label here is product_rating. Our model objective is to predict a user's rating for this product.
import pandas as pd
# Public URL hosting mock data
pd.read_csv("https://azurefeathrstorage.blob.core.windows.net/public/sample_data/product_recommendation_sample/user_observation_mock_data.csv")
# User profile dataset
# Used to generate user features
import pandas as pd
pd.read_csv("https://azurefeathrstorage.blob.core.windows.net/public/sample_data/product_recommendation_sample/user_profile_mock_data.csv")
# User purchase history dataset.
# Used to generate user features. This is activity type data, so we need to use aggregation to genearte features.
import pandas as pd
pd.read_csv("https://azurefeathrstorage.blob.core.windows.net/public/sample_data/product_recommendation_sample/user_purchase_history_mock_data.csv")
After a bit of data exploration, we want to create a training dataset like this:

What's a Feature in Feathr
A feature is an individual measurable property or characteristic of a phenomenon which is sometimes time-sensitive.
In Feathr, feature can be defined by the following characteristics:
- The typed key (a.k.a. entity id): identifies the subject of feature, e.g. a user id of 123, a product id of SKU234456.
- The feature name: the unique identifier of the feature, e.g. user_age, total_spending_in_30_days.
- The feature value: the actual value of that aspect at a particular time, e.g. the feature value of the person's age is 30 at year 2022.
You can feel that this is defined from a feature consumer(a person who wants to use a feature) perspective. It only tells us what a feature is like. In later sections, you can see how a feature consumer can access the features in a very simple way.
To define a feature as well as how it can be produced, additionally we need:
- Feature source: what source data that this feature is based on
- Transformation: what transformation is used to transform the source data into feature. Transformation can be optional when you just want to take a column out from the source data.
(For more details on feature definition, please refer to the Feathr Feature Definition Guide)
Define Sources Section with Preprocssing
A feature source defines where to find the source data and how to use the source data for the upcoming feature transformation. There are different types of feature sources that you can use. HdfsSource is the most commonly used one that can connect you to data lake, Snowflake database tables etc. It's simliar to database connector.
To define HdfsSource, we need:
name: It's used for you to recognize it. It has to be unique among all other feature source. Here we useuserProfileData.path: It points to the location that we can find the source data.preprocessing(optional): If you want some preprocessing other than provided transformation, you can do it here. This preprocessing will be applied all the transformations of this source.event_timestamp_column(optioanl): there areevent_timestamp_columnandtimestamp_formatused for point-in-time join and we will cover them later.
See the python API documentation to get the details of each input fields.
from pyspark.sql import SparkSession, DataFrame
def feathr_udf_preprocessing(df: DataFrame) -> DataFrame:
    from pyspark.sql.functions import col
    df = df.withColumn("tax_rate_decimal", col("tax_rate")/100)
    df.show(10)
    return df

batch_source = HdfsSource(name="userProfileData",
                          path="wasbs://public@azurefeathrstorage.blob.core.windows.net/sample_data/product_recommendation_sample/user_profile_mock_data.csv",
                          preprocessing=feathr_udf_preprocessing)
Define Features on Top of Data Sources
To define features on top of the HdfsSource, we need to:
- specify the key of this feature: feature are like other data, they are keyed by some id. For example, user_id, product_id. You can also define compound keys.
- specify the name of the feature via
nameparameter and how to transform it from source data viatransformparameter. Also some other metadata, likefeature_type. - group them together so we know it's from one
HdfsSourceviaFeatureAnchor. Also give it a unique name vianameparameter so we can recognize it.
It's called FeatureAnchor since it's like this group of features are anchored to the source. There are other types of features that are computed on top of other features(a.k.a. derived feature which we will cover in next section)
user_id = TypedKey(key_column="user_id",
                   key_column_type=ValueType.INT32,
                   description="user id",
                   full_name="product_recommendation.user_id")

feature_user_age = Feature(name="feature_user_age",
                           key=user_id,
                           feature_type=INT32,
                           transform="age")
feature_user_tax_rate = Feature(name="feature_user_tax_rate",
                                key=user_id,
                                feature_type=FLOAT,
                                transform="tax_rate_decimal")
feature_user_gift_card_balance = Feature(name="feature_user_gift_card_balance",
                                    key=user_id,
                                    feature_type=FLOAT,
                                    transform="gift_card_balance")
feature_user_has_valid_credit_card = Feature(name="feature_user_has_valid_credit_card",
                                    key=user_id,
                                    feature_type=BOOLEAN,
                                    transform="number_of_credit_cards > 0")

features = [
    feature_user_age,
    feature_user_tax_rate,
    feature_user_gift_card_balance,
    feature_user_has_valid_credit_card
]

request_anchor = FeatureAnchor(name="anchored_features",
                               source=batch_source,
                               features=features)
Window aggregation features
Using window aggregations can help us create more powerful features. A window aggregation feature compresses large amount of information into one single feature value. Using our raw data as an example, we have the user's purchase history data that might be quite some rows, we want to create a window aggregation feature that represents their last 90 days of average purchase amount.
To create this window aggregation feature via Feathr, we just need to define the following parameters with WindowAggTransformation API:
agg_expr: the field/column you want to aggregate. It can be a ANSI SQL expression. So we just writecast_float(purchase_amount)(the raw data might be in string form, let's cast_float).agg_func: the aggregation function you want. We want to useAVGhere.window: the aggregation window size you want. Let's use90d. You can tune your windows to create different window aggregation features.
For window aggregation functions, see the supported fields below:
| Aggregation Type | Input Type | Description |
|---|---|---|
| SUM, COUNT, MAX, MIN, AVG | Numeric | Applies the the numerical operation on the numeric inputs. |
| MAX_POOLING, MIN_POOLING, AVG_POOLING | Numeric Vector | Applies the max/min/avg operation on a per entry bassis for a given a collection of numbers. |
| LATEST | Any | Returns the latest not-null values from within the defined time window |
(Note that the agg_func should be any of these.)
After you have defined features and sources, bring them together to build an anchor:
purchase_history_data = HdfsSource(name="purchase_history_data",
                          path="wasbs://public@azurefeathrstorage.blob.core.windows.net/sample_data/product_recommendation_sample/user_purchase_history_mock_data.csv",
                          event_timestamp_column="purchase_date",
                          timestamp_format="yyyy-MM-dd")

agg_features = [Feature(name="feature_user_total_purchase_in_90days",
                        key=user_id,
                        feature_type=FLOAT,
                        transform=WindowAggTransformation(agg_expr="cast_float(purchase_amount)",
                                                          agg_func="AVG",
                                                          window="90d"))
                ]

agg_anchor = FeatureAnchor(name="aggregationFeatures",
                           source=purchase_history_data,
                           features=agg_features)
Derived Features Section
Derived features are features that are computed from other Feathr features. They could be computed from anchored features, or other derived features.
Typical usage includes feature cross(f1 * f2), or computing cosine similarity between two features. The syntax works in a similar way.
feature_user_purchasing_power = DerivedFeature(name="feature_user_purchasing_power",
                                      key=user_id,
                                      feature_type=FLOAT,
                                      input_features=[feature_user_gift_card_balance, feature_user_has_valid_credit_card],
                                      transform="feature_user_gift_card_balance + if(boolean(feature_user_has_valid_credit_card), 100, 0)")
Build Features
Lastly, we need to build these features so that they can be consumed later. Note that we have to build both the "anchor" and the "derived" features.
feathr_client.build_features(anchor_list=[agg_anchor, request_anchor],
                      derived_feature_list=[feature_user_purchasing_power])
Optional: A Special Type of Feature: Request Feature
Sometimes features defined on top of request data(a.k.a. observation data) may have no entity key or timestamp. It is merely a function/transformation executing against request data at runtime.
For example, the day of the week of the request, which is calculated by converting the request UNIX timestamp. In this case, the source section should be INPUT_CONTEXT to indicate the source of those defined anchors.
We won't cover the details of it in this notebook.
Create training data using point-in-time correct feature join
A training dataset usually contains entity id column(s), multiple feature columns, event timestamp column and label/target column.
To create a training dataset using Feathr, we need to provide a feature join settings to specify what features and how these features should be joined to the observation data.
(To learn more on this topic, please refer to Point-in-time Correctness).
output_path = feathr_output_path
# Features that we want to request
feature_query = FeatureQuery(feature_list=["feature_user_age",
                                           "feature_user_tax_rate",
                                           "feature_user_gift_card_balance",
                                           "feature_user_has_valid_credit_card",
                                           "feature_user_total_purchase_in_90days",
                                           "feature_user_purchasing_power"],
                             key=user_id)
settings = ObservationSettings(
    observation_path="wasbs://public@azurefeathrstorage.blob.core.windows.net/sample_data/product_recommendation_sample/user_observation_mock_data.csv",
    event_timestamp_column="event_timestamp",
    timestamp_format="yyyy-MM-dd")
feathr_client.get_offline_features(observation_settings=settings,
                            feature_query=feature_query,
                            output_path=output_path)
feathr_client.wait_job_to_finish(timeout_sec=500)
Download the result and show the result
Let's use the helper function get_result_df to download the result and view it:
def get_result_df(client: FeathrClient) -> pd.DataFrame:
    """Download the job result dataset from cloud as a Pandas dataframe."""
    res_url = client.get_job_result_uri(block=True, timeout_sec=600)
    tmp_dir = tempfile.TemporaryDirectory()
    client.feathr_spark_launcher.download_result(result_path=res_url, local_folder=tmp_dir.name)
    dataframe_list = []
    # assuming the result are in avro format
    for file in glob.glob(os.path.join(tmp_dir.name, '*.avro')):
        dataframe_list.append(pdx.read_avro(file))
    vertical_concat_df = pd.concat(dataframe_list, axis=0)
    tmp_dir.cleanup()
    return vertical_concat_df

df_res = get_result_df(feathr_client)

df_res
Train a machine learning model
After getting all the features, let's train a machine learning model with the converted feature by Feathr:
# drop non-feature columns
from sklearn.ensemble import GradientBoostingRegressor
final_df = df_res
final_df.drop(["event_timestamp"], axis=1, inplace=True, errors='ignore')
final_df.fillna(0, inplace=True)
final_df['product_rating'] = final_df['product_rating'].astype("float64")

train_x, test_x, train_y, test_y = train_test_split(final_df.drop(["product_rating"], axis=1),
                                                    final_df["product_rating"],
                                                    test_size=0.2,
                                                    random_state=42)
model = GradientBoostingRegressor()
model.fit(train_x, train_y)

y_predict = model.predict(test_x)

y_actual = test_y.values.flatten().tolist()
rmse = sqrt(mean_squared_error(y_actual, y_predict))

sum_actuals = sum_errors = 0

for actual_val, predict_val in zip(y_actual, y_predict):
    abs_error = actual_val - predict_val
    if abs_error < 0:
        abs_error = abs_error * -1

    sum_errors = sum_errors + abs_error
    sum_actuals = sum_actuals + actual_val

mean_abs_percent_error = sum_errors / sum_actuals
print("Model MAPE:")
print(mean_abs_percent_error)
print()
print("Model Accuracy:")
print(1 - mean_abs_percent_error)
Materialize feature value into offline/online storage
In the previous section, we demonstrated how Feathr can compute feature value to generate training dataset from feature definition on-they-fly.
Now let's talk about how we can use the trained models. We can use the trained models for both online and offline inference. In both cases, we need features to be fed into the models. For offline inference, you can compute and get the features on-demand; or you can store the computed features to some offline database for later offline inference.
For online inference, we can use Feathr to compute and store the features in the online database. Then use it for online inference when the request comes.

In this section, we will focus on materialize features to online store. For materialization to offline store, you can check out our user guide.
We can push the computed features to the online store(Redis) like below:
backfill_time = BackfillTime(start=datetime(2020, 5, 20),
                             end=datetime(2020, 5, 20),
                             step=timedelta(days=1))
redisSink = RedisSink(table_name="productRecommendationDemoFeature")
settings = MaterializationSettings(name="productRecommendationFeatureSetting",
                                   backfill_time=backfill_time,
                                   sinks=[redisSink],
                                   feature_names=["feature_user_age", "feature_user_gift_card_balance"])

feathr_client.materialize_features(settings, allow_materialize_non_agg_feature =True)
feathr_client.wait_job_to_finish(timeout_sec=500)
Fetch feature value from online store
We can then get the features from the online store (Redis) via the client's get_online_features or multi_get_online_features API.
feathr_client.get_online_features('productRecommendationDemoFeature',
                           '2',
                           ['feature_user_age', 'feature_user_gift_card_balance'])
feathr_client.multi_get_online_features('productRecommendationDemoFeature',
                                 ['1', '2'],
                                 ['feature_user_age', 'feature_user_gift_card_balance'])
Registering and Fetching features
We can also register the features and share them across teams:
feathr_client.register_features()
feathr_client.list_registered_features(project_name=f"{FEATHR_PROJECT_NAME}")
Summary
In this notebook you learnt how to set up Feathr and use it to create features, register features and use those features for model training and inferencing.
We hope this example gave you a good sense of Feathr's capabilities and how you could leverage it within your organization's MLOps workflow.