Product Recommendation with Feathr on Azure
This notebook demonstrates how Feathr Feature Store can simplify and empower your model training and inference using Azure Synapse. With this notebook, you will learn the followings:
- Define sharable features using Feathr API
- Register features with register API
- Create a training dataset via point-in-time feature join with Feathr API
- Materialize features to online store and then retrieve them with Feathr API
In this tutorial, we use Feathr Feature Store to create a model that predicts users' product ratings for an e-commerce website. The main purpose of this notebook is to demonstrate the capabilities running on Azure Synapse and thus we simplified the problem to just predict the ratings for a single product. An advanced example can be found here.
1. Prerequisites
Use Azure Resource Manager (ARM) to Provision Azure Resources for Feathr
First step is to provision required cloud resources if you want to use Feathr. Feathr provides a python based client to interact with cloud resources. Please follow the steps here to provision required cloud resources. This will create a new resource group and deploy the needed Azure resources in it.
If you already have an existing resource group and only want to install few resources manually you can refer to the cli documentation here. It provides CLI commands to install the needed resources.
Please Note: CLI documentation is for advance users since there are lot of configurations and role assignment that would have to be done manually. Therefore, ARM template is the preferred way to deploy.
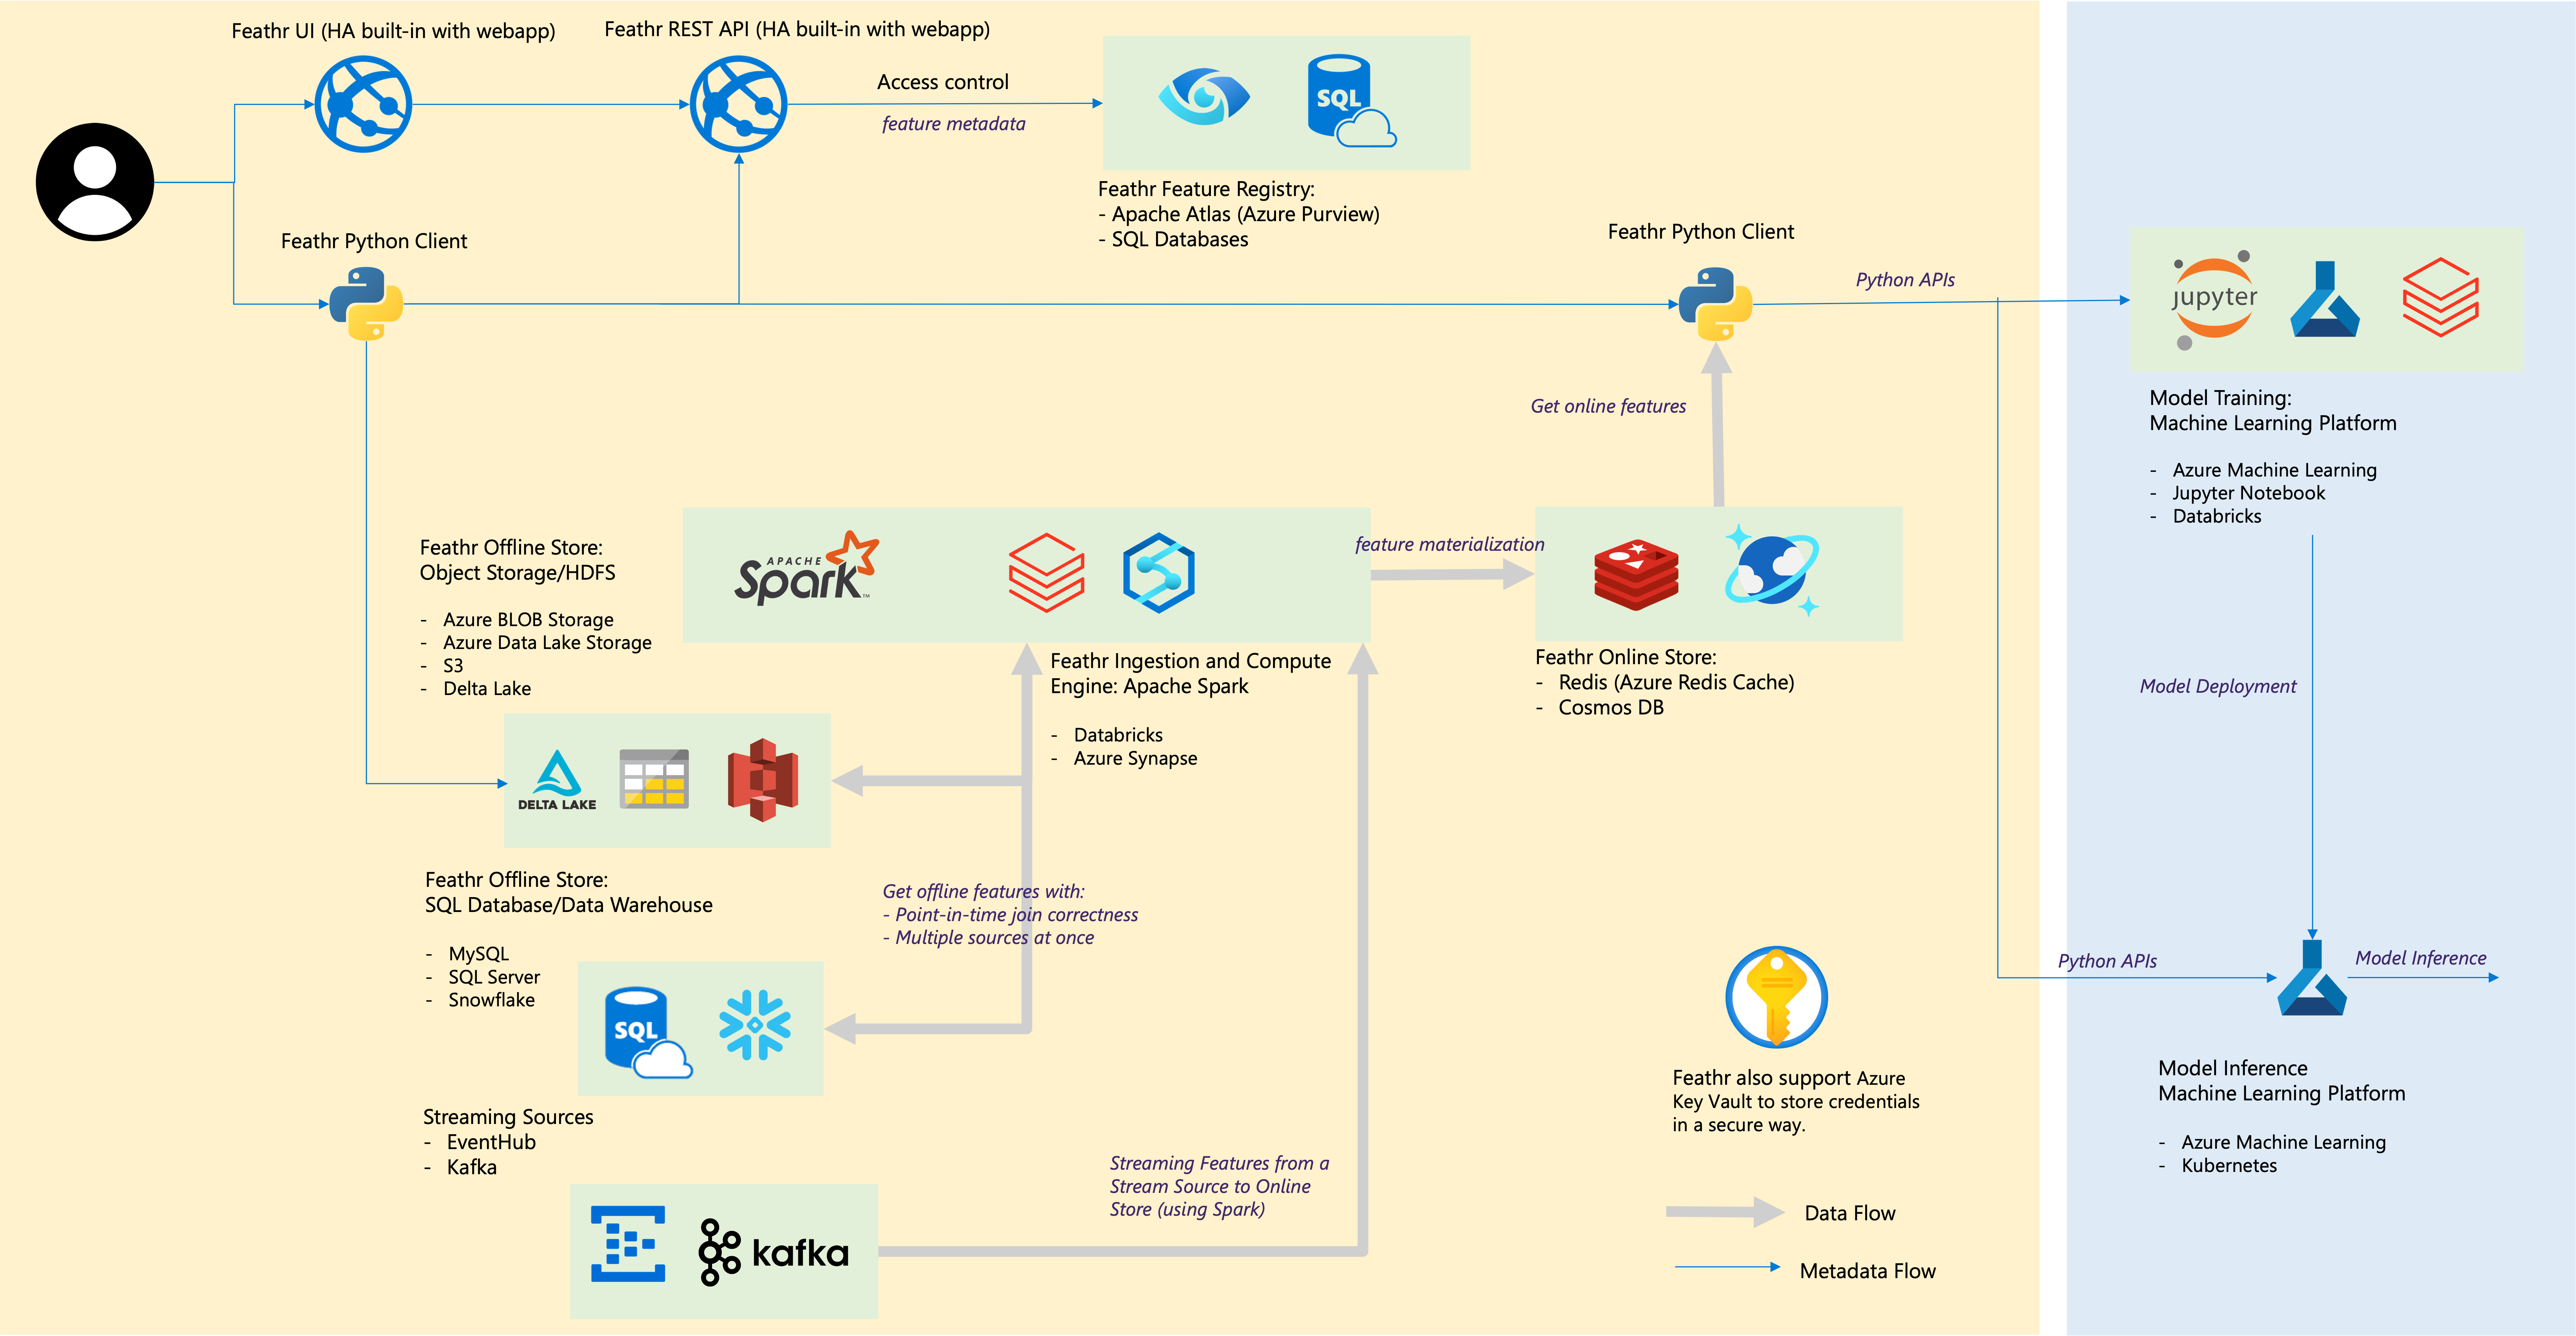
The below architecture diagram represents how different resources interact with each other.
Set the required permissions
Before you proceed further, you would need additional permissions to:
- Access the keyvault,
- Access the Storage Blob as a Contributor, and
- Submit jobs to Synapse cluster.
Run the following commands in the Cloud Shell before moving forward. Please replace YOUR_RESOURCE_PREFIX with the value you used in ARM template deployment.
    resource_prefix="YOUR_RESOURCE_PREFIX"
    synapse_workspace_name="${resource_prefix}syws"
    keyvault_name="${resource_prefix}kv"
    objectId=$(az ad signed-in-user show --query id -o tsv)
    az keyvault update --name $keyvault_name --enable-rbac-authorization false
    az keyvault set-policy -n $keyvault_name --secret-permissions get list --object-id $objectId
    az role assignment create --assignee $objectId --role "Storage Blob Data Contributor"
    az synapse role assignment create --workspace-name $synapse_workspace_name --role "Synapse Contributor" --assignee $objectId
Install Feathr python package and it's dependencies
Here, we install the package from the repository's main branch. To use the latest release, you may run pip install feathr[notebook] instead. If so, however, some of the new features in this notebook might not work.
%pip install "git+https://github.com/feathr-ai/feathr.git#subdirectory=feathr_project&egg=feathr[notebook]"
2. Config Feathr Client
import glob
import os
import tempfile
from datetime import datetime, timedelta
from math import sqrt

from azure.identity import AzureCliCredential

import pandas as pd
from pyspark.sql import DataFrame

import feathr
from feathr import (
    FeathrClient,
    BOOLEAN, FLOAT, INT32, ValueType,
    Feature, DerivedFeature, FeatureAnchor,
    BackfillTime, MaterializationSettings,
    FeatureQuery, ObservationSettings,
    RedisSink,
    INPUT_CONTEXT, HdfsSource,
    WindowAggTransformation,
    TypedKey,
)
from feathr.datasets.constants import (
    PRODUCT_RECOMMENDATION_USER_OBSERVATION_URL,
    PRODUCT_RECOMMENDATION_USER_PROFILE_URL,
    PRODUCT_RECOMMENDATION_USER_PURCHASE_HISTORY_URL,
)
from feathr.datasets.utils import maybe_download
from feathr.utils.config import generate_config
from feathr.utils.job_utils import get_result_df


print(f"Feathr version: {feathr.__version__}")
# TODO fill the following values
RESOURCE_PREFIX = None           # The prefix value used at the ARM deployment step
AZURE_SYNAPSE_SPARK_POOL = None  # Set Azure Synapse Spark pool name
ADLS_KEY = None                  # Set Azure Data Lake Storage key to use Azure Synapse

PROJECT_NAME = "product_recommendation_synapse_demo"
SPARK_CLUSTER = "azure_synapse"

# TODO if you deployed resources manually using different names, you'll need to change the following values accordingly:
ADLS_ACCOUNT = f"{RESOURCE_PREFIX}dls"
ADLS_FS_NAME = f"{RESOURCE_PREFIX}fs"
AZURE_SYNAPSE_URL = f"https://{RESOURCE_PREFIX}syws.dev.azuresynapse.net"  # Set Azure Synapse workspace url to use Azure Synapse
KEY_VAULT_URI = f"https://{RESOURCE_PREFIX}kv.vault.azure.net"
REDIS_HOST = f"{RESOURCE_PREFIX}redis.redis.cache.windows.net"
REGISTRY_ENDPOINT = f"https://{RESOURCE_PREFIX}webapp.azurewebsites.net/api/v1"
AZURE_SYNAPSE_WORKING_DIR = f"abfss://{ADLS_FS_NAME}@{ADLS_ACCOUNT}.dfs.core.windows.net/{PROJECT_NAME}"
Get Azure CLI credential to access Azure resources
Login to Azure with a device code (You will see instructions in the output once you execute the cell):
!az login --use-device-code
credential = AzureCliCredential(additionally_allowed_tenants=['*'])
if "ADLS_KEY" not in os.environ and ADLS_KEY:
    os.environ["ADLS_KEY"] = ADLS_KEY
if "REDIS_PASSWORD" not in os.environ:
    from azure.keyvault.secrets import SecretClient

    secret_client = SecretClient(vault_url=KEY_VAULT_URI, credential=credential)
    retrieved_secret = secret_client.get_secret('FEATHR-ONLINE-STORE-CONN').value
    os.environ['REDIS_PASSWORD'] = retrieved_secret.split(",")[1].split("password=", 1)[1]
If you run into issues where Key vault or other resources are not found through notebook despite being there, make sure you are connected to the right subscription by running the command: 'az account show' and 'az account set --subscription <subscription_id>'
Generate the Feathr client configuration
The code below will write the onfiguration to a temporary location that will be used by a Feathr client. Please refer to feathr_config.yaml for full list of configuration options and details.
config_path = generate_config(
    resource_prefix=RESOURCE_PREFIX,
    project_name=PROJECT_NAME,
    online_store__redis__host=REDIS_HOST,
    feature_registry__api_endpoint=REGISTRY_ENDPOINT,
    spark_config__spark_cluster=SPARK_CLUSTER,
    spark_config__azure_synapse__dev_url=AZURE_SYNAPSE_URL,
    spark_config__azure_synapse__pool_name=AZURE_SYNAPSE_SPARK_POOL,
    spark_config__azure_synapse__workspace_dir=AZURE_SYNAPSE_WORKING_DIR,
)

with open(config_path, 'r') as f:
    print(f.read())
Initialize Feathr Client
client = FeathrClient(config_path=config_path, credential=credential)
# Upload datasets into ADLS so that Syanpse job can access them
user_observation_source_path = client.feathr_spark_launcher.upload_or_get_cloud_path(
    PRODUCT_RECOMMENDATION_USER_OBSERVATION_URL
)
user_profile_source_path = client.feathr_spark_launcher.upload_or_get_cloud_path(
    PRODUCT_RECOMMENDATION_USER_PROFILE_URL
)
user_purchase_history_source_path = client.feathr_spark_launcher.upload_or_get_cloud_path(
    PRODUCT_RECOMMENDATION_USER_PURCHASE_HISTORY_URL
)
# Observation dataset
# Observation dataset usually comes with a event_timestamp to denote when the observation happened.
# The label here is product_rating. Our model objective is to predict a user's rating for this product.
pd.read_csv(user_observation_source_path).head()
# User profile dataset
# Used to generate user features
pd.read_csv(user_profile_source_path).head()
# User purchase history dataset.
# Used to generate user features. This is activity type data, so we need to use aggregation to genearte features.
pd.read_csv(user_purchase_history_source_path).head()
After a bit of data exploration, we want to create a training dataset like this:

What's a feature in Feathr
A feature is an individual measurable property or characteristic of a phenomenon which is sometimes time-sensitive.
In Feathr, a feature is defined by the following characteristics:
- The typed key (a.k.a. entity id): identifies the subject of feature, e.g. a user id of 123, a product id of SKU234456.
- The feature name: the unique identifier of the feature, e.g. user_age, total_spending_in_30_days.
- The feature value: the actual value of that aspect at a particular time, e.g. the feature value of the person's age is 30 at year 2022.
- The timestamp: this indicates when the event happened. For example, the user purchased certain product on a certain timestamp. This is usually used for point-in-time join.
You can feel that this is defined from a feature consumer (a person who wants to use a feature) perspective. It only tells us what a feature is like. In later sections, you can see how a feature consumer can access the features in a very simple way.
To define how to produce the feature, we need to specify:
- Feature source: what source data that this feature is based on
- Transformation: what transformation is used to transform the source data into feature. Transformation can be optional when you just want to take a column out from the source data.
(For more details on feature definition, please refer to the Feathr Feature Definition Guide.)
Define a feature source with preprocessing function
A feature source defines where to find the source data and how to use the source data for the upcoming feature transformation. There are different types of feature sources that you can use. HdfsSource is the most commonly used one that can connect you to data lake, Snowflake database tables etc. It's similar to database connector.
We define HdfsSource with following arguments:
name: It's used for you to recognize it. It has to be unique among all other feature source.path: It points to the source data.preprocessing(optional): Data preprocessing UDF (user defined function). The function will be applied to the data before all the feature transformations based on this source.event_timestamp_column(optional): there areevent_timestamp_columnandtimestamp_formatused for point-in-time join (we will cover them later).
See the python API documentation to get the details of each input fields.
def feathr_udf_preprocessing(df: DataFrame) -> DataFrame:
    from pyspark.sql.functions import col

    return df.withColumn("tax_rate_decimal", col("tax_rate") / 100)


batch_source = HdfsSource(
    name="userProfileData",
    path=user_profile_source_path,
    preprocessing=feathr_udf_preprocessing,
)
Define features
To define features on top of the HdfsSource, we need to:
- Specify the key of this feature: feature are like other data, they are keyed by some id. For example, user_id, product_id. You can also define compound keys.
- Specify the name of the feature via
nameparameter and how to transform it from source data viatransformparameter. Also some other metadata, likefeature_type. - Group them together so we know it's from one
HdfsSourceviaFeatureAnchor. Also give it a unique name vianameparameter so we can recognize it.
It's called Feature Anchor since this group of features are anchored to the source. There are other types of features that are computed on top of other features, called DerivedFeatures (we will cover this in the next section).
user_id = TypedKey(
    key_column="user_id",
    key_column_type=ValueType.INT32,
    description="user id",
    full_name="product_recommendation.user_id",
)

feature_user_age = Feature(
    name="feature_user_age",
    key=user_id,
    feature_type=INT32,
    transform="age",
)

feature_user_tax_rate = Feature(
    name="feature_user_tax_rate",
    key=user_id,
    feature_type=FLOAT,
    transform="tax_rate_decimal",
)

feature_user_gift_card_balance = Feature(
    name="feature_user_gift_card_balance",
    key=user_id,
    feature_type=FLOAT,
    transform="gift_card_balance",
)

feature_user_has_valid_credit_card = Feature(
    name="feature_user_has_valid_credit_card",
    key=user_id,
    feature_type=BOOLEAN,
    transform="number_of_credit_cards > 0",
)

features = [
    feature_user_age,
    feature_user_tax_rate,
    feature_user_gift_card_balance,
    feature_user_has_valid_credit_card,
]

user_feature_anchor = FeatureAnchor(
    name="anchored_features", source=batch_source, features=features
)
Define window aggregation features
Window aggregation helps us to create more powerful features by compressing large amount of information. For example, we can compute average purchase amount over the last 90 days from the purchase history to capture user's recent consumption trend.
To create window aggregation features, we define WindowAggTransformation with following arguments:
agg_expr: the field/column you want to aggregate. It can be an ANSI SQL expression, e.g.cast_float(purchase_amount)to caststrtype values tofloat.agg_func: the aggregation function, e.g.AVG. See below table for the full list of supported functions.window: the aggregation window size, e.g.90dto aggregate over the 90 days.
| Aggregation Type | Input Type | Description |
|---|---|---|
SUM, COUNT, MAX, MIN, AVG |
Numeric | Applies the the numerical operation on the numeric inputs. |
MAX_POOLING, MIN_POOLING, AVG_POOLING |
Numeric Vector | Applies the max/min/avg operation on a per entry basis for a given a collection of numbers. |
LATEST |
Any | Returns the latest not-null values from within the defined time window. |
After you have defined features and sources, bring them together to build an anchor:
purchase_history_data = HdfsSource(
    name="purchase_history_data",
    path=user_purchase_history_source_path,
    event_timestamp_column="purchase_date",
    timestamp_format="yyyy-MM-dd",
)

agg_features = [
    Feature(
        name="feature_user_avg_purchase_for_90days",
        key=user_id,
        feature_type=FLOAT,
        transform=WindowAggTransformation(
            agg_expr="cast_float(purchase_amount)", agg_func="AVG", window="90d"
        ),
    )
]

user_agg_feature_anchor = FeatureAnchor(
    name="aggregationFeatures", source=purchase_history_data, features=agg_features
)
Define derived features
Derived features are the features that are computed from anchored features or other derived features. Typical use cases include feature cross (f1 * f2) or cosine similarity between two features.
derived_features = [
    DerivedFeature(
        name="feature_user_purchasing_power",
        key=user_id,
        feature_type=FLOAT,
        input_features=[feature_user_gift_card_balance, feature_user_has_valid_credit_card],
        transform="feature_user_gift_card_balance + if(boolean(feature_user_has_valid_credit_card), 100, 0)",
    )
]
Build features
Lastly, we need to build these features so that they can be consumed later.
client.build_features(
    anchor_list=[user_agg_feature_anchor, user_feature_anchor],
    derived_feature_list=derived_features,
)
Extra topic: Passing-through features
Some features could be computed from the observation data directly at runtime and thus will not require an entity key or timestamp for joining. For example, the day of the week of the request. We can define such features by passing source=INPUT_CONTEXT to the anchor. Details about the passing through features can be found from here.
4. Create Training Data using Point-in-Time Correct Feature Join
To create a training dataset using Feathr, we need to provide a feature join settings to specify what features and how these features should be joined to the observation data.
To learn more on this topic, please refer to Point-in-time Correctness document.
user_feature_query = FeatureQuery(
    feature_list=[feat.name for feat in features + agg_features + derived_features],
    key=user_id,
)

settings = ObservationSettings(
    observation_path=user_observation_source_path,
    event_timestamp_column="event_timestamp",
    timestamp_format="yyyy-MM-dd",
)

client.get_offline_features(
    observation_settings=settings,
    feature_query=[user_feature_query],
    output_path=user_profile_source_path.rpartition("/")[0] + f"/product_recommendation_features.avro",
)

client.wait_job_to_finish(timeout_sec=5000)
Let's use the helper function get_result_df to download the result and view it:
res_df = get_result_df(client)
res_df.head()
Train a machine learning model
After getting all the features, let's train a machine learning model with the converted feature by Feathr:
from sklearn.ensemble import GradientBoostingRegressor
from sklearn.metrics import mean_squared_error
from sklearn.model_selection import train_test_split


# Fill None values with 0
final_df = (
    res_df
    .drop(["event_timestamp"], axis=1, errors="ignore")
    .fillna(0)
)

# Split data into train and test
X_train, X_test, y_train, y_test = train_test_split(
    final_df.drop(["product_rating"], axis=1),
    final_df["product_rating"].astype("float64"),
    test_size=0.2,
    random_state=42,
)

# Train a prediction model
model = GradientBoostingRegressor()
model.fit(X_train, y_train)

# Predict and evaluate
y_pred = model.predict(X_test)
rmse = sqrt(mean_squared_error(y_test.values.flatten(), y_pred))

print(f"Root mean squared error: {rmse}")
5. Feature Materialization
In the previous section, we demonstrated how Feathr can compute feature value to generate training dataset from feature definition on-they-fly. Now let's talk about how we can use the trained models.
We can use the trained models for both online and offline inference. In both cases, we need features to be fed into the models. For offline inference, you can compute and get the features on-demand; or you can store the computed features to some offline database for later offline inference.
For online inference, we can use Feathr to compute and store the features in the online database. Then use it for online inference when the request comes.

In this section, we will focus on materialize features to online store. For materialization to offline store, you can check out our user guide.
Materialize feature values to online store
We can push the computed features to the online store (Redis) like below:
# Materialize user features
# Note, you can only materialize features of same entity key into one table.
redisSink = RedisSink(table_name="user_features")
settings = MaterializationSettings(
    name="user_feature_setting",
    sinks=[redisSink],
    feature_names=["feature_user_age", "feature_user_gift_card_balance"],
)

client.materialize_features(settings=settings, allow_materialize_non_agg_feature=True)
client.wait_job_to_finish(timeout_sec=5000)
Fetch feature values from online store
We can then get the features from the online store via the client's get_online_features or multi_get_online_features API.
client.get_online_features(
    "user_features", "2", ["feature_user_age", "feature_user_gift_card_balance"]
)
client.multi_get_online_features(
    "user_features", ["1", "2"], ["feature_user_age", "feature_user_gift_card_balance"]
)
6. Feature Registration
Lastly, we can also register the features and share them across teams:
try:
    client.register_features()
except Exception as e:
    print(e)
print(client.list_registered_features(project_name=PROJECT_NAME))
Summary
In this notebook you learned how to set up Feathr and use it to create features, register the features and use them for model training and inferencing.
We hope this example gave you a good sense of Feathr's capabilities and how you could leverage it within your organization's MLOps workflow.