A Graphical User Interface (GUI) facilitates setting input variables of scripts. This is particularly useful for reusing a script that you have written a long time ago, without having to study the whole script again in detail. Although it is arguable whether GUIs are still appropriate in times of web applications, large and in particular copyrighted data must be processed locally. Ultimately, for local data processing, a GUI can be very convenient to run self-written, custom programs.
Several GUI libraries (packages) are available for Python and this chapter builds on the tkinter library. Alternatives are, for instance, wxPython or Jython (a Java implementation of Python 2). tkinter is a standard library, which does not need to be installed additionally. For a quick example, type in the terminal (e.g., Anaconda Prompt, PyCharm or Linux terminal - not in the Python itself):
python -m tkinter
If you encounter troubles with
tkinteron *Linux*, make sure thattkinterfor Python is installed, either withsudo apt install python3-tkorsudo apt install python3.X-tk(replaceXwith your Python version) or
sudo apt install tk8.6-devto install the library only (this should be sufficient).
If the above comments do not work, make sure that thetkinterrepository is available to your system, for example on Debian:sudo add-apt-repository ppa:deadsnakes/ppa(the repository address may change and depends on your Linux and Python versions).
tkinter works on most popular platforms (Linux, macOS, Windows) and is not only available to Python, but also Ruby, Perl, Tcl (the origin of tkinter), and many more languages. Because it supports languages like Ruby or Perl, tkinter can be used for local GUIs as well as for web applications.
Tips:
- All GUI codes featured in this chapter can be downloaded from the course respository.
- Consider using another IDE than Jupyter (e.g., PyCharm, Atom, or Spyder) for running the code blocks provided in this notebook.
The First GUI
The very first step is to import tkinter, usually using the alias as tk. With tk.Tk(), a so-called parent window (e.g., top) can be created, in which further elements will be accommodated. All further elements are created as tk child-objects of the parent window and placed (arranged) in the parent window using the pack() or grid() method. Here, we will use pack most of the time and grid will be useful to place elements at an exact position on the window (e.g., tk.ELEMENT.grid(row=INT, column=INT)). To display the GUI, the parent window top must be launched with top.mainloop() after arranging all elements. The following code block shows how to create a parent window with a label element (tk.Label).
import tkinter as tk
top = tk.Tk()
a_label = tk.Label(top, text="A label just shows some text.")
a_label.pack()
top.mainloop()
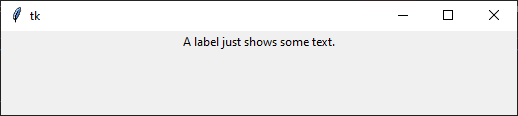
After calling the mainloop() method, the window is in a wait state. That means the window is waiting for events being triggered through user action (e.g., a click on a button). This is called event-driven programming, where event handlers are called rather than a single linear flow in the form of a sequence of (Python) commands.
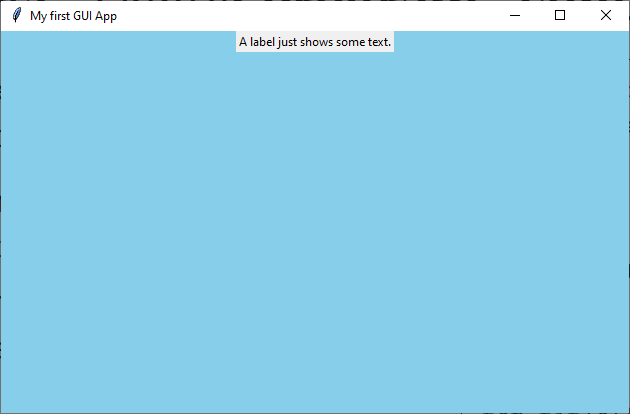
For now, our window uses default values, for instance, for the window title, size, and background color. These window properties can be modified with the title, minsize or maxsize, and configure attributes of the top parent window:
top = tk.Tk()
a_label = tk.Label(top, text="A label just shows some text.")
a_label.pack()

top.title("My first GUI App")
top.minsize(628, 382)
top.configure(bg="sky blue")
top.mainloop()
Add a Button to Call a Function
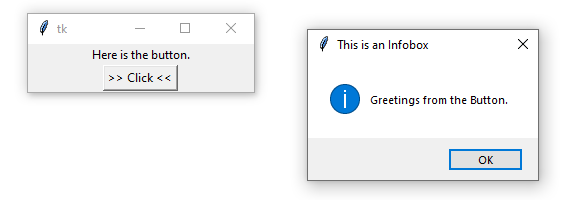
Currently, the window only shows a (boring) label and waits for events that do not exist. With a tk.Button we can add an event trigger, which still needs something to trigger. To this end, define a call_back function that creates an infobox, which is an object of showinfo from tkinter.messagebox (i.e., it needs to be imported).
from tkinter.messagebox import showinfo
# more message boxes: askokcancel, askyesno

def call_back(message):
    showinfo("This is an Infobox", message)


top = tk.Tk()
a_label = tk.Label(top, text="Here is the button.")
a_label.pack()
# add a button
a_button = tk.Button(top, text = ">> Click <<", command=lambda: call_back("Greetings from the Button."))
a_button.pack()
top.mainloop()
Note: The
commandkeyword receives a lambda function that links to thecall_backfunction. Why do we need this complication? The answer is that thecall_backfunction would be automatically triggered with themainloop()method if we were not using alambdafunction.
A Vanilla tkinter Program
The above code blocks instantiate tkinter objects (widgets) in non-object-oriented script style. However, when we write a GUI, we most likely want to start an application (App) by running the script. This is why tkinter widgets are usually created as objects of custom classes that typically inherit from tk.Frame. Therefore, the following code block recasts the previous example into an object-oriented code with the template from the section on Python classes.
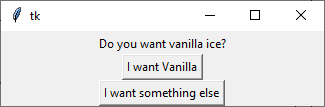
The below example creates a VanillaApp, which is a child of tk.Frame (tkinters master frame). The initialization method __init__ needs to invoke tk.Frame and pack() it to initialize the window. After that, we can place other widgets such as labels and buttons as before. In the VanillaApp, we can also directly implement the above call_back function as a method. In addition, make the script run stand-alone (not supported by a beautiful Jupyter notebook) by adding an if __name__ == "__main__": VanillaApp().mainloop() statement at the bottom of the script (read more about the __main__ statement in the section on packages).
# define the VanillaApp class
class VanillaApp(tk.Frame):
    def __init__(self, master=None):
        tk.Frame.__init__(self, master)
        self.pack()

        table_label = tk.Label(master, text="Do you want vanilla ice?")
        table_label.pack()
        vanilla_button = tk.Button(master, text="I want Vanilla", command=lambda: self.call_back("Here is Vanilla!"))
        vanilla_button.pack()
        no_vanilla_button = tk.Button(master, text="I want something else", command=lambda: self.call_back("Here is bread!"))
        no_vanilla_button.pack()

    def call_back(self, message):
        showinfo("This is an Infobox", message)


# instantiate a VanillaApp object
if __name__ == "__main__":
    VanillaApp().mainloop()
Make Script a Stand-alone App
The above code block providing the VanillaApp class can be copied to any external Python file and saved as, for example, vanilla_app.py. Next, in Anaconda Prompt (Windows) or Linux Terminal start the GUI as follows (depending on the Python installation used):
- Activate the required environment, for example:
- Windows/Anaconda:
conda activate flussenv - Linux/Virtualenv:
source vflussenv/bin/activate
- Windows/Anaconda:
- Navigate to the directory where the script is located (use
cdin Windows or Linux/macOS). - Type
python vanilla_app.py(orpython -m vanilla_app.py) to launch the GUI.
This sequence of commands can also be written to a batch or bash file (.bat on Windows) or shell script (.sh on Linux/macOS - alternative documentation). After writing and saving a batch or bash file, double-click on the file to start the Python-based GUI.
More Widgets
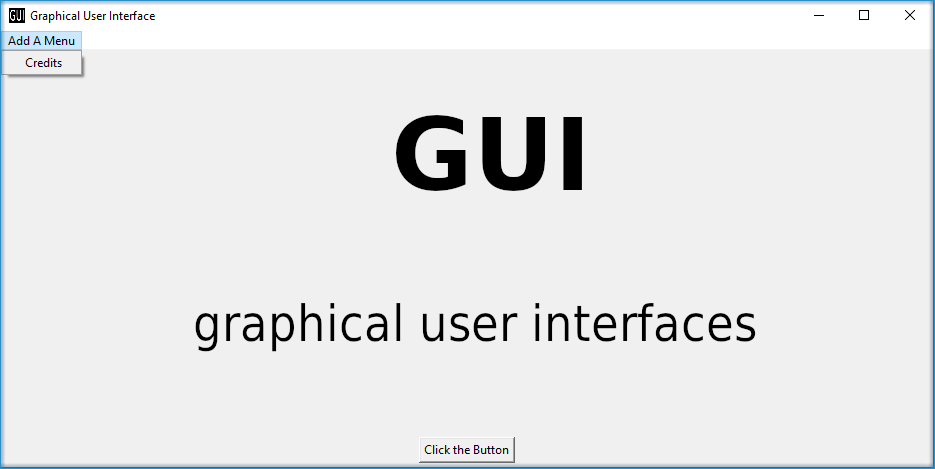
There are many more widgets than labels and buttons and the below figure features some of them including:
- A definition of the GUI window name with
master.title("Window name") - A definition of the GUI window icon (ICO) with
master.iconbitmap("directory/icon-file.ico")
Attention: Some recent versions of
tkintercannot open icons because of an unknown error that might stem from relative path definitions in the library. Therefore, if you get an error message such asTclError: bitmap "gui/sample-icon.ico" not defined, the only solution might be to comment out the lineself.master.iconbitmap("gui/sample-icon.ico").
tk.Menuwith drop-down cascadetk.Label(see above)tk.Button(see above)tk.Entrythat is a blank field where users can enter values or wordsttk.Comboboxthat is a drop-down menu in the master frame (tk-themedttkwidget)tk.Listboxwith atk.Scrollbar, where the scrollbar is required to navigate to listbox entries that are not in the visible range of the listbox sizetk.Checkbuttonthat can be checked (ticked) to set atk.BooleanVar()object toTrue(default: not checked ->False)
Alternatively, have a look attk.Radiobuttonto enable selections from a multiple-choice frame (rather than theFalse-True-only frame of a checkbutton)tk.PhotoImageto display a sub-sampled image in the GUI

The next block features the code that creates the tkinter widgets in the figure (the script, image and icon are available at the course repository):
import tkinter as tk
from tkinter.messagebox import showinfo
from tkinter import ttk


class MyApp(tk.Frame):
    def __init__(self, master=None):
        tk.Frame.__init__(self, master)

        self.master.title("Master Title")
        self.master.iconbitmap("gui/sample-icon.ico")

        # Set geometry: upper-left corner of the window
        ww = 628  # width
        wh = 382  # height
        wx = (self.master.winfo_screenwidth() - ww) / 2
        wy = (self.master.winfo_screenheight() - wh) / 2
        # assign geometry
        self.master.geometry("%dx%d+%d+%d" % (ww, wh, wx, wy))
        # assign space holders around widgets
        self.dx = 5
        self.dy = 5

        # Menu Bar
        self.mbar = tk.Menu(self)  # create standard menu bar
        self.master.config(menu=self.mbar)  # make self.mbar standard menu bar
        # add menu entry
        self.ddmenu = tk.Menu(self, tearoff=0)
        self.mbar.add_cascade(label="A Drop Down Menu", menu=self.ddmenu)  # attach entry it to standard menu bar
        self.ddmenu.add_command(label="Drop Down Entry 1", command=lambda: self.hello("Drop Down Menu!"))

        # Label
        self.a_label = tk.Label(master, text="A Label")
        self.a_label.grid(column=0, row=0, padx=self.dx, pady=self.dy)

        # Button
        self.a_button = tk.Button(master, text="A Button", command=lambda: self.hello("The Button!"))
        self.a_button.grid(column=0, row=1, padx=self.dx, pady=self.dy)

        # Entry
        self.an_entry = tk.Entry(master, width=20)
        self.an_entry.grid(column=0, row=2, padx=self.dx, pady=self.dy)

        # Combobox
        self.cbox = ttk.Combobox(master, width=20)
        self.cbox.grid(column=0, row=3, padx=self.dx, pady=self.dy)
        self.cbox['state'] = 'readonly'
        self.cbox['values'] = ["Combobox Entry 1", "Combobox Entry 2", "Combobox Entry ..."]
        self.cbox.set("Combobox Entry 1")
        self.cbox_selection = self.cbox.get()

        # Listbox with Scrollbar
        self.scrlbar = tk.Scrollbar(master, orient=tk.VERTICAL)
        self.scrlbar.grid(stick=tk.W, column=1, row=4, padx=self.dx, pady=self.dy)
        self.lbox = tk.Listbox(master, height=3, width=20, yscrollcommand=self.scrlbar.set)
        for e in ["Listbox Entry 1", "Listbox Entry 2", "With Scrollbar ->", "lb entry n"]:
            self.lbox.insert(tk.END, e)
        self.lbox.grid(sticky=tk.E, column=0, row=4, padx=self.dx, pady=self.dy)
        self.scrlbar.config(command=self.lbox.yview)
        self.lbox_selection = self.lbox.get(0)

        # Checkbutton
        self.check_variable = tk.BooleanVar()
        self.cbutton = tk.Checkbutton(master, text="Tick this Checkbutton", variable=self.check_variable)
        self.cbutton.grid(sticky=tk.E, column=2, row=0, padx=self.dx, pady=self.dy)

        # Image
        logo = tk.PhotoImage(file="gui/sunny-image.gif")
        logo = logo.subsample(2, 2)  # controls size
        self.l_img = tk.Label(master, image=logo)
        self.l_img.image = logo
        self.l_img.grid(row=1, column=2, rowspan=4)
        # create a placeholder to relax layout
        tk.Label(text="                                                    ").grid(row=0, column=1)

    @staticmethod
    def hello(message):
        showinfo("Got Message from ...", message)


if __name__ == '__main__':
    MyApp().mainloop()
As usual in Python, there are many more options (widgets) available and the effbot.org offers a detailed overview of available tkinter objects.
tkinter Variables
In the above example, the checkbox receives a tk.BooleanVar(), which takes a True value when a user checks the checkbox. There are more variables that can be associated with tkinter widgets (e.g., tk.Entry, tk.Listbox, or ttk.Combobox). tkinter variables correspond basically to Python data types with special methods that are required to set or retrieve (get) user-defined values of these data types. Here is an overview of tkinter variables:
tk.BooleanVar()is a boolean that can beTrueorFalsetk.DoubleVar()is a numeric floating point (float) variabletk.IntVar()is a numeric integer variabletk.StringVar()is a string (i.e., typically some text)
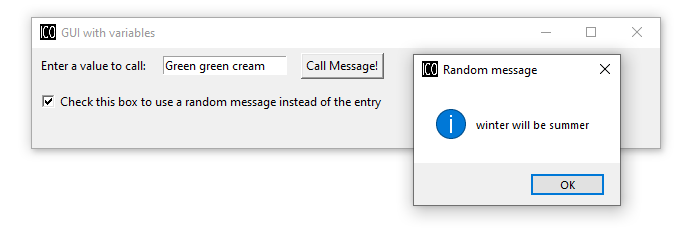
How does Python know when to retrieve a user-defined value? Typically, we want to evaluate user-defined values when we call a function that receives user-defined values as input arguments. Default, predefined default values in a script can be set with VARIABLE.set() and the user settings can be retrieved with VARIABLE.get(). The following script and the icon are available at the course repository.
import tkinter as tk
from tkinter.messagebox import showinfo
import random

class MyApp(tk.Frame):
    def __init__(self, master=None):
        tk.Frame.__init__(self, master)

        self.master.title("GUI with variables")
        self.master.iconbitmap("gui/sample-icon.ico")

        # Set geometry: upper-left corner of the window
        ww = 628  # width
        wh = 100  # height
        wx = (self.master.winfo_screenwidth() - ww) / 2
        wy = (self.master.winfo_screenheight() - wh) / 2
        # assign geometry
        self.master.geometry("%dx%d+%d+%d" % (ww, wh, wx, wy))

        self.a_label = tk.Label(master, text="Enter a value to call:")
        self.a_label.grid(column=0, row=0, padx=5, pady=5)

        # define tk.StringVar() and assign it to an entry
        self.user_entry = tk.StringVar()
        self.an_entry = tk.Entry(master, width=20, textvariable=self.user_entry)
        self.an_entry.grid(column=1, row=0, padx=5, pady=5)

        # define Button to trigger call back
        self.a_button = tk.Button(master, text="Call Message!", command=lambda: self.message_distributor())
        self.a_button.grid(column=2, row=0, padx=5, pady=5)

        # define a Checkbutton to use either user input or a random message
        self.check_variable = tk.BooleanVar()
        self.cbutton = tk.Checkbutton(master, text="Check this box to use a random message instead of the entry", variable=self.check_variable)
        self.cbutton.grid(sticky=tk.E, column=0, columnspan=3, row=1, padx=5, pady=5)
        self.check_variable.set(False)


    def message_distributor(self):
        if not self.check_variable.get():
            showinfo("User message", self.user_entry.get())
        else:
            showinfo("Random message", self.random_message())

    def random_message(self):
        random_words = ["summer", "winter", "is", "cold", "hot", "will be"]
        return " ".join(random.sample(random_words, 3))


if __name__ == '__main__':
    MyApp().mainloop()
Design, Place and Modify Widgets
The above code examples use both the OBJECT.grid() and the OBJECT.pack() methods (geometry managers) to place widgets in the GUI. There is an additional geometry manager in the form of the place method. The choice of a convenient geometry manager depends on your preferences and there are pros and cons for the three geometry managers:
pack- automatically places widgets within a box
- works best for simple GUIs, where all widgets are in one column or row
- complex layouts can only be handled with complicated workarounds (tip: do not try)
place- places widgets at absolute or relative x-y positions
- works well for graphical arrangements of widgets
grid- places widgets in columns and rows of a grid
- works well with table-like apps and structured layouts
To enable more graphical flexibility, widgets accept many optional keywords to change their foreground (fg) or background (bg) color. In addition, widgets can be modified with the tk.OBJECT.config(PARAMETER_TO_CONMFIGURE=NEW_CONFIG) method.
The following sections provide more details on the place and grid geometry managers (the relevant functions of pack are already above shown: pack() - that is all) and illustrate keyword arguments along with widget methods to modify widgets.
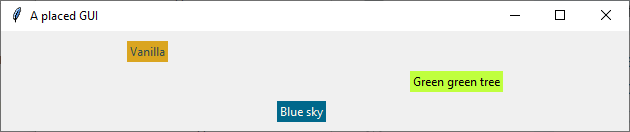
Place with place and Use Object Colors
The simplest geometry manager is the pack method, which works even without any keyword provided (see the very first examples in this section). With the pack method, widgets can be placed relatively in the window (relx and rely, where both must be < 1) or with absolute positions (x and y, where both should fit into the window dimensions defined through self.config(width=INT, height=INT)). The axis origin (zero positions of x and y) is determined with the anchor keyword.
class PlacedApp(tk.Frame):
    def __init__(self, master=None, **options):
        tk.Frame.__init__(self, master, **options)
        self.pack(expand=True, fill=tk.BOTH)
        self.config(width=628, height=100)
        self.master.title("A placed GUI")
        tk.Label(self, text="Vanilla", bg="goldenrod", fg="dark slate gray").place(anchor=tk.NW, relx=0.2, y=10)
        tk.Label(self, text="Green green tree", bg="OliveDrab1").place(anchor=tk.E, relx=0.8, rely=0.5)
        tk.Label(self, text="Blue sky", bg="DeepSkyBlue4", fg="floral white").place(anchor=tk.CENTER, x=300, rely=0.8)


if __name__ == '__main__':
    PlacedApp().mainloop()
Note: The above example does not create class objects of
tk.Labels, which makes the labels non-modifiable. This definition of widgets is acceptable to shorten the often long GUI scripts, but only if the widgets should not be modified later.
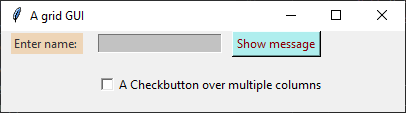
Place Objects with grid
In grid-ed GUIs, the widget alignment can be controlled with the sticky argument that uses cardinal directions (e.g., sticky=tk.W aligns or "sticks" a widget at the west, meaning, left side, of a GUI). The padx and pady keywords arguments enable the implementation of pixel space around widgets.
from tkinter.messagebox import showinfo

class GriddedApp(tk.Frame):
    def __init__(self, master=None, **options):
        tk.Frame.__init__(self, master, **options)
        self.pack(expand=True, fill=tk.BOTH)
        self.config(width=628, height=100)
        self.master.title("A grid GUI")
        tk.Label(self, text="Enter name: ", bg="bisque2", fg="gray21").grid(sticky=tk.W, row=0, column=0, padx=10)
        tk.Entry(self, bg="gray76", width=20).grid(stick=tk.EW, row=0, column=1, padx=5)
        tk.Button(self, text="Show message", bg="pale turquoise", fg="red4", command=lambda: showinfo("Info", "Random message")).grid(row=0, column=2, padx=5)
        tk.Checkbutton(self, text="A Checkbutton over multiple columns").grid(stick=tk.E, row=1, column=0, columnspan=3, pady=15)


if __name__ == '__main__':
    GriddedApp().mainloop()
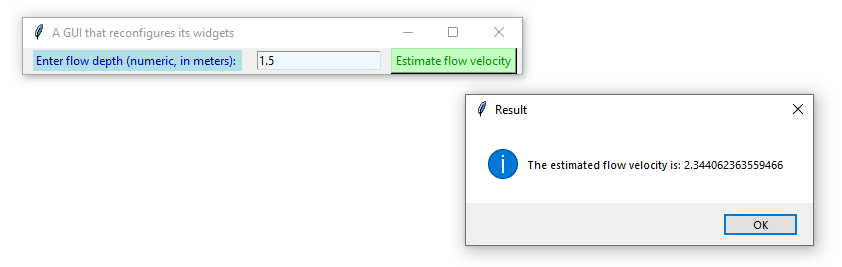
Configure Widgets
Upon user action (an event), we may want to modify previously defined widgets. For instance, we may want to change the text of a label or the layout of a button to indicate successful or failed operations. For this purpose, tkinter objects can be modified with tk.OBJECT.config(PARAMETER_TO_CONMFIGURE=NEW_CONFIG). Moreover, objects can be deleted (destroyed) with tk.OBJECT.destroy(), even though this is not an elegant method for any other widgets than pop-up windows (child frames of the master frame).
from tkinter.messagebox import showinfo, showerror

class ReConfigApp(tk.Frame):
    def __init__(self, master=None, **options):
        tk.Frame.__init__(self, master, **options)
        self.config(width=628, height=100)
        self.pack()

        self.user_depth = tk.DoubleVar()
        self.kst = 40.0
        self.w = 5.0
        self.slope = 0.002


        self.master.title("A GUI that reconfigures its widgets")
        tk.Label(self, text="Enter water depth (numeric, in meters): ", bg="powder blue", fg="medium blue").grid(sticky=tk.W, row=0, column=0, padx=10)
        tk.Entry(self, bg="alice blue", width=20, textvariable=self.user_depth).grid(stick=tk.EW, row=0, column=1, padx=5)
        self.eval_button = tk.Button(self, text="Estimate flow velocity", bg="snow2", fg="dark violet", command=lambda: self.call_estimator())
        self.eval_button.grid(row=0, column=2, padx=5)

    def call_estimator(self):
        try:
            flow_depth = float(self.user_depth.get())
        except tk.TclError:
            return showerror("ERROR", "Non-numeric value entered.")
        self.eval_button.config(fg="green4", bg="DarkSeaGreen1")
        showinfo("Result", "The estimated flow velocity is: " + str(self.estimate_u(flow_depth)))

    def estimate_u(self, h):
        try:
            return self.kst * h ** (2/3) * self.slope ** 0.5
        except ValueError:
            showerror("ERROR: Bad values defined.")
            return None
        except TypeError:
            showerror("ERROR: Bad data types defined.")
            return None


if __name__ == '__main__':
    ReConfigApp().mainloop()
Challenges:
- The roughness value varies as a function of surface characteristics. Can you implement a
ttk.Comboboxto let a user choose a Strickler kst roughness value between 10 and 85 (integers) and define the channel slope in atk.Entryor a custom pop-up window (see below)?- The cross-section averaged flow velocity also depends on the cross-section geometry. Can you implement
tkinterwidgets to enable the definition of a bank slopemand channel base widthwfor calculating the hydraulic radius?

Pop-up Windows
Default Messages from tkinter.messagebox
The tkinter.messagebox library provides standard pop-up windows, such as:
showinfo(title=STR, message=STR)that prints an information message (see above examples).showwarning(title=STR, message=STR)that prints a warning message.showerror(title=STR, message=STR)that prints an error message (see above example).askyesno(title=STR, message=STR)that returnsFalseorTruedepending on a user's answers to a Yes-or-No question.askretrycancel(title=STR, message=STR)that returnsFalseorTrue, or re-attempts to run an event (function) depending on a user's answers to a Yes-or-No-or-Cancel question.askokcancel(title=STR, message=STR)that returnsFalseorTruedepending on a user's answers to an OK question.
Read more about default pop-up windows in the Python docs.
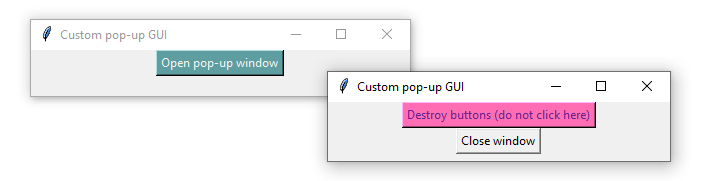
Top-level Custom Pop-ups
The default windows may not meet the needs for every application, for instance, to invite users to enter a custom value. In this case, a tk.Toplevel object aids in producing a customized pop-up window, and the below example shows how a customized top-level pop-up window can be called within a method. With the tk.Toplevel widget and the tk.Frame (master) widgets, the code block produces two frames, in which buttons, labels, or any other tkinter object can be placed. The very first argument of any tkinter widget-object created determines whether the object is placed in the master or the top-level frame. For example, tk.Entry(self).pack() creates an entry in the master tk.Frame, and tk.Entry(pop_up).pack() creates an entry in the child tk.Toplevel.
from tkinter.messagebox import showwarning

class PopApp(tk.Frame):
    def __init__(self, master=None, **options):
        tk.Frame.__init__(self, master, **options)
        self.config(width=628, height=50)
        self.pack()

        self.master.title("Custom pop-up GUI")
        self.pop_button = tk.Button(self, text="Open pop-up window", bg="cadet blue", fg="white smoke", command=lambda: self.new_window())
        self.pop_button.pack()

    def destroy_buttons(self):
        self.pop_button.destroy()
        self.p_button1.destroy()
        self.p_button2.destroy()
        showwarning("Congratulations", "This app is useless now. Don't press red-ish buttons ...'")

    def new_window(self):
        pop_up = tk.Toplevel(master=self)
        # add two buttons to the new pop_up Toplevel object (window)
        self.p_button1 = tk.Button(pop_up, text="Destroy buttons (do not click here)", fg="DarkOrchid4",
                                   bg="HotPink1", command=lambda: self.destroy_buttons())
        self.p_button2 = tk.Button(pop_up, text="Close window", command=lambda: pop_up.quit())
        self.p_button1.pack()
        self.p_button2.pack()


if __name__ == '__main__':
    PopApp().mainloop()
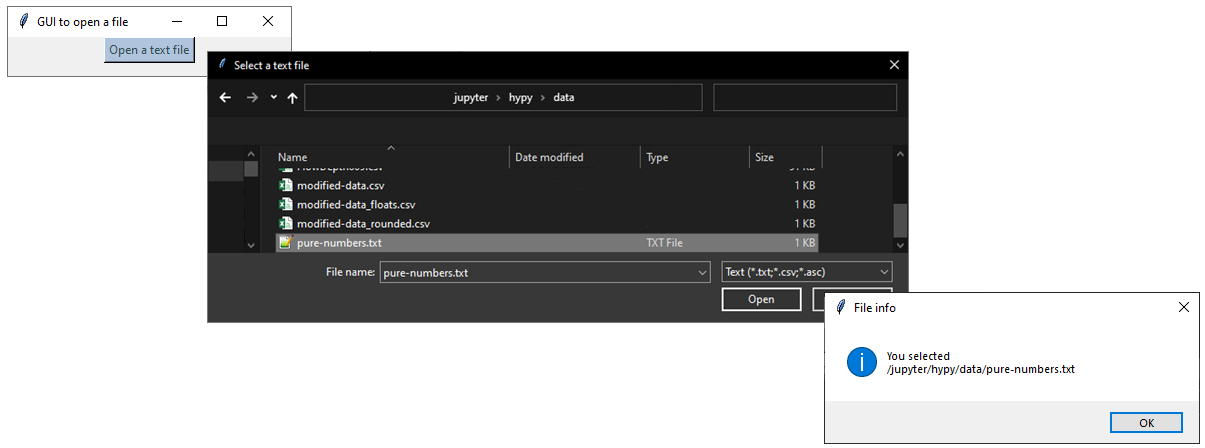
File Dialog (Open ...)
When a custom function's argument is a file or file name, we most likely want the user to be able to select the file type needed. The tkinter.filedialog library provides methods to let users choose general or specific file types. Specific file types can be defined with the filetypes=("Name", "*.ending") (or filetypes=("Name", "*.ending1;*.ending2;...") for multiple file types) keyword argument. The following example illustrates the usage of tkinter.filedialog's askopenfilename.
from tkinter.filedialog import askopenfilename
from tkinter.messagebox import showinfo

class OpenFileApp(tk.Frame):
    def __init__(self, master=None, **options):
        tk.Frame.__init__(self, master, **options)
        self.config(width=628, height=50)
        self.pack()

        self.master.title("GUI to open a file")

        self.pop_button = tk.Button(self, text="Open a text file", bg="light steel blue", fg="dark slate gray", command=lambda: self.open_file())
        self.pop_button.pack()

    def open_file(self):
        file_types = (("Text", "*.txt;*.csv;*.asc"),)  # equivalent to [("Text", "*.txt;*.csv;*.asc")]
        file_name = askopenfilename(initialdir=".", title="Select a text file", filetypes=file_types, parent=self)
        showinfo("File info", "You selected " + str(file_name))


if __name__ == '__main__':
    OpenFileApp().mainloop()
Quit
To cleanly quit a GUI, use tk.Frame.quit() (i.e., in a custom class, write self.quit() or master.quit()). The above example of the PopApp class also features the destroy() method, which helps to remove particular widgets.
tkinter provides many more options such as the implementation of tabs with ttk.Notebook() (requires binding of tab objects), tables (from tkintertable import TableCanvas, TableModel), or interactive graphic objects with matplotib.
import matplotlib
matplotlib.use('TkAgg')
import numpy as np
from matplotlib.backends.backend_tkagg import FigureCanvasTkAgg
from matplotlib.figure import Figure
Enjoy creating your custom apps!
Exercise: Get familiar with creating GUIs and object orientation in the GUI exercise.