Copyright (c) Microsoft Corporation. All rights reserved.
Licensed under the MIT License.
Testing different Hyperparameters and Benchmarking
In this notebook, we will cover how to test different hyperparameters for a particular dataset and how to benchmark different parameters across a group of datasets using AzureML. We assume familiarity with the basic concepts and parameters, which are discussed in the 01_training_introduction.ipynb, 02_mask_rcnn.ipynb and 03_training_accuracy_vs_speed.ipynb notebooks.
We will be using a Faster R-CNN model with ResNet-50 backbone to find all objects in an image belonging to 4 categories: 'can', 'carton', 'milk_bottle', 'water_bottle'. We will then conduct hyper-parameter tuning to find the best set of parameters for this model. For this, we present an overall process of utilizing AzureML, specifically Hyperdrive which can train and evaluate many different parameter combinations in parallel. We demonstrate the following key steps:
- Configure AzureML Workspace
- Create Remote Compute Target (GPU cluster)
- Prepare Data
- Prepare Training Script
- Setup and Run Hyperdrive Experiment
- Model Import, Re-train and Test
This notebook is very similar to the 24_exploring_hyperparameters_on_azureml.ipynb hyperdrive notebook used for image classification. For key concepts of AzureML see this tutorial on model training and evaluation.
import os
import sys
from distutils.dir_util import copy_tree
import numpy as np
import scrapbook as sb
import uuid

import azureml.core
from azureml.core import Workspace, Experiment
from azureml.core.compute import ComputeTarget, AmlCompute
from azureml.core.compute_target import ComputeTargetException
import azureml.data
from azureml.train.estimator import Estimator
from azureml.train.hyperdrive import (
    RandomParameterSampling, GridParameterSampling, BanditPolicy, HyperDriveConfig, PrimaryMetricGoal, choice, uniform
)
import azureml.widgets as widgets

sys.path.append("../../")
from utils_cv.common.azureml import get_or_create_workspace
from utils_cv.common.data import unzip_url
from utils_cv.detection.data import Urls
Ensure edits to libraries are loaded and plotting is shown in the notebook.
%reload_ext autoreload
%autoreload 2
%matplotlib inline
We now define some parameters which will be used in this notebook:
# Azure resources
subscription_id = "YOUR_SUBSCRIPTION_ID"
resource_group = "YOUR_RESOURCE_GROUP_NAME"
workspace_name = "YOUR_WORKSPACE_NAME"
workspace_region = "YOUR_WORKSPACE_REGION" #Possible values eastus, eastus2, etc.

# Choose a size for our cluster and the maximum number of nodes
VM_SIZE = "STANDARD_NC6" #STANDARD_NC6S_V3"
MAX_NODES = 8

# Hyperparameter grid search space
IM_MAX_SIZES = [600] #Default is 1333 pixels, defining small values here to speed up training
LEARNING_RATES = [1e-4, 3e-4, 1e-3, 3e-3, 1e-2]

# Image data
DATA_PATH = unzip_url(Urls.fridge_objects_path, exist_ok=True)

# Path to utils_cv library
UTILS_DIR = os.path.join('..', '..', 'utils_cv')
1. Config AzureML workspace
Below we setup (or load an existing) AzureML workspace, and get all its details as follows. Note that the resource group and workspace will get created if they do not yet exist. For more information regaring the AzureML workspace see also the 20_azure_workspace_setup.ipynb notebook in the image classification folder.
To simplify clean-up (see end of this notebook), we recommend creating a new resource group to run this notebook.
ws = get_or_create_workspace(
    subscription_id, resource_group, workspace_name, workspace_region
)

# Print the workspace attributes
print(
    "Workspace name: " + ws.name,
    "Workspace region: " + ws.location,
    "Subscription id: " + ws.subscription_id,
    "Resource group: " + ws.resource_group,
    sep="\n",
)
2. Create Remote Target
We create a GPU cluster as our remote compute target. If a cluster with the same name already exists in our workspace, the script will load it instead. This link provides more information about how to set up a compute target on different locations.
By default, the VM size is set to use STANDARD_NC6 machines. However, if quota is available, our recommendation is to use STANDARD_NC6S_V3 machines which come with the much faster V100 GPU. We set the minimum number of nodes to zero so that the cluster won't incur additional compute charges when not in use.
CLUSTER_NAME = "gpu-cluster"

try:
    # Retrieve if a compute target with the same cluster name already exists
    compute_target = ComputeTarget(workspace=ws, name=CLUSTER_NAME)
    print("Found existing compute target.")

except ComputeTargetException:
    # If it doesn't already exist, we create a new one with the name provided
    print("Creating a new compute target...")
    compute_config = AmlCompute.provisioning_configuration(
        vm_size=VM_SIZE, min_nodes=0, max_nodes=MAX_NODES
    )

    # create the cluster
    compute_target = ComputeTarget.create(ws, CLUSTER_NAME, compute_config)
    compute_target.wait_for_completion(show_output=True)

# we can use get_status() to get a detailed status for the current cluster.
print(compute_target.get_status().serialize())
Creating a new compute target...
Creating
Succeeded
AmlCompute wait for completion finished
Minimum number of nodes requested have been provisioned
{'currentNodeCount': 0, 'targetNodeCount': 0, 'nodeStateCounts': {'preparingNodeCount': 0, 'runningNodeCount': 0, 'idleNodeCount': 0, 'unusableNodeCount': 0, 'leavingNodeCount': 0, 'preemptedNodeCount': 0}, 'allocationState': 'Steady', 'allocationStateTransitionTime': '2019-09-30T18:20:25.067000+00:00', 'errors': None, 'creationTime': '2019-09-30T18:18:06.217384+00:00', 'modifiedTime': '2019-09-30T18:20:38.458332+00:00', 'provisioningState': 'Succeeded', 'provisioningStateTransitionTime': None, 'scaleSettings': {'minNodeCount': 0, 'maxNodeCount': 8, 'nodeIdleTimeBeforeScaleDown': 'PT120S'}, 'vmPriority': 'Dedicated', 'vmSize': 'STANDARD_NC6'}
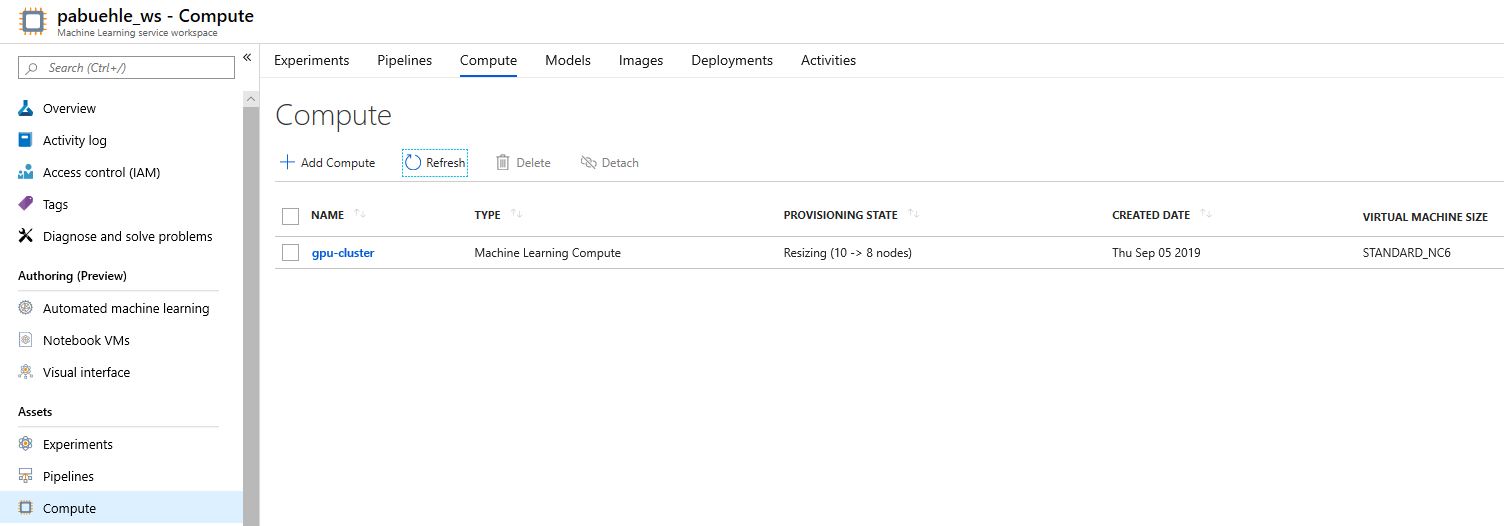
The compute cluster and its status can be seen in the portal. For example in the screenshot below, its automatically resizing (eventually to 0 nodes) to adjust to the number of open runs:

3. Prepare data
In this notebook, we'll use the Fridge Objects dataset, which is already stored in the correct format. We then upload our data to the AzureML workspace.
# Retrieving default datastore that got automatically created when we setup a workspace
ds = ws.get_default_datastore()

# We now upload the data to a unique sub-folder to avoid accidentially training/evaluating also including older images.
data_subfolder = str(uuid.uuid4())
ds.upload(
    src_dir=DATA_PATH, target_path=data_subfolder, overwrite=False, show_progress=True
)
Here's where you can see the data in your portal:

4. Prepare training script
Next step is to prepare scripts that AzureML Hyperdrive will use to train and evaluate models with selected hyperparameters.
# Create a folder for the training script and copy the utils_cv library into that folder
script_folder = os.path.join(os.getcwd(), "hyperdrive")
os.makedirs(script_folder, exist_ok=True)
_ = copy_tree(UTILS_DIR, os.path.join(script_folder, 'utils_cv'))
%%writefile $script_folder/train.py

# Use different matplotlib backend to avoid error during remote execution
import matplotlib
matplotlib.use("Agg")
import matplotlib.pyplot as plt

import os
import sys
import argparse
import numpy as np
from pathlib import Path
from azureml.core import Run
from utils_cv.detection.dataset import DetectionDataset
from utils_cv.detection.model import DetectionLearner, get_pretrained_fasterrcnn
from utils_cv.common.gpu import which_processor
which_processor()

# Parse arguments passed by Hyperdrive
parser = argparse.ArgumentParser()
parser.add_argument('--data-folder', type=str, dest='data_dir')
parser.add_argument('--data-subfolder', type=str, dest='data_subfolder')
parser.add_argument('--epochs', type=int, dest='epochs', default=20)
parser.add_argument('--batch_size', type=int, dest='batch_size', default=2)
parser.add_argument('--learning_rate', type=float, dest='learning_rate', default=1e-4)
parser.add_argument('--min_size', type=int, dest='min_size', default=800)
parser.add_argument('--max_size', type=int, dest='max_size', default=1333)
parser.add_argument('--rpn_pre_nms_top_n_train', type=int, dest='rpn_pre_nms_top_n_train', default=2000)
parser.add_argument('--rpn_pre_nms_top_n_test', type=int, dest='rpn_pre_nms_top_n_test', default=1000)
parser.add_argument('--rpn_post_nms_top_n_train', type=int, dest='rpn_post_nms_top_n_train', default=2000)
parser.add_argument('--rpn_post_nms_top_n_test', type=int, dest='rpn_post_nms_top_n_test', default=1000)
parser.add_argument('--rpn_nms_thresh', type=float, dest='rpn_nms_thresh', default=0.7)
parser.add_argument('--box_score_thresh', type=float, dest='box_score_thresh', default=0.05)
parser.add_argument('--box_nms_thresh', type=float, dest='box_nms_thresh', default=0.5)
parser.add_argument('--box_detections_per_img', type=int, dest='box_detections_per_img', default=100)
args = parser.parse_args()
params = vars(args)
print(f"params = {params}")

# Get training and validation data
data_path = os.path.join(params['data_dir'], params["data_subfolder"])
print(f"data_path={data_path}")
data = DetectionDataset(data_path, train_pct=0.5, batch_size = params["batch_size"])
print(
    f"Training dataset: {len(data.train_ds)} | Training DataLoader: {data.train_dl} \n \
    Testing dataset: {len(data.test_ds)} | Testing DataLoader: {data.test_dl}"
)

# Get model
model = get_pretrained_fasterrcnn(
    num_classes = len(data.labels)+1,
    min_size = params["min_size"],
    max_size = params["max_size"],
    rpn_pre_nms_top_n_train = params["rpn_pre_nms_top_n_train"],
    rpn_pre_nms_top_n_test = params["rpn_pre_nms_top_n_test"],
    rpn_post_nms_top_n_train = params["rpn_post_nms_top_n_train"],
    rpn_post_nms_top_n_test = params["rpn_post_nms_top_n_test"],
    rpn_nms_thresh = params["rpn_nms_thresh"],
    box_score_thresh = params["box_score_thresh"],
    box_nms_thresh = params["box_nms_thresh"],
    box_detections_per_img = params["box_detections_per_img"]
)
detector = DetectionLearner(data, model)

# Run Training
detector.fit(params["epochs"], lr=params["learning_rate"], print_freq=30)
print(f"Average precision after each epoch: {detector.ap}")

# Get accuracy on test set at IOU=0.5:0.95
acc = float(detector.ap[-1]["bbox"])

# Add log entries
run = Run.get_context()
run.log("accuracy", float(acc))  # Logging our primary metric 'accuracy'
run.log("data_dir", params["data_dir"])
run.log("epochs", params["epochs"])
run.log("batch_size", params["batch_size"])
run.log("learning_rate", params["learning_rate"])
run.log("min_size", params["min_size"])
run.log("max_size", params["max_size"])
run.log("rpn_pre_nms_top_n_train", params["rpn_pre_nms_top_n_train"])
run.log("rpn_pre_nms_top_n_test", params["rpn_pre_nms_top_n_test"])
run.log("rpn_post_nms_top_n_train", params["rpn_post_nms_top_n_train"])
run.log("rpn_post_nms_top_n_test", params["rpn_post_nms_top_n_test"])
run.log("rpn_nms_thresh", params["rpn_nms_thresh"])
run.log("box_score_thresh", params["box_score_thresh"])
run.log("box_nms_thresh", params["box_nms_thresh"])
run.log("box_detections_per_img", params["box_detections_per_img"])
Overwriting C:\Users\pabuehle\Desktop\ComputerVision\scenarios\detection\hyperdrive/train.py
exp = Experiment(workspace=ws, name="hyperparameter-tuning")
5.2. Define search space
Now we define the search space of hyperparameters. To test discrete parameter values use 'choice()', and for uniform sampling use 'uniform()'. For more options, see Hyperdrive parameter expressions.
Hyperdrive provides three different parameter sampling methods: 'RandomParameterSampling', 'GridParameterSampling', and 'BayesianParameterSampling'. Details about each method can be found here. Here, we use the 'GridParameterSampling'.
# Grid-search
param_sampling = GridParameterSampling(
    {"--learning_rate": choice(LEARNING_RATES), "--max_size": choice(IM_MAX_SIZES)}
)
AzureML Estimator is the building block for training. An Estimator encapsulates the training code and parameters, the compute resources and runtime environment for a particular training scenario. We create one for our experimentation with the dependencies our model requires as follows:
script_params = {"--data-folder": ds.as_mount(), "--data-subfolder": data_subfolder}

est = Estimator(
    source_directory=script_folder,
    script_params=script_params,
    compute_target=compute_target,
    entry_script="train.py",
    use_gpu=True,
    pip_packages=["nvidia-ml-py3", "fastai"],
    conda_packages=[
        "scikit-learn",
        "pycocotools>=2.0",
        "torchvision==0.3",
        "cudatoolkit==9.0",
    ],
)
We now create a HyperDriveConfig object which includes information about parameter space sampling, termination policy, primary metric, estimator and the compute target to execute the experiment runs on.
hyperdrive_run_config = HyperDriveConfig(
    estimator=est,
    hyperparameter_sampling=param_sampling,
    policy=None,  # Do not use any early termination
    primary_metric_name="accuracy",
    primary_metric_goal=PrimaryMetricGoal.MAXIMIZE,
    max_total_runs=None,  # Set to none to run all possible grid parameter combinations,
    max_concurrent_runs=MAX_NODES,
)
5.3 Run Experiment
We now run the parameter sweep and visualize the experiment progress using the RunDetails widget:

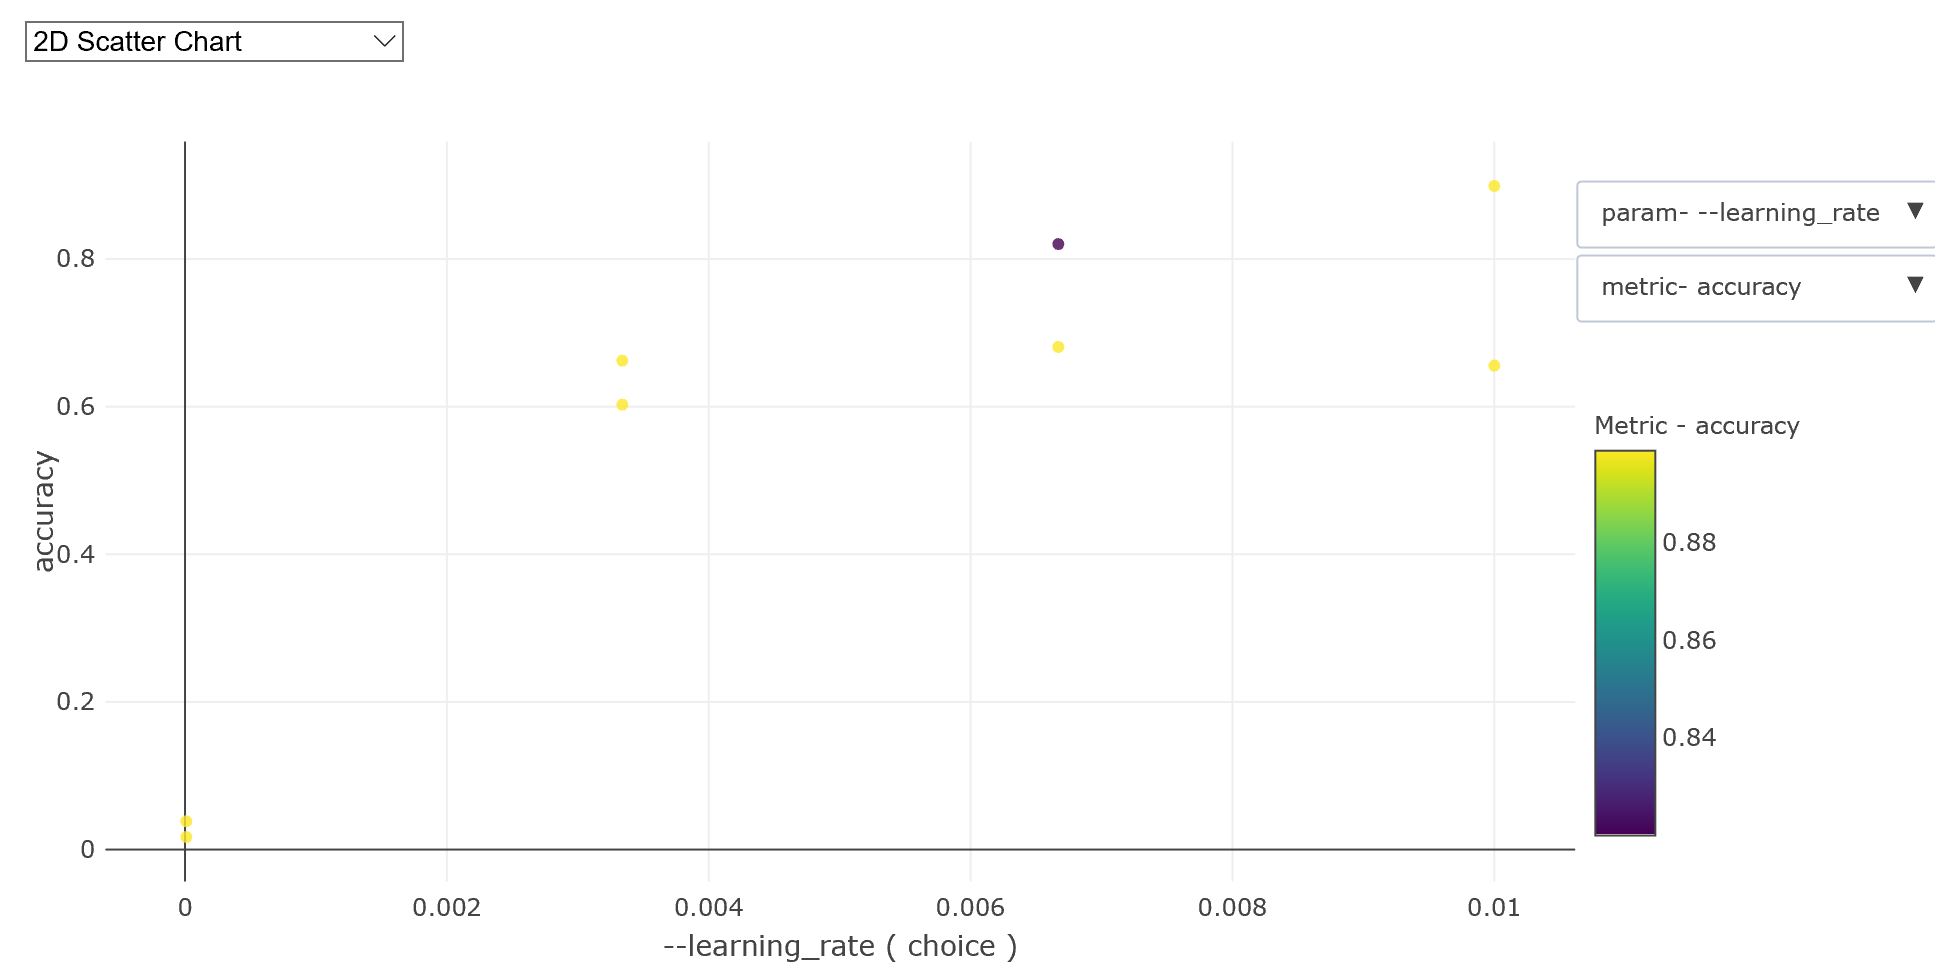
Once completed, the accuracy for the different runs can be analyzed via the widget, for example below is a plot of the accuracy versus learning rate below (for two different image sizes)

hyperdrive_run = exp.submit(config=hyperdrive_run_config)
print(f"Url to hyperdrive run on the Azure portal: {hyperdrive_run.get_portal_url()}")
Url to hyperdrive run on the Azure portal: https://mlworkspace.azure.ai/portal/subscriptions/989b90f7-da4f-41f9-84c9-44848802052d/resourceGroups/pabuehle_delme2_hyperdrive/providers/Microsoft.MachineLearningServices/workspaces/pabuehle_ws/experiments/hyperparameter-tuning/runs/hyperparameter-tuning_1569867670036119
widgets.RunDetails(hyperdrive_run).show()
_HyperDriveWidget(widget_settings={'childWidgetDisplay': 'popup', 'send_telemetry': False, 'log_level': 'INFO'…
hyperdrive_run.wait_for_completion()
{'runId': 'hyperparameter-tuning_1569867670036119',
 'target': 'gpu-cluster',
 'status': 'Completed',
 'startTimeUtc': '2019-09-30T18:21:10.209419Z',
 'endTimeUtc': '2019-09-30T18:55:14.128089Z',
 'properties': {'primary_metric_config': '{"name": "accuracy", "goal": "maximize"}',
  'runTemplate': 'HyperDrive',
  'azureml.runsource': 'hyperdrive',
  'platform': 'AML',
  'baggage': 'eyJvaWQiOiAiNWFlYTJmMzAtZjQxZC00ZDA0LWJiOGUtOWU0NGUyZWQzZGQ2IiwgInRpZCI6ICI3MmY5ODhiZi04NmYxLTQxYWYtOTFhYi0yZDdjZDAxMWRiNDciLCAidW5hbWUiOiAiMDRiMDc3OTUtOGRkYi00NjFhLWJiZWUtMDJmOWUxYmY3YjQ2In0',
  'ContentSnapshotId': '0218d18a-3557-4fdf-8c29-8d43297621ed'},
 'logFiles': {'azureml-logs/hyperdrive.txt': 'https://pabuehlestorage579709b90.blob.core.windows.net/azureml/ExperimentRun/dcid.hyperparameter-tuning_1569867670036119/azureml-logs/hyperdrive.txt?sv=2018-11-09&sr=b&sig=PCMArksPFcTc1rk1DMhFP6wvoZbhrpmnZbDCV8uInWw%3D&st=2019-09-30T18%3A45%3A14Z&se=2019-10-01T02%3A55%3A14Z&sp=r'}}
To load an existing Hyperdrive Run instead of start new one, we can use
hyperdrive_run = azureml.train.hyperdrive.HyperDriveRun(exp, <your-run-id>, hyperdrive_run_config=hyperdrive_run_config)
We also can cancel the Run with
hyperdrive_run.cancel().
Once all the child-runs are finished, we can get the best run and the metrics.
# Get best run and print out metrics
best_run = hyperdrive_run.get_best_run_by_primary_metric()
best_run_metrics = best_run.get_metrics()
parameter_values = best_run.get_details()["runDefinition"]["arguments"]
best_parameters = dict(zip(parameter_values[::2], parameter_values[1::2]))

print(f"* Best Run Id:{best_run.id}")
print(best_run)
print("\n* Best hyperparameters:")
print(best_parameters)
print(f"Accuracy = {best_run_metrics['accuracy']}")
print("Learning Rate =", best_run_metrics["learning_rate"])
* Best Run Id:hyperparameter-tuning_1569867670036119_4
Run(Experiment: hyperparameter-tuning,
Id: hyperparameter-tuning_1569867670036119_4,
Type: azureml.scriptrun,
Status: Completed)

* Best hyperparameters:
{'--data-folder': '$AZUREML_DATAREFERENCE_workspaceblobstore', '--data-subfolder': '01679d79-1c47-49b8-88c3-d657f36b0c0f', '--learning_rate': '0.01', '--max_size': '600'}
Accuracy = 0.8918015856432082
Learning Rate = 0.01
hyperdrive_run.get_children_sorted_by_primary_metric()
[{'run_id': 'hyperparameter-tuning_1569867670036119_4',
  'hyperparameters': '{"--learning_rate": 0.01, "--max_size": 600}',
  'best_primary_metric': 0.8918015856432082,
  'status': 'Completed'},
 {'run_id': 'hyperparameter-tuning_1569867670036119_3',
  'hyperparameters': '{"--learning_rate": 0.003, "--max_size": 600}',
  'best_primary_metric': 0.8760658534573615,
  'status': 'Completed'},
 {'run_id': 'hyperparameter-tuning_1569867670036119_2',
  'hyperparameters': '{"--learning_rate": 0.001, "--max_size": 600}',
  'best_primary_metric': 0.8282478586888209,
  'status': 'Completed'},
 {'run_id': 'hyperparameter-tuning_1569867670036119_1',
  'hyperparameters': '{"--learning_rate": 0.0003, "--max_size": 600}',
  'best_primary_metric': 0.7405032357605712,
  'status': 'Completed'},
 {'run_id': 'hyperparameter-tuning_1569867670036119_0',
  'hyperparameters': '{"--learning_rate": 0.0001, "--max_size": 600}',
  'best_primary_metric': 0.47537724312149304,
  'status': 'Completed'},
 {'run_id': 'hyperparameter-tuning_1569867670036119_preparation',
  'hyperparameters': None,
  'best_primary_metric': None,
  'status': 'Completed'}]
7. Clean up
To avoid unnecessary expenses, all resources which were created in this notebook need to get deleted once parameter search is concluded. To simplify this clean-up step, we recommended creating a new resource group to run this notebook. This resource group can then be deleted, e.g. using the Azure Portal, which will remove all created resources.
# Log some outputs using scrapbook which are used during testing to verify correct notebook execution
sb.glue("best_accuracy", best_run_metrics["accuracy"])
Concluding Remark
In this notebook, we showed how to tune hyperparameters by utilizing Azure Machine Learning service. Complex and powerful models often have many hyperparameters that affect on the model's accuracy, and it is not practical to tune the model without using a GPU cluster.
For example, a training and evaluation loop of a model on a single Standard NC6 VM could take a long time depending on the number of images, epochs, and image size. If a single run took 10 minute, a thorough investigation of 100 different combinations of hyperparameters would take over 16 hours on the single VM.
With AzureML, as we shown in this notebook, we can easily setup different size of GPU cluster fits to our problem and utilize different sampling techniques to navigate through the huge search space efficiently, and tweak the experiment with different criteria and algorithms for further research.