%matplotlib inline
import warnings
warnings.filterwarnings("ignore")
import pandas as pd
import plotly.express as px
import re
from datetime import datetime, date, timedelta
import sys
sys.path.append("..")
from data.utils import get_days_index

all_days = get_days_index(200)
import sqlite3

conn = sqlite3.connect("../data/dbs/Ex1.db")
c = conn.cursor()
1. Introduction
Welcome to the Data Downtime Challenge! In this exercise, we'll learn Data Observability through practice on some sample datasets. Each subproblem will ask you to craft some SQL queries that help us learn about the state of our tables and identify Data Downtime issues.
For these exercises, we'll be using mock astronomical data to identify habitable planets.

The Ex1.db database contains a single table, EXOPLANETS, which has information on nearly 2000 exoplanets across the Milky Way Galaxy.
c.execute("PRAGMA table_info(EXOPLANETS);")
c.fetchall()
A database entry in EXOPLANETS contains the following info:
_id: A UUID corresponding to the planet.distance: Distance from Earth, in lightyears.g: Surface gravity as a multiple of $g$, the gravitational force constant.orbital_period: Length of a single orbital cycle in days.avg_temp: Average surface temperature in degrees Kelvin.date_added: The date our system discovered the planet and added it automatically to our databases.
Note that one or more of distance, g, orbital_period, and avg_temp may be NULL for a given planet as a result of missing or erroneous data.
pd.read_sql_query("SELECT * FROM EXOPLANETS LIMIT 10", conn)
2. Exercise: Visualizing Freshness
Grouping by the DATE_ADDED column can give us insight into how EXOPLANETS updates daily. For example, we can query for the number of new IDs added per day:
SQL = """
SELECT
    DATE_ADDED,
    COUNT(*) AS ROWS_ADDED
FROM
    EXOPLANETS
GROUP BY
    DATE_ADDED
"""
rows_added = pd.read_sql_query(SQL, conn)
rows_added = rows_added.rename(columns={clmn: clmn.lower() for clmn in rows_added.columns})
rows_added = rows_added.set_index("date_added")
rows_added = rows_added.reindex(all_days)
It looks like EXOPLANETS typically updates with around 100 new entries each day. Something looks off in a few places, though. We have what we'd call a freshness incident -- on a couple of occasions, the table doesn't update at all for 3 or more days. It has "stale" (3+ day old) data.
fig = px.bar(x=all_days, y=rows_added["rows_added"])
fig.update_xaxes(title="Date")
fig.update_yaxes(title="Rows Added")
fig.show()
In this exercise, we'll try writing some SQL code that returns timestamps for when freshness incidents occur. Feel free to use the query above as a starting point.
An example solution is given in solutions/exercise_1.ipynb, if needed for comparison.
To start, let's just copy the SQL statement from above, which gives the count of entries added per day.
# YOUR CODE HERE
SQL = """

"""
# END YOUR CODE
pd.read_sql_query(SQL, conn).head(5)
Verify that your output looks like this:

Great! Since we've grouped by the DATE_ADDED field, we now have one row entry for each day where data came in. As a next step, let's devise a way to compare adjacent dates in our grouped output. For example, in row 1 above, we'd like to know that the previous date (on row 0) was 2021-01-01.
A great way to compare adjacent rows in SQL is to use the LAG window function. Also, you can try including our data from above using SQL's WITH prefix.
# YOUR CODE HERE
SQL = """

"""
# END YOUR CODE
pd.read_sql_query(SQL, conn).head(5)
Check that your output looks like this:

Awesome! The ability to compare adjacent dates is crucial for detecting stale data. Our next step is this: given two adjacent dates, calculate the difference in days between those dates. We're answering the question, "How many days old is the previous batch?"
Since we're in SQLite, we can cast our strings into dates with JULIANDAY(), and easily find the difference between them.
# YOUR CODE HERE
SQL = """

"""
# END YOUR CODE
pd.read_sql_query(SQL, conn).head(5)
See if you can get something looking like this:

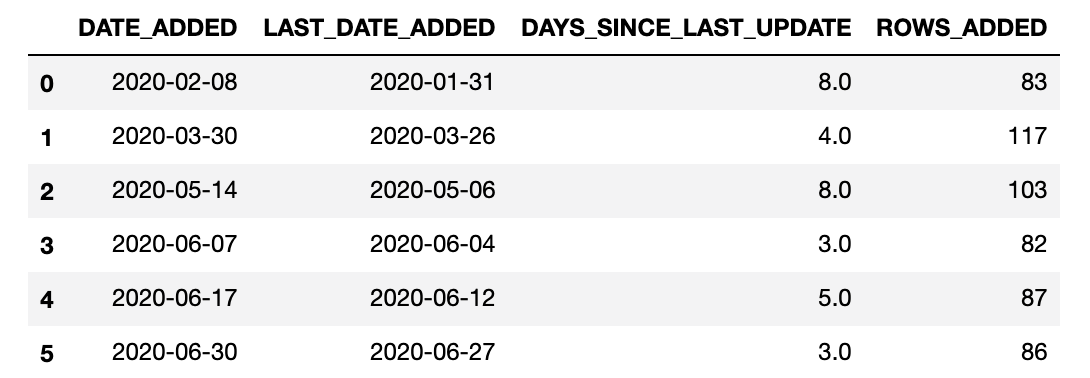
Well done! We're basically all the way there. Recall that our original task was to identify freshness incidents -- that is, dates where the previous data entry is more than 1 day old. After adding another WITH statement and a WHERE clause, our query should be able to do just that.
# YOUR CODE HERE
SQL = """

"""
# END YOUR CODE
detections = pd.read_sql_query(SQL, conn)
detections
If your result looks like this:

then congratulations! You've built a detector for freshness incidents, a key part of any data observability solution. With the following code, you can visualize your detections along with the update data.
for _, row in detections.iterrows():
    fig.add_vline(x=row['DATE_ADDED'], line_color='red')
fig.show()
In the next exercise, we'll build off of these simpler reports to handle scenarios with multiple tables and lineage information.