Infinite Zoom Stable Diffusion v2 and OpenVINO™
Stable Diffusion v2 is the next generation of Stable Diffusion model a Text-to-Image latent diffusion model created by the researchers and engineers from Stability AI and LAION.
General diffusion models are machine learning systems that are trained to denoise random gaussian noise step by step, to get to a sample of interest, such as an image. Diffusion models have shown to achieve state-of-the-art results for generating image data. But one downside of diffusion models is that the reverse denoising process is slow. In addition, these models consume a lot of memory because they operate in pixel space, which becomes unreasonably expensive when generating high-resolution images. Therefore, it is challenging to train these models and also use them for inference. OpenVINO brings capabilities to run model inference on Intel hardware and opens the door to the fantastic world of diffusion models for everyone!
In previous notebooks, we already discussed how to run Text-to-Image generation and Image-to-Image generation using Stable Diffusion v1 and controlling its generation process using ControlNet. Now is turn of Stable Diffusion v2.
Stable Diffusion v2: What’s new?
The new stable diffusion model offers a bunch of new features inspired by the other models that have emerged since the introduction of the first iteration. Some of the features that can be found in the new model are:
- The model comes with a new robust encoder, OpenCLIP, created by LAION and aided by Stability AI; this version v2 significantly enhances the produced photos over the V1 versions.
- The model can now generate images in a 768x768 resolution, offering more information to be shown in the generated images.
- The model finetuned with v-objective. The v-parameterization is particularly useful for numerical stability throughout the diffusion process to enable progressive distillation for models. For models that operate at higher resolution, it is also discovered that the v-parameterization avoids color shifting artifacts that are known to affect high resolution diffusion models, and in the video setting it avoids temporal color shifting that sometimes appears with epsilon-prediction used in Stable Diffusion v1.
- The model also comes with a new diffusion model capable of running upscaling on the images generated. Upscaled images can be adjusted up to 4 times the original image. Provided as separated model, for more details please check stable-diffusion-x4-upscaler
- The model comes with a new refined depth architecture capable of preserving context from prior generation layers in an image-to-image setting. This structure preservation helps generate images that preserving forms and shadow of objects, but with different content.
- The model comes with an updated inpainting module built upon the previous model. This text-guided inpainting makes switching out parts in the image easier than before.
This notebook demonstrates how to download the model from the Hugging Face Hub and convert to OpenVINO IR format with the Hugging Face Optimum Intel library. And how to use the model to generate sequence of images for infinite zoom video effect using OpenVINO GenAI that provides easy-to-use API.

Table of contents:
- Stable Diffusion v2 Infinite Zoom Showcase
- Prerequisites
- Load Stable Diffusion Inpaint pipeline using Optimum Intel
- Zoom Video Generation
- Run Infinite Zoom video generation
Installation Instructions
This is a self-contained example that relies solely on its own code.
We recommend running the notebook in a virtual environment. You only need a Jupyter server to start. For details, please refer to Installation Guide.
Stable Diffusion v2 Infinite Zoom Showcase
In this tutorial we consider how to use Stable Diffusion v2 model for generation sequence of images for infinite zoom video effect.
To do this, we will need stabilityai/stable-diffusion-2-inpainting model.
Stable Diffusion Text guided Inpainting
In image editing, inpainting is a process of restoring missing parts of pictures. Most commonly applied to reconstructing old deteriorated images, removing cracks, scratches, dust spots, or red-eyes from photographs.
But with the power of AI and the Stable Diffusion model, inpainting can be used to achieve more than that. For example, instead of just restoring missing parts of an image, it can be used to render something entirely new in any part of an existing picture. Only your imagination limits it.
The workflow diagram explains how Stable Diffusion inpainting pipeline for inpainting works:
The pipeline has a lot of common with Text-to-Image generation pipeline discussed in previous section. Additionally to text prompt, pipeline accepts input source image and mask which provides an area of image which should be modified. Masked image encoded by VAE encoder into latent diffusion space and concatenated with randomly generated (on initial step only) or produced by U-Net latent generated image representation and used as input for next step denoising.
Using this inpainting feature, decreasing image by certain margin and masking this border for every new frame we can create interesting Zoom Out video based on our prompt.
%pip install -q -U "openvino>=2025.0" "openvino-genai>=2025.0"
%pip install -q "diffusers>=0.14.0" "transformers>=4.25.1" "gradio>=4.19" "torch>=2.1" Pillow opencv-python "git+https://github.com/huggingface/optimum-intel.git" --extra-index-url https://download.pytorch.org/whl/cpu
Load Stable Diffusion Inpaint pipeline using Optimum Intel
stable-diffusion-2-inpainting is available for downloading via the HuggingFace hub. We will use optimum-cli interface for exporting it into OpenVINO Intermediate Representation (IR) format.
Optimum CLI interface for converting models supports export to OpenVINO (supported starting optimum-intel 1.12 version). General command format:
optimum-cli export openvino --model <model_id_or_path> --task <task> <output_dir>
where task is the task to export the model for, if not specified, the task will be auto-inferred based on the model.
You can find a mapping between tasks and model classes in Optimum TaskManager documentation.
Additionally, you can specify weights compression --weight-format for the model compression. Please note, that for INT8/INT4, it is necessary to install nncf.
Full list of supported arguments available via --help
For more details and examples of usage, please check optimum documentation.
For running the Stable Diffusion model, we will use OpenVINO GenAI that provides easy-to-use API for running text generation. Firstly we will create pipeline with InpaintingPipeline. You can see more details in Image Python Generation Pipeline Example.
Then we run the generate method and get the image tokens and then convert them into the image using Image.fromarray from PIL. Also we convert the input images to ov.Tensor using image_to_tensor function.
Select device from dropdown list for running inference using OpenVINO.
import requests
from pathlib import Path

if not Path("notebook_utils.py").exists():
    r = requests.get(
        url="https://raw.githubusercontent.com/openvinotoolkit/openvino_notebooks/latest/utils/notebook_utils.py",
    )
    open("notebook_utils.py", "w").write(r.text)

if not Path("cmd_helper.py").exists():
    r = requests.get(url="https://raw.githubusercontent.com/openvinotoolkit/openvino_notebooks/latest/utils/cmd_helper.py")
    open("cmd_helper.py", "w").write(r.text)

# Read more about telemetry collection at https://github.com/openvinotoolkit/openvino_notebooks?tab=readme-ov-file#-telemetry
from notebook_utils import collect_telemetry

collect_telemetry("stable-diffusion-v2-infinite-zoom.ipynb")

from notebook_utils import device_widget

device = device_widget()

device
import openvino as ov

from cmd_helper import optimum_cli


MODEL_ID = "stabilityai/stable-diffusion-2-inpainting"
MODEL_DIR = Path("sd2_inpainting")

optimum_cli(MODEL_ID, MODEL_DIR, additional_args={"weight-format": "fp16"})
import openvino_genai as ov_genai


pipe = ov_genai.InpaintingPipeline(MODEL_DIR, device.value)
Zoom Video Generation
For achieving zoom effect, we will use inpainting to expand images beyond their original borders.
We run our InpaintingPipeline in the loop, where each next frame will add edges to previous. The frame generation process illustrated on diagram below:
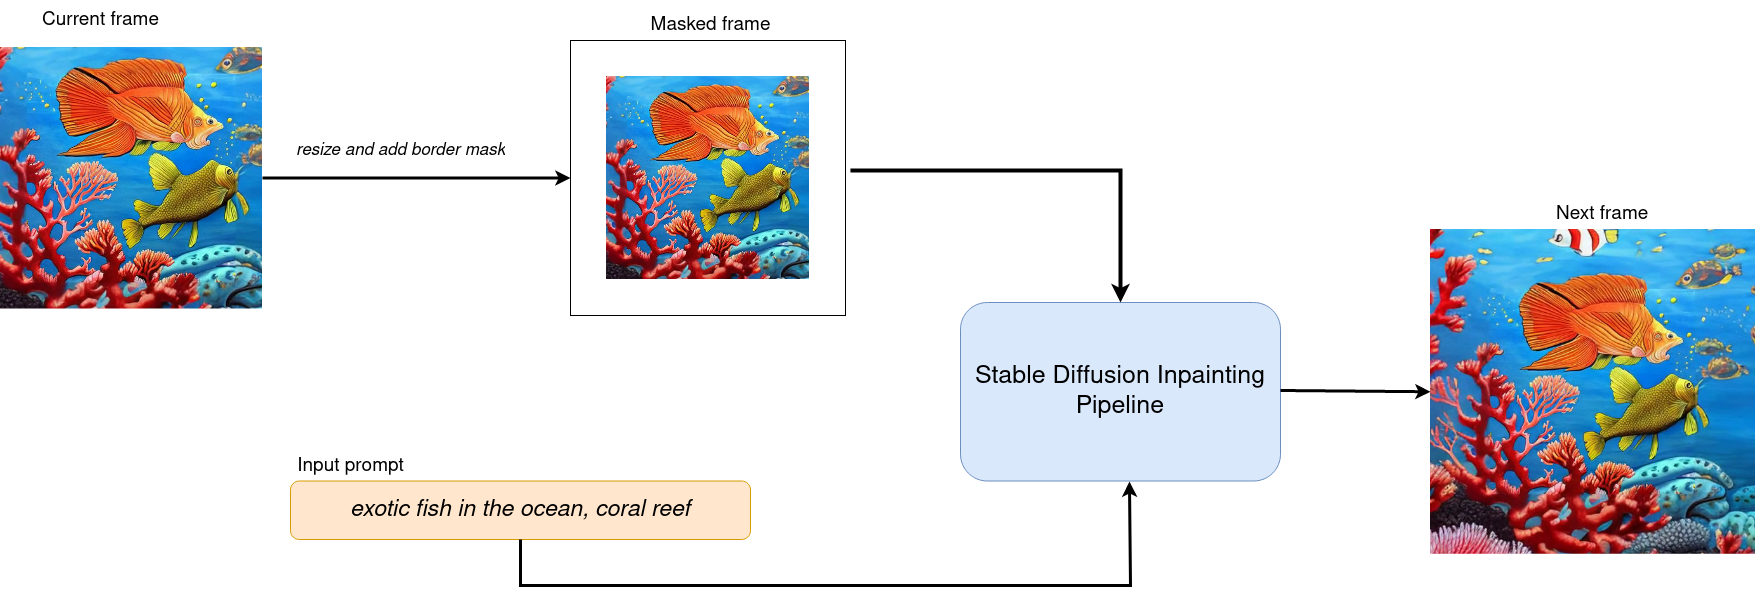
After processing current frame, we decrease size of current image by mask size pixels from each side and use it as input for next step. Changing size of mask we can influence the size of painting area and image scaling.
There are 2 zooming directions:
- Zoom Out - move away from object
- Zoom In - move closer to object
Zoom In will be processed in the same way as Zoom Out, but after generation is finished, we record frames in reversed order.
from typing import List, Union

import PIL
from PIL import Image
import cv2
from tqdm import trange
import numpy as np


def image_to_tensor(image: Image) -> ov.Tensor:
    pic = image.convert("RGB")
    image_data = np.array(pic.getdata()).reshape(1, pic.size[1], pic.size[0], 3).astype(np.uint8)
    return ov.Tensor(image_data)


def generate_video(
    pipe,
    prompt: Union[str, List[str]],
    negative_prompt: Union[str, List[str]],
    guidance_scale: float = 7.5,
    num_inference_steps: int = 20,
    num_frames: int = 20,
    mask_width: int = 128,
    seed: int = 9999,
    zoom_in: bool = False,
):
    """
    Zoom video generation function

    Parameters:
      pipe (OVStableDiffusionInpaintingPipeline): inpainting pipeline.
      prompt (str or List[str]): The prompt or prompts to guide the image generation.
      negative_prompt (str or List[str]): The negative prompt or prompts to guide the image generation.
      guidance_scale (float, *optional*, defaults to 7.5):
                Guidance scale as defined in Classifier-Free Diffusion Guidance(https://arxiv.org/abs/2207.12598).
                guidance_scale is defined as `w` of equation 2.
                Higher guidance scale encourages to generate images that are closely linked to the text prompt,
                usually at the expense of lower image quality.
      num_inference_steps (int, *optional*, defaults to 50): The number of denoising steps for each frame. More denoising steps usually lead to a higher quality image at the expense of slower inference.
      num_frames (int, *optional*, 20): number frames for video.
      mask_width (int, *optional*, 128): size of border mask for inpainting on each step.
      zoom_in (bool, *optional*, False): zoom mode Zoom In or Zoom Out.
    Returns:
      output_path (str): Path where generated video loacated.
    """

    height = 512
    width = height

    current_image = PIL.Image.new(mode="RGBA", size=(height, width))
    mask_image = np.array(current_image)[:, :, 3]
    mask_image = PIL.Image.fromarray(255 - mask_image).convert("RGB")
    current_image = current_image.convert("RGB")
    current_image = image_to_tensor(current_image)
    mask_image = image_to_tensor(mask_image)
    image_tensors = pipe.generate(
        prompt=prompt,
        negative_prompt=negative_prompt,
        image=current_image,
        guidance_scale=guidance_scale,
        mask_image=mask_image,
        num_inference_steps=num_inference_steps,
    )
    init_images = []
    for image_tensor in image_tensors.data:
        init_images.append(PIL.Image.fromarray(image_tensor))

    image_grid(init_images, rows=1, cols=1)

    num_outpainting_steps = num_frames
    num_interpol_frames = 30

    current_image = init_images[0]
    all_frames = []
    all_frames.append(current_image)
    for i in trange(
        num_outpainting_steps,
        desc=f"Generating {num_outpainting_steps} additional images...",
    ):
        prev_image_fix = current_image

        prev_image = shrink_and_paste_on_blank(current_image, mask_width)

        current_image = prev_image

        # create mask (black image with white mask_width width edges)
        mask_image = np.array(current_image)[:, :, 3]
        mask_image = PIL.Image.fromarray(255 - mask_image).convert("RGB")

        # inpainting step
        current_image = current_image.convert("RGB")
        current_image = image_to_tensor(current_image)
        mask_image = image_to_tensor(mask_image)
        image_tensor = pipe.generate(
            prompt=prompt,
            negative_prompt=negative_prompt,
            image=current_image,
            guidance_scale=guidance_scale,
            mask_image=mask_image,
            num_inference_steps=num_inference_steps,
        )
        current_image = PIL.Image.fromarray(image_tensor.data[0])
        current_image.paste(prev_image, mask=prev_image)

        # interpolation steps bewteen 2 inpainted images (=sequential zoom and crop)
        for j in range(num_interpol_frames - 1):
            interpol_image = current_image
            interpol_width = round((1 - (1 - 2 * mask_width / height) ** (1 - (j + 1) / num_interpol_frames)) * height / 2)
            interpol_image = interpol_image.crop(
                (
                    interpol_width,
                    interpol_width,
                    width - interpol_width,
                    height - interpol_width,
                )
            )

            interpol_image = interpol_image.resize((height, width))

            # paste the higher resolution previous image in the middle to avoid drop in quality caused by zooming
            interpol_width2 = round((1 - (height - 2 * mask_width) / (height - 2 * interpol_width)) / 2 * height)
            prev_image_fix_crop = shrink_and_paste_on_blank(prev_image_fix, interpol_width2)
            interpol_image.paste(prev_image_fix_crop, mask=prev_image_fix_crop)
            all_frames.append(interpol_image)
        all_frames.append(current_image)

    video_file_name = f"infinite_zoom_{'in' if zoom_in else 'out'}"
    fps = 30
    save_path = video_file_name + ".mp4"
    write_video(save_path, all_frames, fps, reversed_order=zoom_in)

    return save_path
def shrink_and_paste_on_blank(current_image: PIL.Image.Image, mask_width: int):
    """
    Decreases size of current_image by mask_width pixels from each side,
    then adds a mask_width width transparent frame,
    so that the image the function returns is the same size as the input.

    Parameters:
        current_image (PIL.Image): input image to transform
        mask_width (int): width in pixels to shrink from each side
    Returns:
       prev_image (PIL.Image): resized image with extended borders
    """

    height = current_image.height
    width = current_image.width

    # shrink down by mask_width
    prev_image = current_image.resize((height - 2 * mask_width, width - 2 * mask_width))
    prev_image = prev_image.convert("RGBA")
    prev_image = np.array(prev_image)

    # create blank non-transparent image
    blank_image = np.array(current_image.convert("RGBA")) * 0
    blank_image[:, :, 3] = 1

    # paste shrinked onto blank
    blank_image[mask_width : height - mask_width, mask_width : width - mask_width, :] = prev_image
    prev_image = PIL.Image.fromarray(blank_image)

    return prev_image


def image_grid(imgs: List[PIL.Image.Image], rows: int, cols: int):
    """
    Insert images to grid

    Parameters:
        imgs (List[PIL.Image.Image]): list of images for making grid
        rows (int): number of rows in grid
        cols (int): number of columns in grid
    Returns:
        grid (PIL.Image): image with input images collage
    """
    assert len(imgs) == rows * cols

    w, h = imgs[0].size
    grid = PIL.Image.new("RGB", size=(cols * w, rows * h))

    for i, img in enumerate(imgs):
        grid.paste(img, box=(i % cols * w, i // cols * h))
    return grid


def write_video(
    file_path: str,
    frames: List[PIL.Image.Image],
    fps: float,
    reversed_order: bool = True,
    gif: bool = True,
):
    """
    Writes frames to an mp4 video file and optionaly to gif

    Parameters:
        file_path (str): Path to output video, must end with .mp4
        frames (List of PIL.Image): list of frames
        fps (float): Desired frame rate
        reversed_order (bool): if order of images to be reversed (default = True)
        gif (bool): save frames to gif format (default = True)
    Returns:
        None
    """
    if reversed_order:
        frames.reverse()

    w, h = frames[0].size
    fourcc = cv2.VideoWriter_fourcc("m", "p", "4", "v")
    writer = cv2.VideoWriter(file_path, fourcc, fps, (w, h))

    for frame in frames:
        np_frame = np.array(frame.convert("RGB"))
        cv_frame = cv2.cvtColor(np_frame, cv2.COLOR_RGB2BGR)
        writer.write(cv_frame)

    writer.release()
    if gif:
        frames[0].save(
            file_path.replace(".mp4", ".gif"),
            save_all=True,
            append_images=frames[1:],
            duratiobn=len(frames) / fps,
            loop=0,
        )
Run Infinite Zoom video generation
import requests

if not Path("gradio_helper.py").exists():
    r = requests.get(url="https://raw.githubusercontent.com/openvinotoolkit/openvino_notebooks/latest/notebooks/stable-diffusion-v2/gradio_helper.py")
    open("gradio_helper.py", "w").write(r.text)

from gradio_helper import make_demo_zoom_video

demo = make_demo_zoom_video(pipe, generate_video)

try:
    demo.queue().launch()
except Exception:
    demo.queue().launch(share=True)
# if you are launching remotely, specify server_name and server_port
# demo.launch(server_name='your server name', server_port='server port in int')
# Read more in the docs: https://gradio.app/docs/