New to Plotly?
Plotly's Python library is free and open source! Get started by downloading the client and reading the primer.
You can set up Plotly to work in online or offline mode, or in jupyter notebooks.
We also have a quick-reference cheatsheet (new!) to help you get started!
Overview
This notebook demonstrates how to use DataShader to display large datasets inside a plotly FigureWidget. Change callbacks are used to recompute the datashader image whenever the axis range or figure size changes
Imports
# core
import io
import base64
import time

# pandas
import pandas as pd

# numpy
import numpy as np

# scikit learn
from sklearn import datasets

# datashader
import datashader as ds
import datashader.transfer_functions as tf
from datashader.colors import inferno
Generate dataset
We will create a large dataset by duplicating the Iris dataset many times with random noise
num_copies = 7000 # 1,050,000 rows

iris_data = datasets.load_iris()
feature_names = [name.replace(' (cm)', '').replace(' ', '_') for name in iris_data.feature_names]
iris_df_orig = pd.DataFrame(iris_data.data, columns=feature_names)
target_orig = iris_data.target + 1

# frame of features
iris_df = pd.concat(
    np.random.normal(scale=0.2, size=iris_df_orig.shape) + iris_df_orig for i in range(num_copies)
).reset_index(drop=True)

# array of targets
target = [t for i in range(num_copies) for t in target_orig]

# dataframe that includes target as categorical
iris_target_df = pd.concat([iris_df, pd.Series(target, name='target', dtype='category')], axis=1)

iris_df.describe()
| sepal_length | sepal_width | petal_length | petal_width | |
|---|---|---|---|---|
| count | 1.050000e+06 | 1.050000e+06 | 1.050000e+06 | 1.050000e+06 |
| mean | 5.843322e+00 | 3.053826e+00 | 3.758637e+00 | 1.198662e+00 |
| std | 8.488862e-01 | 4.761369e-01 | 1.769910e+00 | 7.865315e-01 |
| min | 3.513149e+00 | 1.299055e+00 | 3.115114e-01 | -6.631019e-01 |
| 25% | 5.156767e+00 | 2.740113e+00 | 1.636770e+00 | 3.929785e-01 |
| 50% | 5.801633e+00 | 3.033015e+00 | 4.306745e+00 | 1.316042e+00 |
| 75% | 6.443514e+00 | 3.345643e+00 | 5.143670e+00 | 1.827473e+00 |
| max | 8.598814e+00 | 5.109186e+00 | 7.763358e+00 | 3.267767e+00 |
Define DataShader image generation function
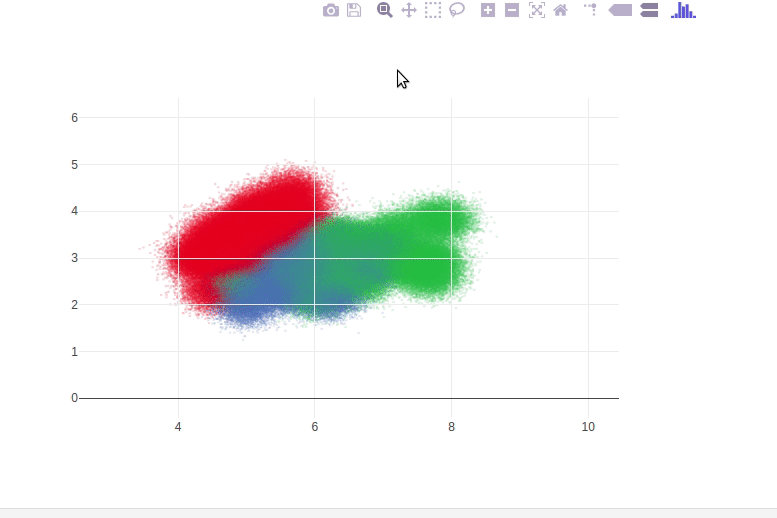
Define a function that inputs an x/y ranges and the plot width/height and generates a DataShader image of the dataset. The image will be returned as a PIL image object
def gen_ds_image(x_range, y_range, plot_width, plot_height):
    if x_range is None or y_range is None or plot_width is None or plot_height is None:
        return None

    cvs = ds.Canvas(x_range=x_range, y_range=y_range, plot_height=plot_height, plot_width=plot_width)
    agg_scatter = cvs.points(iris_target_df,
                         'sepal_length', 'sepal_width',
                          ds.count_cat('target'))
    img = tf.shade(agg_scatter)
    img = tf.dynspread(img, threshold=0.95, max_px=5, shape='circle')

    return img.to_pil()
Define initial ranges and plot size
x_range=[3, 10]
y_range=[0, 6]
plot_height=500
plot_width=700
# Test image generation function and display the PIL image
initial_img = gen_ds_image(x_range, y_range, plot_width, plot_height)
initial_img

Create FigureWidget with background image
import plotly.graph_objs as go
f = go.FigureWidget(data=[{'x': x_range,
                           'y': y_range,
                           'mode': 'markers',
                           'marker': {'opacity': 0}}], # invisible trace to init axes and to support autoresize
                    layout={'width': plot_width, 'height': plot_height})
f
# Set background image
f.layout.images = [go.layout.Image(
    source = initial_img,  # plotly now performs auto conversion of PIL image to png data URI
    xref = "x",
    yref = "y",
    x = x_range[0],
    y = y_range[1],
    sizex = x_range[1] - x_range[0],
    sizey = y_range[1] - y_range[0],
    sizing = "stretch",
    layer = "below")]
Install change callback to update image on zoom/resize
def update_ds_image(layout, x_range, y_range, plot_width, plot_height):
    img = f.layout.images[0]

    # Update with batch_update so all updates happen simultaneously
    with f.batch_update():
        img.x = x_range[0]
        img.y = y_range[1]
        img.sizex = x_range[1] - x_range[0]
        img.sizey = y_range[1] - y_range[0]
        img.source = gen_ds_image(x_range, y_range, plot_width, plot_height)

# Install callback to run exactly once if one or more of the following properties changes
#  - xaxis range
#  - yaxis range
#  - figure width
#  - figure height
f.layout.on_change(update_ds_image, 'xaxis.range', 'yaxis.range', 'width', 'height')
Image updates on drag zoom
f.layout.dragmode = 'zoom'
f
Reference
See these Jupyter notebooks for even more FigureWidget examples.
from IPython.display import display, HTML

display(HTML('<link href="//fonts.googleapis.com/css?family=Open+Sans:600,400,300,200|Inconsolata|Ubuntu+Mono:400,700" rel="stylesheet" type="text/css" />'))
display(HTML('<link rel="stylesheet" type="text/css" href="http://help.plot.ly/documentation/all_static/css/ipython-notebook-custom.css">'))

! pip install git+https://github.com/plotly/publisher.git --upgrade

import publisher
publisher.publish(
    'change-callbacks-datashader.ipynb', 'python/change-callbacks-datashader/', 'FigureWidget | plotly',
    'Display Large Datasets with DataShader and Change Callbacks',
    title = 'DataShader Case Study',
    name = 'DataShader Case Study',
    uses_plotly_offline=True,
    has_thumbnail='true', thumbnail='thumbnail/figurewidget-datashader.gif',
    language='python',
    display_as='chart_events', order=24,
    ipynb= '~notebook_demo/239')
Collecting git+https://github.com/plotly/publisher.git
  Cloning https://github.com/plotly/publisher.git to /tmp/pip-req-build-MGM4eC
Building wheels for collected packages: publisher
  Running setup.py bdist_wheel for publisher ... done
  Stored in directory: /tmp/pip-ephem-wheel-cache-yx3xDQ/wheels/99/3e/a0/fbd22ba24cca72bdbaba53dbc23c1768755fb17b3af0f33966
Successfully built publisher
Installing collected packages: publisher
  Found existing installation: publisher 0.11
    Uninstalling publisher-0.11:
      Successfully uninstalled publisher-0.11
Successfully installed publisher-0.11
You are using pip version 10.0.1, however version 18.0 is available.
You should consider upgrading via the 'pip install --upgrade pip' command.