Setting up stat-nlp-book on Microsoft Azure
It's exciting to live in future where you can create your own virtual machine (VM) far away from you, somewhere in a remote server farm, and make it do your bidding, like setting up an environment to have your own private stat-nlp-book. This is exactly what we're going to do with this short tutorial.
But first:
DISCLAIMER
This setup is NOT required Be careful when registering with Microsoft Azure. As UCL students you have $25 per month to spend there, but to register you need to provide your card number. Be 100% sure you know what you're doing as we're not responsible if you manage to spends too much money there. The free $25 should be enough for your standard usage. We're trying to make this tutorial as easy as possible, but interfaces might change, as well as the procedure, so be wary of any deviations and proceed at your own responsability.
Registering for your monthly credit (UCL students only)
Head to my.visualstudio.com:

...where you will enter your UCL mail of form ucxxxxx@ucl.ac.uk and click on Continue. Microsoft will recognise the UCL e-mail doman and greet you with a personalised UCL background:

...where you should enter your password and Sign in. You should be inside the Visual Studio Dev Essentials now:

There you will proceed to activate your £20 monthly credit for 1 year on Azure by clicking on Activate. In the following screen you will be greated with a request for personal info, including credit card info. Please study this in detail- your credit card should not be charged for this offer unless you explicitly remove the spending limit. However, please re-check everything as we are not responsible if you spend your own money on Azure.
If you are fine with proceeding, after you input your data, agree to the usage agreement, and click on Purchase.

After entering your data, you will have to wait a few minutes until Microsoft Azure gets set up (grab some fresh air, Tweet about how you're setting up Azure or check the static stat-nlp-book so you stay on top of everything). When the setup finishes, click on Start managing my service > and in a moment you should be seeing Microsoft Azure dashboard.

Virtual machine setup
The previously shown Microsoft Azure dashboard (later easily available via https://portal.azure.com) is the place where we will set up our VM:
Choosing a machine
Click on the green + sign, then Compute, and select Ubuntu Server 16.04 LTS as shown here:

You are also free to experiment with Windows Server 2012 if you wish, and remotely connect to it, but we won't do that in this tutorial.
On the following screen, select Resource Manager as deployment model and click on Create:

On the following screen, we need to configure some standard settings, grouped in 4 groups - Basics, Size, Settings, and Summary
On Basics you should set the options like this:
- Name - name of your VM (e.g. stat-nlp-book)
- VM disk type - disk type, HDDs are cheaper
- User name - user name you will use to log in, we'll refer to this as USER_NAME
- Authentication type - it's easier to go with Password, but go with SSH public key if you know what you're doing
- Password - your login password
- Subscription - should be set to Developer Program Benefit (your free UCL stuff)
- Resource group - create a new one, name it whichever way you want (e.g. stat-nlp-book, ucl-stuff, komputrz...)
- Location - having a Developer Program Benefit, you are limited to specific locations. West Central US should give you cheapest option.

Once you enter your data, click OK to go to the next sub-menu, Size, where you will need to pick your machine size. By clicking View all, you can see all the available machines. You will need a machine with at least 3GB of disk space.

By clicking ok on Select you will be brought to the Settings sub-menu. You can leave the values there as given by default and click on OK.
The final, Summary sub-menu gives you a summary of your chosen options. If you agree with the following, click on OK.
The dashboard will submit your request and deploy the machine in a matter of minutes. When this is done, you should see your machine up and running like this:

However, before installing the stat-nlp-book, we need to ensure that we can access Jupyter notebooks by permitting incoming connections on Jupyter's standard port (8888).
Setting up the firewall
Click on your newly deployed VM to get to the overview menu:
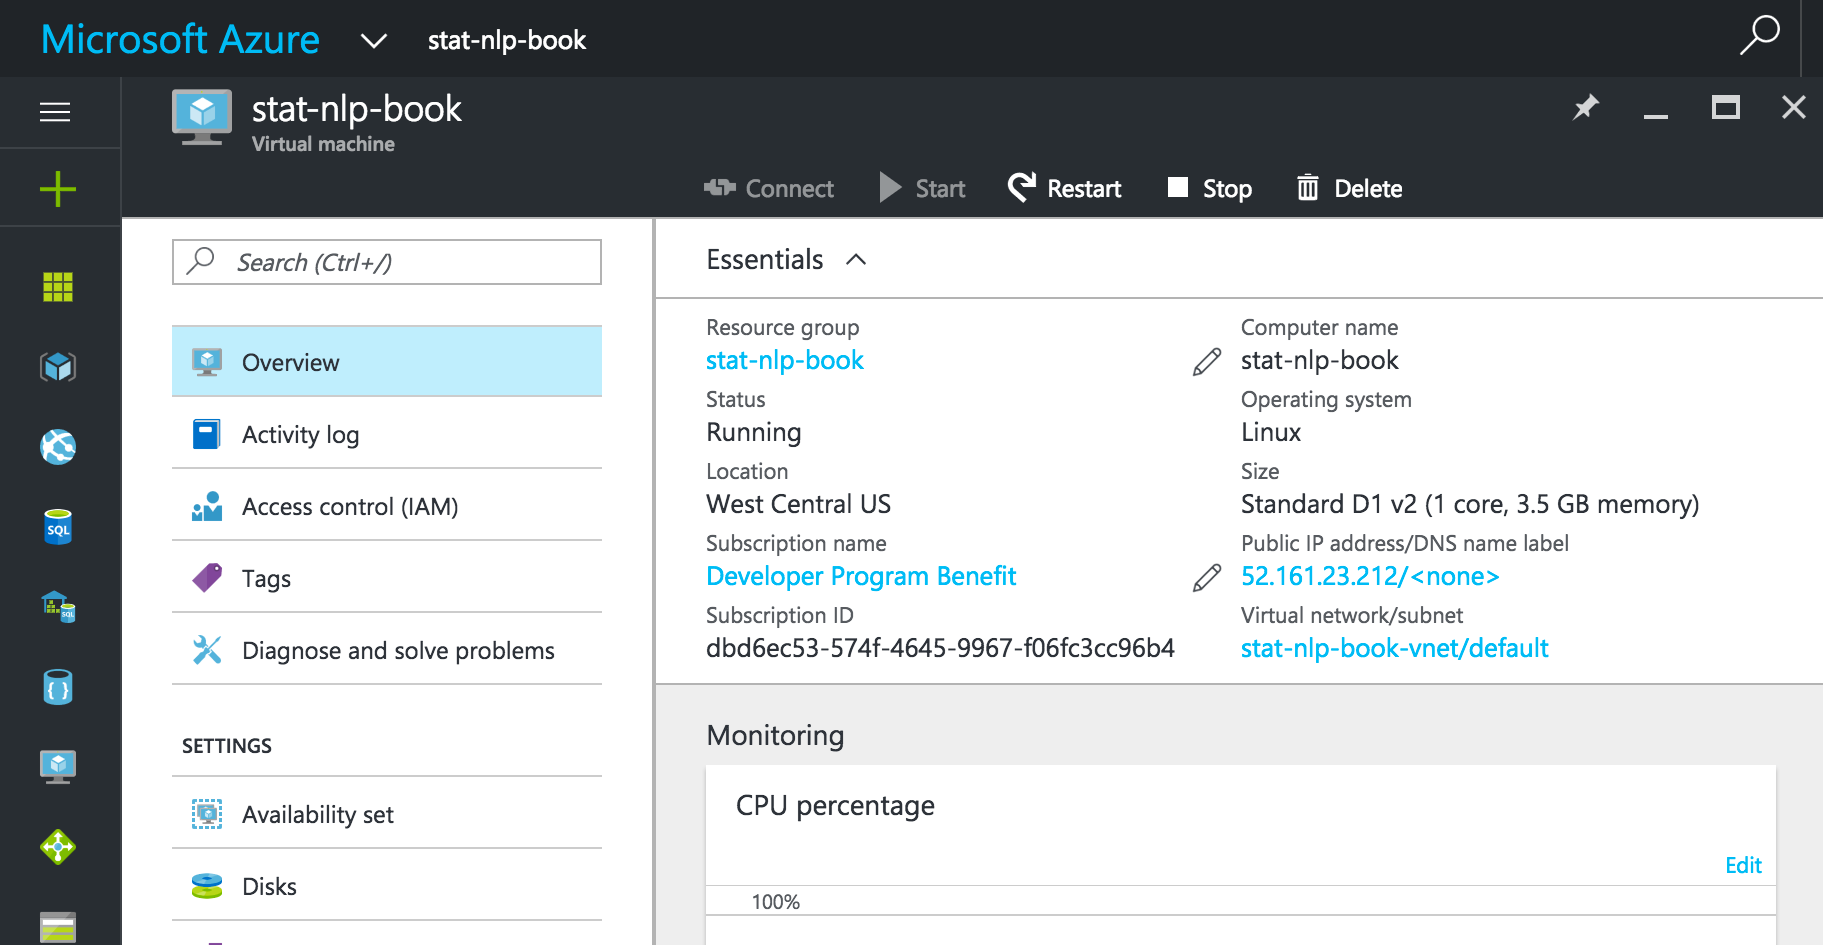
Over there, first remember your Public IP address (as in the image). We'll refer to it as IP_ADDRESS. Then click on the name of your resource group (stat-nlp-book in the image) to get to the resource group menu:

In the resource group menu, click on your Network security group (stat-nlp-book-nsg in the image above):

In the Network security group menu, click on Inbound security rules, and click on Add.

On the following screen you need to set the following properties:
- Name (e.g. Jupyter)
- Priority (you can leave this as is)
- Source (Any)
- Protocol (TCP)
- Port range (8888)
- Action (Allow)
as this:

Click on OK, wait until the rule is set, and go back to your VM overview.
Your machine is now running and waiting for you to install the stat-nlp-book.
Installing stat-nlp-book
Connect to your virtual machine with ssh:
ssh USER_NAME@IP_ADDRESS
Follow the instructions from here with a few twists:
Git is already installed, so you can clone the stat-nlp-book repository:
git clone https://github.com/uclmr/stat-nlp-book.git
cd stat-nlp-book
Install docker:
sudo apt install docker.io
and proceed with pulling the docker container, with a twist: when calling docker, always call it through sudo:
sudo docker pull riedelcastro/stat-nlp-book
When that is done, download data required by the book:
sudo docker run -p 8888:8888 -v $PWD:/home/jovyan/work riedelcastro/stat-nlp-book scripts/download_data.sh
and finally run the book:
sudo docker run -p 8888:8888 -v $PWD:/home/jovyan/work riedelcastro/stat-nlp-book
Connect to Jupyter on your VM by typing IP_ADDRESS:8888 in your browser...and voila:
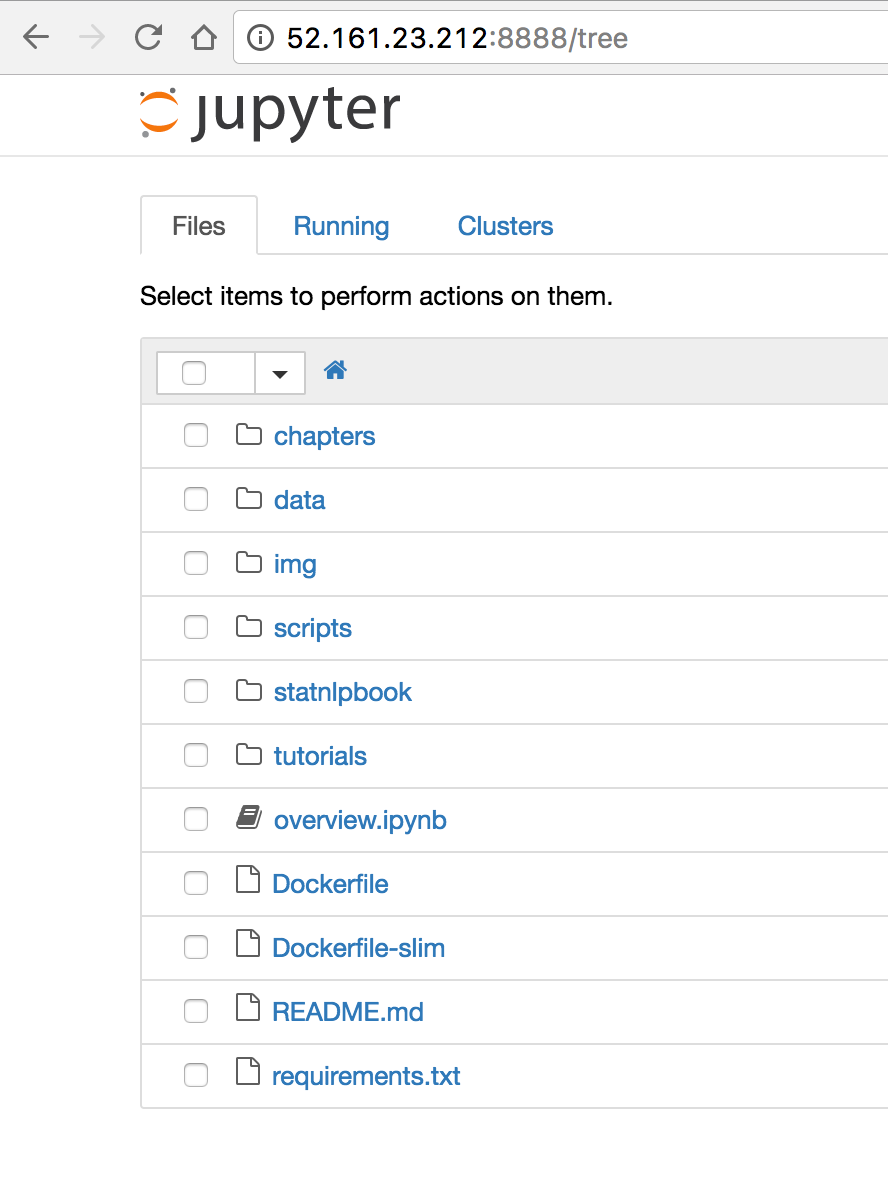
The book is up an running. Now you have your own (temporary) dedicated machine for stat-nlp-book-ing, how awesome is that? :)
Shutting down your machine
In order to release unused computational power, and save some credits/money, when you're done with your computation, just go back to your VM overview, and stop your machine by pressing the Stop button. BEWARE: any unsaved data WILL BE LOST! Be 100% sure that you saved all the changes you made.
And that's it, happy coding!